This chapter describes how to write secure Jakarta EE applications, which contain components that perform user authentication and access authorization for the business logic of Jakarta EE components.
For general information about Jakarta EE security, see Security in The Jakarta EE Tutorial.
| Payara Server’s Web Profile supports the EJB 4.0+ specification, which allows enterprise beans within web applications, among other features. The Full Profile supports the entire EJB 4.0+ specification. For details, see Jakarta Enterprise Beans. |
Security Goals
In an enterprise computing environment, there are many security risks. The goal of Payara Server is to provide highly secure, interoperable, and distributed component computing based on the Jakarta EE security model. Security goals include:
-
Full compliance with the Jakarta EE security model. This includes EJB and servlet role-based authorization.
-
Full compliance with Eclipse MicroProfile JWT Propagation API.
-
Support for single sign-on across all Payara Server applications within a single security domain.
-
Support for web services message security.
-
Security support for application clients.
-
Support for the Jakarta Authentication API.
-
Support for the Jakarta Authorization API.
-
Support for Web Services Interoperability Technologies (WSIT) as described in the Metro Users Guide.
-
Support for the Jakarta Security API
-
Support for several underlying security realms, such as simple file, JDBC and Lightweight Directory Access Protocol (LDAP) configurable realms.
Certificate authentication is also supported for Secure Socket Layer (SSL) client authentication.
For Solaris, OS platform authentication is supported in addition to these. -
Support for declarative security through Payara Server specific XML-based role mapping.
-
Support for OpenID Connect compatible security features (such as OAuth2).
Payara Server Specific Security Features
Payara Server supports the Jakarta EE Platform’s security model (and added features courtesy of Eclipse MicroProfile APIs), as well as the following features which are specific to it:
-
Message security; see Configuring Message Security for Web Services
-
Single sign-on across all Payara Server applications within a single security domain; see User Authentication for Single Sign-on
-
Programmatic login; see Programmatic Login Using the ProgrammaticLogin Class
-
OAuth2 integration support.
Container Security
The component containers are responsible for providing Jakarta EE application security. The container provides two security forms:
Annotations (also called metadata) enable a declarative style of programming, and so encompass both the declarative and programmatic security concepts. Users can specify information about security within a class file using annotations.
When an application is deployed, this information can either be used by or overridden by the application or module deployment descriptors.
Declarative Security
Declarative security means that the security mechanism for an application is declared and handled externally to the application.
Deployment descriptors describe the Jakarta EE application’s security structure, including security roles, access control, and authentication requirements.
Payara Server supports the deployment descriptors specified by Jakarta EE and has additional security elements included in its own deployment descriptors. Declarative security is the application deployer’s responsibility.
There are two levels of declarative security, as follows:
Application Level Security
For an application, roles used by any application must be defined in @DeclareRoles annotations in the code or role-name elements in the application deployment descriptor (application.xml).
These role names are scoped to the EJB XML deployment descriptors (ejb-jar.xml and glassfish-ejb-jar.xml/payara-ejb-jar.xml files) and to the servlet XML deployment descriptors (web.xml and payara-web.xml files).
For an individually deployed web or EJB module, you define roles using @DeclareRoles annotations or role-name elements in the Jakarta EE deployment descriptor files web.xml or ejb-jar.xml.
To map roles to principals and groups, define matching security-role-mapping elements in the glassfish-application.xml/payara-application.xml, glassfish-ejb-jar.xml/payara-ejb-jar.xml, or glassfish-web.xml/payara-web.xml file for each role-name used by the application.
| glassfish-web.xml is deprecated and support will be removed in a future release. It is recommended to use payara-web.xml instead. |
By default, group principal names are mapped to roles of the same name. Accordingly, the Default Principal To Role Mapping setting is enabled by default on the Security page of the Payara Server Administration Console.
| This default role mapping definition is in effect if you do not define your own mapping in the deployment descriptor for your application as described in this section. |
Component Level Security
Component level security encompasses web components and EJB components.
A secure web container authenticates users and authorizes access to a servlet or JSP by using the security policy laid out in the servlet XML deployment descriptors (web.xml, glassfish-web.xml and payara-web.xml files).
| glassfish-web.xml is deprecated and support will be removed in a future release. It is recommended to use payara-web.xml instead. |
The EJB container is responsible for authorizing access to a bean method by using the security policy laid out in the EJB XML deployment descriptors (ejb-jar.xml and glassfish-ejb-jar.xml/payara-ejb-jar.xml files).
Programmatic Security
Programmatic security involves an EJB component or servlet using method calls to the security API, as specified by the Jakarta EE security model, to make business logic decisions based on the caller or remote user’s security role.
Programmatic security should only be used when declarative security alone is insufficient to meet the application’s security model.
The API for programmatic security consists of methods of the Jakarta Security API SecurityContext interface, and methods of the EJB EJBContext interface and the servlet HttpServletRequest interface.
Payara Server supports these interfaces as specified in the Jakarta EE specification.
There is also a proprietary Payara API for programmatic login. See Programmatic Login Using the ProgrammaticLogin Class.
For more information about programmatic security in web applications, see Using Programmatic Security with Web Applications in the Jakarta EE Tutorial.
Roles, Principals, and Principal to Role Mapping
By default, any groups that an authenticated user belongs to will be mapped to roles with the same names.
Therefore, the Default Principal To Role Mapping setting is enabled by default on the Security page of the Payara Administration Console. To change the default mapping you can clear this setting.
For applications, you define roles in @DeclareRoles annotations or the Jakarta EE deployment descriptor file application.xml. You define the corresponding role mappings in the Payara Server deployment descriptor file glassfish-application.xml/payara-application.xml.
For individually deployed web or EJB modules, you define roles in @DeclareRoles annotations or the Jakarta EE deployment descriptor files web.xml or ejb-jar.xml. You define the corresponding role mappings in the Payara Server deployment descriptor files glassfish-web.xml/payara-web.xml or glassfish-ejb-jar.xml/payara-ejb-jar.xml.
For more information regarding Jakarta EE deployment descriptors, see the Jakarta EE Specification. For more information regarding Payara Server deployment descriptors, see "Elements of the Payara Server Deployment Descriptors" in the Application Deployment section.
Each security-role-mapping element in the glassfish-application.xml/payara-application.xml, glassfish-web.xml/payara-web.xml, or glassfish-ejb-jar.xml/payara-ejb-jar.xml file maps a role name permitted by the application or module to principals and groups.
For example, a payara-web.xml file for an individually deployed web module might contain the following:
<payara-web-app>
    <security-role-mapping>
        <role-name>manager</role-name>
        <principal-name>jgarcia</principal-name>
        <principal-name>mwebster</principal-name>
        <group-name>team-leads</group-name>
    </security-role-mapping>
    <security-role-mapping>
        <role-name>administrator</role-name>
        <principal-name>dsmith</principal-name>
    </security-role-mapping>
</payara-web-app>| glassfish-web.xml is deprecated and support will be removed in a future release. It is recommended to use payara-web.xml instead. |
A role can be mapped to either specific principals or to groups (or both). The principal or group names used must be valid principals or groups in the realm for the application or module.
Note that the role-name in this example must match the @DeclareRoles annotations or the role-name in the security-role element of the corresponding web.xml file.
You can also specify a custom principal implementation class. This provides more flexibility in how principals can be assigned to roles.
A user’s Jakarta Authentication login module now can authenticate its custom principal, and the authenticated custom principal can further participate in the Payara Server’s authorization process. For example:
<security-role-mapping>
    <role-name>administrator</role-name>
    <principal-name class-name="CustomPrincipalImplClass">dsmith</principal-name>
</security-role-mapping>
You can specify a default principal and a default principal to role mapping, each of which applies to the entire Payara Server instance. The default principal to role-mapping maps group principals to the same named roles.
Web modules that omit the run-as element in web.xml use the default principal. Applications and modules that omit the security-role-mapping element use the default principal to role mapping. These defaults settings are part of the Security Service, which you can access in the following ways:
-
In the Administration Console, select the Security component under the relevant configuration.
-
Use the
asadmin setcommand. For example, you can set the default principal as follows:asadmin set server-config.security-service.default-principal=dsmith asadmin set server-config.security-service.default-principal-password=secretYou can set the default principal to role mapping as follows.
asadmin set server-config.security-service.activate-default-principal-to-role-mapping=true
asadmin set server-config.security-service.mapped-principal-class=CustomPrincipalImplClass
Default principal to role mapping is enabled by default. To disable it, set the default principal to role mapping property to
false.
Realm Configuration
Supported Security Realms
The following security realms are supported:
-
file- Stores user information in a file. This is the default realm. -
ldap- Stores user information in an LDAP directory. -
jdbc- Stores user information in a database.In the JDBC realm, the server gets user credentials from a database Payara Server uses the database information and the enabled JDBC realm option in the configuration file.
For digest authentication, a JDBC realm should be created with
jdbcDigestRealmas the JAAS context. -
certificate- Sets up the user identity in the Payara Server’s security context, and populates it with user data obtained from cryptographically verified client certificates. -
solaris- Allows authentication using Solarisusername+passworddata.This realm is only supported on the Solaris operating system, version 9 and above
How to Configure a Security Realm
You can configure a realm in one of these ways:
-
In the Administration Console, open the Security component under the relevant configuration and go to the Realms page.
-
Use the
asadmin create-auth-realmcommand to create a new security realms.
How to Set a Realm for an Application or Module
The following deployment descriptor elements have optional realm or realm-name data sub-elements or attributes that override the domain’s default realm:
-
glassfish-application/payara-applicationelement inglassfish-application.xml/payara-application.xml -
web-appelement inweb.xml -
as-contextelement inglassfish-ejb-jar.xml/payara-ejb-jar.xml -
client-containerelement insun-acc.xml -
client-credentialelement insun-acc.xml
If modules within an application specify realms, these are ignored. If present, the realm defined in glassfish-application.xml/payara-application.xml is used, otherwise the domain’s default realm is used.
For example, a realm is specified in payara-application.xml as follows:
<payara-application>
    ...
    <realm>ldap</realm>
</payara-application>
For more information about the deployment descriptor files and elements, see "Elements of the Payara Server Deployment Descriptors" in the Payara Server Application Deployment section.
Creating a Custom Realm
You can create a custom security realm by providing a custom Jakarta Authentication login module class and a custom security realm class.
| Client-side login modules are not suitable for use with Payara Server. |
To activate custom login modules and security realms, place their corresponding JAR files in the domain-dir/lib directory or the class files in the domain-dir/lib/classes directory.
For more information about class loading in the Payara Server, see Class Loaders.
Jakarta Authentication is a set of APIs that enable services to authenticate and enforce access controls upon users. They provide a pluggable and extensible framework for programmatic user authentication and authorization.
For Javadoc tool pages relevant to custom realms, see the com.sun.appserv.security package.
Custom login modules must extend the com.sun.appserv.security.AppservPasswordLoginModule class. This class implements jakarta.security.auth.spi.LoginModule.
Custom login modules must not implement the LoginModule interface directly.
|
Custom login modules must provide an implementation for one abstract method defined in the AppservPasswordLoginModule class:
public abstract class AppservPasswordLoginModule extends BasePasswordLoginModule {
    abstract protected void authenticateUser() throws LoginException;
}
This method performs the actual authentication. The custom login module must not implement any of the other methods, such as login, logout,
abort, commit, or initialize.
Default implementations are provided in AppservPasswordLoginModule which hook into the Payara Server infrastructure.
|
The custom login module can access the following protected object fields, which it inherits from AppservPasswordLoginModule. These contain the username and password credentials of the user to be authenticated:
public abstract class AppservPasswordLoginModule extends BasePasswordLoginModule {
    protected String _username;
    protected String _password;
}
The authenticateUser method must end with the following code sequence:
public abstract class AppservPasswordLoginModule extends BasePasswordLoginModule {

    protected void authenticateUser() throws LoginException{
        String[] grpList;
        // populate grpList with the set of groups to which
        // _username belongs in this realm, if any
        commitUserAuthentication(grpList);
    }
}
Custom security realms must extend the com.sun.appserv.security.AppservRealm class and implement the following methods:
public abstract class AppservRealm extends BaseRealm {
    public void init(Properties props) throws BadRealmException, NoSuchRealmException;
}
This method is invoked during server startup when the realm is initially loaded. The props argument contains the configuration properties defined for this realm. The realm can do any initialization it needs in this method.
If the method returns without throwing an exception, Payara Server assumes that the realm is ready to service authentication requests. If an exception is thrown, the realm is disabled.
public abstract class AppservRealm extends BaseRealm {
    public String getAuthType();
}
This method returns a descriptive string representing the type of authentication done by this realm.
public abstract class AppservRealm extends BaseRealm {
    public abstract Enumeration getGroupNames(String username) throws InvalidOperationException, NoSuchUserException;
}
This method returns an Enumeration (of String objects) enumerating the groups (if any) to which the given username belongs in this realm.
Custom realms that manage users must implement the following additional methods:
public abstract class AppservRealm extends BaseRealm {
    public abstract boolean supportsUserManagement();
}
This method returns true if the realm supports user management.
public abstract class AppservRealm extends BaseRealm {
    public abstract Enumeration getGroupNames() throws BadRealmException;
}
This method returns an Enumeration of all group names.
public abstract class AppservRealm extends BaseRealm {
    public abstract Enumeration getUserNames() throws BadRealmException;
}
This method returns an Enumeration of all usernames.
public abstract class AppservRealm extends BaseRealm {
    public abstract void refresh() throws BadRealmException;
}
This method refreshes the realm data so that new users and groups are visible.
public abstract class AppservRealm extends BaseRealm {
    public abstract void persist() throws BadRealmException;
}
This method persists the realm data to permanent storage.
public abstract class AppservRealm extends BaseRealm {
    public abstract User getUser(String name) throws NoSuchUserException,BadRealmException;
}
This method returns the information recorded about a particular named user.
public abstract class AppservRealm extends BaseRealm {
    public abstract void addUser(String name, String password, String[] groupList) throws BadRealmException, IASSecurityException;
}
This method adds a new user, who cannot already exist in the realm’s storage.
public abstract class AppservRealm extends BaseRealm {
    public abstract void removeUser(String name) throws NoSuchUserException, BadRealmException;
}
This method removes a user, who must exist in the realm’s storage.
public abstract class AppservRealm extends BaseRealm {
    public abstract void updateUser(String name, String newName, String password, String[] groups) throws NoSuchUserException, BadRealmException, IASSecurityException;
}
This method updates data for a user, who must exist.
The array passed to the commitUseAuthentication method should be newly created and otherwise unreferenced. This is because the group name array elements are set to null after authentication as part of cleanup. |
So the second time your custom realm executes it returns an array with null elements.
Ideally, your custom realm should not return member variables from the authenticate method. It should return local variables Your custom realm can create a local String array in its authenticate method, copy the values from the member variables, and return the String array.
The server.policy File
Each Payara Server domain has its own global Java policy file, located in domain-dir/config. The file is named server.policy.
Payara Server is a Jakarta EE compliant application server. As such, it follows the requirements of the Jakarta EE specification, including the ability to run application components in the presence of a security manager (the internal Java component that enforces the policy) and a limited permission set for Jakarta EE application code.
Default Permissions
Internal server code is granted all permissions. These are covered by the AllPermission grant blocks to various parts of the server infrastructure code.
Application permissions are granted in the default grant block. These permissions apply to all code not part of the internal server code listed previously.Payara Server does not distinguish between EJB and web module permissions.
All code is granted the minimal set of web component permissions (which is a superset of the EJB minimal set).
A few permissions above the minimal set are also granted in the default server.policy file. These are necessary due to various internal dependencies of the server implementation. Jakarta EE application developers must not rely on these additional permissions.
In some cases, deleting these permissions might be appropriate. For example, one additional permission is granted specifically for using connectors. If connectors are not used in a particular domain, you should remove this permission, because it is not otherwise necessary.
| Unless strictly required, do not modify the entries for the default permissions under any circumstance. |
System Properties
The following predefined system properties, also called system variables, are available for use in the server.policy file.
The system property most frequently used in the server.policy file is ${com.sun.aas.instanceRoot}.
|
| Property | Default | Description | ||
|---|---|---|---|---|
|
Depends on operating system |
Specifies the directory where Payara Server is installed. |
||
|
Depends on operating system |
Specifies the top level directory for a server instance. |
||
|
|
Specifies the name of the host (machine). |
||
|
Depends on operating system |
Specifies the installation directory for the Java runtime. |
||
|
Depends on operating system |
Specifies the library directory for the Open Message Queue software. |
||
|
|
Specifies the name of the configuration used by a server instance. |
||
|
|
Specifies the name of the server instance. |
||
|
|
Specifies the name of the cluster. This property is only set on clustered server instances.
|
||
|
|
Specifies the name of the domain. |
The com.sun.aas.instanceName, com.sun.aas.clusterName and com.sun.aas.domainName properties are not used in the default configuration, but can be used to customize configuration.
|
Changing Permissions for an Application
The default policy for each domain limits the permissions of Jakarta EE deployed applications to the minimal set of permissions required for these applications to operate correctly.
Do not add extra permissions to the default set (the grant block with no codebase, which applies to all code). Instead, add a new grant block with a codebase specific to the applications requiring the extra permissions, and only add the minimally necessary permissions in that block.
If you develop multiple applications that require more than this default set of permissions, you can add the custom permissions that your applications need. The com.sun.aas.instanceRoot variable refers to the domain directory. For example:
grant codeBase "file:${com.sun.aas.instanceRoot}/applications/-" {
...
}
You can add permissions to stub code with the following grant block:
grant codeBase "file:${com.sun.aas.instanceRoot}/generated/-" {
...
}
In general, you should add extra permissions only to the applications or modules that require them, not to all applications deployed to a domain. To apply permissions for a specific application, for example:
grant codeBase "file:${com.sun.aas.instanceRoot}/applications/MyApp/-" {
...
}
And for a specific module:
grant codeBase "file:${com.sun.aas.instanceRoot}/applications/MyModule/-" {
...
}
An alternative way to add permissions to a specific application or module is to edit the granted.policy file for that application or module. The granted.policy file is located in the domain-dir/generated/policy/<app-or-module-name> directory. In this case, you add permissions to the default grant block.
| Do not delete permissions from this file. |
When the Payara Server policy subsystem determines that a permission should not be granted, it logs a server.policy message specifying the permission that was not granted and the protection domains, with indicated code source and principals that failed the protection check.
For example, here is a similar entry:
[#|INFO|jakarta.enterprise.system.core.security|_ThreadID=14;_ThreadName=Thread-31;|JACC Policy Provider: PolicyProviderImpl.implies, context(null)-permission((java.util.PropertyPermission java.security.manager write)) domain that failed(ProtectionDomain(file:/glassfish/domains/domain1/applications/sample/ ... )Granting the following permission eliminates the message:
grant codeBase "file:${com.sun.aas.instanceRoot}/applications/sample/-" {
    permission java.util.PropertyPermission "java.security.manager", "write";
}
Do not add java.security.AllPermission to the server.policy file for application code. Doing so completely defeats the purpose of the security manager, yet you still get the performance overhead associated with it.
|
As a last resort, you can iteratively determine the permission set an application needs by observing AccessControlException occurrences in the server’s log.
If this is not sufficient, you can add the -Djava.security.debug=failure JVM option to the domain. Use the following asadmin create-jvm-options command, then restart the server:
asadmin create-jvm-options -Djava.security.debug=failureEnabling and Disabling the Security Manager
| The security manager is disabled by default. |
In a production environment, you may be able to safely disable the security manager if all the following conditions are true:
-
Performance is critical
-
Deployment to the production server is carefully controlled
-
Only trusted applications are deployed
-
Applications don’t need a strict policy enforcement
Disabling the security manager may improve performance significantly for some types of applications.
To enable the security manager, do one of the following:
-
To use the Administration Console, open the Security component under the relevant configuration, and check the Security Manager Enabled box. Then restart the server instance.
-
Use the following
asadmin create-jvm-optionscommand, then restart the server:asadmin create-jvm-options -Djava.security.manager
To disable the security manager, uncheck the Security Manager Enabled box or use the corresponding asadmin delete-jvm-options command.
You must grant additional permissions to CDI-enabled Jakarta EE applications that are deployed in a Payara Server domain, cluster or deployment group for which the security manager is enabled. These additional permissions are not required when it is disabled.
To deploy CDI-enabled Jakarta EE applications in this scenario in which security manager is enabled, add the following permissions to the corresponding applications:
grant codeBase "file:${com.sun.aas.instanceRoot}/applications/[ApplicationName]" {
    permission java.lang.reflect.ReflectPermission "suppressAccessChecks";
};
For example, for a CDI application named foo.war, add the following permissions to the server.policy file, restart the domain, cluster or deployment group, and then deploy and use the application.
grant codeBase "file:${com.sun.aas.instanceRoot}/applications/foo" {
    permission java.lang.reflect.ReflectPermission "suppressAccessChecks";
};
Configuring Message Security for Web Services
In message security, security information is applied at the message layer and travels along with the web services message. Web Services Security (WSS) is the use of XML Encryption and XML Digital Signatures to secure messages.
WSS profiles the use of various security tokens including X.509 certificates, Security Assertion Markup Language (SAML) assertions, and username/password tokens to achieve this.
Message layer security differs from transport layer security in that it can be used to decouple message protection from message transport so that messages remain protected after transmission, regardless of how many hops they travel.
| Message layer annotations are not currently supported. |
For more information about web services, see Developing Web Services.
For more information about message security, see the following:
-
Introduction to Security in the Jakarta EE Platform in The Jakarta EE Tutorial
-
The Web Services Interoperability Organization (WS-I) Basic Security Profile (BSP) specification
-
The Metro User’s guide WSIT Security documentation.
Message Security Providers
By default, the XWS_ClientProvider and XWS_ServerProvider security message providers are configured but disabled. You can enable them in one of the following ways:
-
To enable the message security providers using the Administration Console, open the Security component under the relevant configuration, select the Message Security component, and select SOAP. Then select
XWS_ServerProviderfrom the Default Provider list andXWS_ClientProviderfrom the Default Client Provider list. -
You can enable the message security providers using the following Asadmin CLI commands:
asadmin set
server-config.security-service.message-security-config.SOAP.default_provider=XWS_ServerProvider
asadmin set
server-config.security-service.message-security-config.SOAP.default_client_provider=XWS_ClientProvider
You can create new message security providers in one of the following ways:
-
To create a message security provider using the Administration Console, open the Security component under the relevant configuration, and select the Message Security component.
-
You can use the
asadmin create-message-security-providercommand to create a message security provider.
In addition, you can set a few optional provider properties using the asadmin set command. For example:
asadmin set server-config.security-service.message-security-config.provider-config.property.debug=trueThe following table describes these message security provider properties.
| Property | Default | Description |
|---|---|---|
|
|
Specifies the location of the message security configuration file. To point to a configuration file in the ${com.sun.aas.instanceRoot}/config/wss-server-config-1.0.xml
|
|
|
If |
|
|
If If |
|
|
Specifies the encryption key used by the provider. The key is identified by its |
|
|
Specifies the signature key used by the provider. The key is identified by its |
Message Security Responsibilities
In Payara Server, the system administrator and application deployer roles are expected to take primary responsibility for configuring message security.
In some situations, the application developer may also contribute, although in the typical case either of the other roles may secure an existing application without changing its implementation and without involving the developer.
Application Developer Responsibilities
The application developer can turn on message security, but is not responsible for doing so. Message security can be set up by the system administrator so that all web services are secured, or set up by the application deployer when the provider or protection policy bound to the application must be different from that bound to the container.
The application developer is responsible for the following:
-
Determining if an application-specific message protection policy is required by the application. If so, ensuring that the required policy is specified at application assembly which may be accomplished by communicating with the application deployer.
-
Determining if message security is necessary at the server’s level. If so, ensuring that this need is communicated to the system administrator, or taking care of implementing message security at the server’s level.
Application Deployer Responsibilities
The application deployer is responsible for the following:
-
Specifying (at application assembly) any required application-specific message protection policies if such policies have not already been specified by upstream roles (the developer or assembler).
-
Modifying Payara Server deployment descriptors to specify application-specific message protection policies information (message-security-binding elements) to web service endpoint and service references
These security tasks are discussed in Application-Specific Message Protection.
System Administrator Responsibilities
The system administrator is responsible for the following:
-
Configuring message security providers on Payara Server.
-
Managing user databases.
-
Managing keystore and truststore files.
A system administrator uses the Administration Console to manage server security settings and uses a command line tool to manage certificate databases. Certificates and private keys are stored in key stores and are managed with the keytool utility (and in the case of Payara Server Enterprise with its Integrated Certificate Management enhancements).
Application-Specific Message Protection
When the Payara Server provided configuration is insufficient for your security needs, and you want to override the default protection, you can apply application-specific message security to a web service.
Application-specific security is implemented by adding the message security binding to the web service endpoint, whether it is an EJB or servlet web service endpoint. Modify the corresponding XML deployment descriptor files to add the message binding information.
Message security can also be specified using a WSIT security policy in the WSDL file.
For more information about message security providers, see Message Security Providers.
For more details on message security binding for EJB web services,servlet web services, and clients, see the XML file descriptions in "Elements of the Payara Server Deployment Descriptors" in the Payara Server Application Deployment section.
Using a Signature to Enable Message Protection for All Methods
To enable message protection for all methods using digital signature, update the message-security-binding element for the EJB web service endpoint in the application’s glassfish-ejb-jar.xml/payara-ejb-jar.xml file.
To apply the same protection mechanisms for all methods, leave the method-name element blank. Configuring Message Protection for a Specific Method Based on Digital Signatures discusses listing specific methods or using wildcard characters.
To Enable Message Protection for All Methods Using Digital Signature
Follow this procedure:
-
Modify the
glassfish-ejb-jar.xml/payara-ejb-jar.xmlfile by adding themessage-security-bindingelement as shown:<payara-ejb-jar> <enterprise-beans> <unique-id>1</unique-id> <ejb> <ejb-name>HelloWorld</ejb-name> <jndi-name>HelloWorld</jndi-name> <webservice-endpoint> <port-component-name>HelloIF</port-component-name> <endpoint-address-uri>service/HelloWorld</endpoint-address-uri> <message-security-binding auth-layer="SOAP"> <message-security> <request-protection auth-source="content" /> <response-protection auth-source="content"/> </message-security> </message-security-binding> </webservice-endpoint> </ejb> </enterprise-beans> </payara-ejb-jar> -
Compile and deploy the corresponding application.
Configuring Message Protection for a Specific Method Based on Digital Signatures
To enable message protection for a specific method, or for a set of methods that can be identified using a wildcard value, follow these steps.
As in the example discussed in Using a Signature to Enable Message Protection for All Methods, to enable message protection for a specific method, update the message-security-binding element for the EJB web service endpoint in the application’s glassfish-ejb-jar.xml/payara-ejb-jar.xml file.
Add the request-protection and response-protection elements, which are analogous to the request-policy and response-policy elements discussed in the Payara Platform Security Guide.
The administration guide includes a table listing the set and order of security operations for different request and response policy configurations.
To Enable Message Protection for a Particular Method or Set of Methods Using Digital Signature
Follow this procedure.
-
Modify the
glassfish-ejb-jar.xml/payara-ejb-jar.xmlfile by adding themessage-security-bindingelement as shown:<payara-ejb-jar> <enterprise-beans> <unique-id>1</unique-id> <ejb> <ejb-name>HelloWorld</ejb-name> <jndi-name>HelloWorld</jndi-name> <webservice-endpoint> <port-component-name>HelloIF</port-component-name> <endpoint-address-uri>service/HelloWorld</endpoint-address-uri> <message-security-binding auth-layer="SOAP"> <message-security> <message> <java-method> <method-name>ejbCreate</method-name> </java-method> </message> <message> <java-method> <method-name>sayHello</method-name> </java-method> </message> <request-protection auth-source="content" /> <response-protection auth-source="content"/> </message-security> </message-security-binding> </webservice-endpoint> </ejb> </enterprise-beans> </payara-ejb-jar> -
Compile and deploy the corresponding application.
Programmatic Login Using the ProgrammaticLogin Class
Programmatic login allows a deployed Jakarta EE application or module to invoke a login method. If the login is successful, a SecurityContext is established as if the client had authenticated using any of the conventional Jakarta EE mechanisms.
Programmatic login is supported for servlet and EJB components on the server side, and for stand-alone or application clients on the client side.
Programmatic login is useful for an application having special needs that cannot be accommodated by any of the Jakarta EE standard authentication mechanisms.
This section describes a proprietary Payara mechanism, but see also the standard security APIs in the Jakarta EE tutorial.
The com.sun.enterprise.security.ee.auth.login.ProgrammaticLogin class present in Payara Server is not part of any Jakarta EE APIs; therefore, it is not portable to other application servers.
|
Programmatic Login Precautions
Payara Server is not involved in how the login information (user, password) is obtained by the deployed application. Programmatic login places the burden on the application developer with respect to assuring that the resulting system meets security requirements. If the application code reads the authentication information across the network, the application determines whether to trust the user.
Programmatic login allows the application developer to bypass the Payara Server-supported authentication mechanisms and feed authentication data directly to the security service.
|
While flexible, this capability should not be used without some understanding of security issues. Since this mechanism bypasses the container-managed authentication process and sequence, the application developer must be very careful in making sure that authentication is established before accessing any restricted resources or methods. |
It is also the application developer’s responsibility to verify the status of the login attempt and to alter the behavior of the application accordingly.
The programmatic login state does not necessarily persist in sessions or participate in single sign-on.
Lazy authentication is not supported for programmatic login. If an access check is reached and the deployed application has not properly authenticated using the programmatic login method, access is denied immediately and the application might fail if not coded to account for this occurrence.
One way to account for this occurrence is to catch the access control or security exception, perform a programmatic login, and repeat the request.
Granting Programmatic Login Permission
The ProgrammaticLoginPermission permission is required to invoke the programmatic login mechanism for an application if the security manager is enabled. For information about the security manager, see The server.policy File.
This permission is not granted by default to deployed applications because this is not a standard Jakarta EE mechanism.
To grant the required permission to the application, add the following to the domain-dir/config/server.policy file:
grant codeBase "file:${jar-file-path}" {
    permission com.sun.appserv.security.ProgrammaticLoginPermission "login";
};
jar-file-path is the path to the application’s JAR file.
|
The ProgrammaticLogin Class
The com.sun.enterprise.security.ee.auth.login.ProgrammaticLogin class enables a user to perform login programmatically and in addition, logout of the existing security context when required.
The ProgrammaticLogin class has eight overloaded login methods: four variants to be used by Web components and four variants to be used by EJB components.
The login methods for web components have the following signatures:
public class ProgrammaticLogin {
    public Boolean login(String user, String password, HttpServletRequest request, HttpServletResponse response);

    //Same as above, but uses a char[] for the password credential
    public Boolean login(String user, char[] password, HttpServletRequest request, HttpServletResponse response);

    public Boolean login(String user, String password, String realm, HttpServletRequest request, HttpServletResponse response, boolean errors) throws Exception;

    //Same as above, but uses a char[] for the password credential
    public Boolean login(String user, char[] password, String realm, HttpServletRequest request, HttpServletResponse response, boolean errors) throws Exception;
}
The login methods for EJB components have the following signatures:
public class ProgrammaticLogin {
    public Boolean login(String user, String password);
    //Same as above, but uses a char[] for the password credential
    public Boolean login(String user, char[] password);
    public Boolean login(String user, String password, String realm, boolean errors) throws Exception;
    //Same as above, but uses a char[] for the password credential
    public Boolean login(String user, char[] password, String realm, boolean errors);
}
All method variants accomplish the following:
-
Perform the authentication
-
Return
trueif login succeeded,falseif the login has failed
The login occurs on the realm specified unless it is null, in which case the domain’s default realm is used. The variants with no realm parameter will use the domain’s default security realm.
If the errors parameter is set to true, any exceptions encountered during the login process are propagated to the caller. If set to false, exceptions will be thrown.
On the client side, the realm and errors parameters are ignored and the actual login does not occur until a resource requiring a login is accessed. A java.rmi.AccessException with a COBRA NO_PERMISSION occurs if the actual login fails.
|
The logout method has 4 overloaded variants: 2 used by Web components, 2 used by EJB components. Here are the variants used by web components:
public class ProgrammaticLogin {
    public Boolean logout(HttpServletRequest request, HttpServletResponse response);
    public Boolean logout(HttpServletRequest request, HttpServletResponse response, boolean errors) throws Exception;
}
The variants used for EJB components have the following signatures:
public class ProgrammaticLogin {
    public Boolean logout();
    public Boolean logout(boolean errors) throws Exception;
}
All logout method variants return true if the logout process succeeded, false if it failed.
If the errors parameter is set to true, any exceptions encountered during the logout process are propagated to the caller. If set to false, exceptions will be thrown.
User Authentication for Single Sign-on
The single sign-on feature of the Payara Server allows multiple web applications deployed to the same virtual server to share the user authentication state.
With single sign-on enabled, users who log in to one web application become implicitly logged into other web applications on the same virtual server that require the same authentication information. Otherwise, users would have to log in separately to each web application whose protected resources they tried to access.
A sample application using the single sign-on scenario could be a consolidated airline booking service that searches all airlines and provides links to different airline websites. After the user signs on to the consolidated booking service, the user information can be used by each individual airline site without requiring another sign-on.
Single sign-on operates according to the following rules:
-
Single sign-on applies to web applications configured for the same security realm and virtual server. The realm is defined by the
realm-nameelement in theweb.xmlfile. For information about virtual servers, see "Administering Internet Connectivity" in the Payara Server General Administration section. -
As long as users access only unprotected resources in any of the web applications on a virtual server, they are not challenged to authenticate themselves.
-
As soon as a user accesses a protected resource in any web application associated with a virtual server, the user is challenged to authenticate himself or herself, using the login method defined for the web application currently being accessed.
-
After authentication, the roles associated with this user are used for access control decisions across all associated web applications, without challenging the user to authenticate to each application individually.
-
When the user logs out of one web application (for example, by invalidating the corresponding web session), the user’s sessions in all web applications are automatically invalidated. Any subsequent attempt to access a protected resource in any application requires the user to authenticate again.
| The single sign-on feature utilizes HTTP cookies to transmit a token that associates each request with the saved user identity, so it can only be used in client environments that support cookies. |
To configure single sign-on, set the following configuration properties for a virtual server:
sso-enabled-
If
false, single sign-on is disabled for this virtual server, and users must authenticate separately to every application on the virtual server. The default value isfalse. sso-max-inactive-seconds-
Specifies the time after which a user’s single sign-on record becomes eligible for purging if no client activity is received. Since single sign-on applies across several applications on the same virtual server, access to any of the applications keeps the single sign-on record active. The default value is 5 minutes (
300seconds).Higher values provide longer single sign-on persistence for the users at the expense of more memory use on the server. sso-reap-interval-seconds-
Specifies the interval between purges of expired single sign-on records. The default value is
60.
Here are example asadmin set commands on a virtual server named vsrv1 using the default values mentioned above:
asadmin set server-config.http-service.virtual-server.vsrv1.property.sso-enabled="true"
asadmin set server-config.http-service.virtual-server.vsrv1.property.sso-max-inactive-seconds="300"
asadmin set server-config.http-service.virtual-server.vsrv1.property.sso-reap-interval-seconds="60"
Jakarta Security Support
Jakarta Security defines several authentication-related plugin SPIs, such as the HttpAuthenticationMechanism and IdentityStore interfaces:
HttpAuthenticationMechanism-
An interface for modules that authenticate callers to a web application. An application can supply its own
HttpAuthenticationMechanism, or use one of the default implementations provided by the container. IdentityStore-
This interface defines methods for validating a caller’s credentials (such as username and password) and returning group membership information. An application can provide its own
IdentityStore, or use the builtin LDAP or Database stores.
In addition to these authentication plugin SPIs, the Jakarta Security specification defines the SecurityContext API for use by application code to query and interact with the current security context.
The SecurityContext interface defines methods that allow an application to access security information about a caller, authenticate a caller, and authorize a caller. These methods include getCallerPrincipal(), getPrincipalsByType(), isCallerInRole(), authenticate(), and hasAccessToWebResource().
Payara Platform and Jakarta Security
Payara Server and Micro implement Jakarta Security to provide built-in support for the following authentication mechanisms:
-
BASIC
-
FORM
-
Custom FORM
-
OpenID Connect
A significant advantage of using HttpAuthenticationMechanism and IdentityStore over the declarative mechanisms defined by the Servlet specification is that it allows an application to control the identity stores that it authenticates against, in a standard, portable way. You can use the built-in implementations of these APIs, or define custom implementations as suggested by the specification.
Jakarta Security defines several annotations, with names that end with the Definition suffix, which when used makes the corresponding built-in mechanism available as a CDI bean.
| Jakarta Security also supports the use of Jakarta Expression Language in these annotations to allow dynamic configuration. |
Built-in Authentication Mechanisms and Identity Stores
An application packages its own HttpAuthenticationMechanism by including in a bean archive that is a part of the application. Alternatively, it may select and configure one of the built-in mechanisms using the corresponding annotation, as listed below:
BasicAuthenticationMechanismDefinition-
Implements HTTP BASIC authentication that conforms to the behavior of the servlet container when BASIC <auth-method> is declared in the
web.xmldeployment descriptor. FormAuthenticationMechanismDefinition-
Implements HTTP FORM authentication that conforms to the behavior of the servlet container when the FORM <auth-method> is declared in the
web.xmldeployment descriptor. CustomFormAuthenticationMechanismDefinition-
Implements a modified version of HTTP FORM authentication in which custom handling replaces the POST action to the
j_security_checkservlet. OpenIdAuthenticationMechanismDefinition-
Implements an OpenID Connect authentication workflow using the metadata configured in the annotation attributes.
All built-in authentication mechanisms need to be authenticated using an identity store. The IdentityStore interface, included in the Jakarta Security API, defines an SPI for interacting with identity stores, which are repositories (like databases or naming directories) containing user account information.
The IdentityStore interface has four methods: validate(Credential), getCallerGroups(CredentialValidationResult), validationTypes() and priority(). Developers can provide their own implementation of this interface, or use one of the built-in identity stores.
The RememberMeIdentityStore interface, which is a variation on the IdentityStore interface, can be used when an application wants to "remember" a user’s authenticated session for an extended period, so that the caller can return to the application periodically without needing to present primary authentication credentials each time.
|
There are two built-in implementations of IdentityStore:
LdapIdentityStoreDefinition-
Used to configure an LDAP naming directory as the identity store of an application.
DatabaseIdentityStoreDefinition-
Used to configure a set of relational database tables as the identity store.
The following snippet shows the usage of the DatabaseIdentityStoreDefinition annotation, which makes it available as a CDI bean.
@DatabaseIdentityStoreDefinition(
    callerQuery = "#{'select password from caller where name = ?'}",
    groupsQuery = "select group_name from caller_groups where caller_name = ?",
    hashAlgorithm = Pbkdf2PasswordHash.class,
    priorityExpression = "#{100}",
    hashAlgorithmParameters = {
        "Pbkdf2PasswordHash.Iterations=3072",
        "${applicationConfig.dynamic}"
    }
)
public class MyComponent{
}
Since the Jakarta Security API provides support for Jakarta Expression Language, regular expressions can be used to set value of annotation attributes.
Payara Server provides out of the box implementation of the Pbkdf2PasswordHash interface that supports PBKDF2 password hashing.
It is suggested that you use Pbkdf2PasswordHash for generating and validating passwords, unless there are specific requirements which cannot be met in any other way.
Custom Authentication Mechanism
An application provider can choose to provide its own custom authentication mechanism, apart from built-in authentication mechanisms.
A custom authentication mechanism implements the HttpAuthenticationMechanism interface, introduced in Jakarta Security. This interface defines the following three methods.
public interface HttpAuthenticationMechanism{
    AuthenticationStatus validateRequest(HttpServletRequest request, HttpServletResponse response, HttpMessageContext httpMessageContext) throws AuthenticationException;

    AuthenticationStatus secureResponse(HttpServletRequest request, HttpServletResponse response, HttpMessageContext httpMessageContext) throws AuthenticationException;

    void cleanSubject(HttpServletRequest request, HttpServletResponse response, HttpMessageContext httpMessageContext);
}
A custom authentication mechanism must return an AuthenticationStatus to indicate the status of its current authentication request. Internally, it gets translated to a corresponding Jakarta Authentication AuthStatus instance as shown below:
-
AuthenticationStatus.NOT_DONE→AuthStatus.SUCCESS -
AuthenticationStatus.SEND_CONTINUE→AuthStatus.SEND_CONTINUE -
AuthenticationStatus.SUCCESS→AuthStatus.SUCCESS -
AuthenticationStatus.SEND_FAILURE→AuthStatus.SEND_FAILURE
Each method of the HttpAuthenticationMechanism interface performs the same function as the corresponding ServerAuth methods.
Unlike Jakarta Authentication, HttpAuthenticationMechanism is specified for the servlet container only. Only the validateRequest() must be implemented, for other two methods, default behaviors are specified.
validateRequest allows a caller to authenticate. The request gets inspected inside validateRequest to read credential or any other information, or it can write to standard response with status of the authentication request or redirect the caller to an OAuth provider. Once the credential is validated, the result of the validation is communicated to the container using the HttpMessageContext parameter.
Here’s an example of a custom authentication mechanism:
Only the validateRequest method has been implemented, since Jakarta Security provides default implementation of the other two methods. An application provider may choose to override the default implementation depending on the business context.
|
import jakarta.enterprise.context.RequestScoped;
import jakarta.inject.Inject;
import jakarta.security.enterprise.AuthenticationException;
import jakarta.security.enterprise.AuthenticationStatus;
import jakarta.security.enterprise.authentication.mechanism.http.HttpAuthenticationMechanism;
import jakarta.security.enterprise.authentication.mechanism.http.HttpMessageContext;
import jakarta.security.enterprise.credential.UsernamePasswordCredential;
import jakarta.security.enterprise.identitystore.CredentialValidationResult;
import jakarta.security.enterprise.identitystore.IdentityStoreHandler;
import jakarta.servlet.http.HttpServletRequest;
import jakarta.servlet.http.HttpServletResponse;

import static jakarta.security.enterprise.identitystore.CredentialValidationResult.Status.VALID;

@RequestScoped
public class MyAuthenticationMechanism implements HttpAuthenticationMechanism {

    @Inject
    private IdentityStoreHandler identityStoreHandler;

    @Override
    public AuthenticationStatus validateRequest(HttpServletRequest request, HttpServletResponse response, HttpMessageContext httpMessageContext) throws AuthenticationException {

        // Get the (caller) name and password from the request
        // NOTE: This is for the smallest possible example only. In practice
        // putting the password in a request query parameter is highly
        // insecure and is discouraged.
        var name = request.getParameter("name");
        var password = request.getParameter("password");

        if (name != null && password != null) {
            // Delegate the {credentials in -> identity data out} function to the Identity Store
            var result = identityStoreHandler.validate(new UsernamePasswordCredential(name, password));

            if (result.getStatus() == VALID) {
                // Communicate the details of the authenticated user to the container.
                response.addHeader("Authentication Mechanism", "MyAuthenticationMechanism");
                return httpMessageContext.notifyContainerAboutLogin(result.getCallerPrincipal(), result.getCallerGroups());
            } else {
                return httpMessageContext.responseUnauthorized();
            }
        }
        return httpMessageContext.doNothing();
    }
}
Multiple HttpAuthenticationMechanisms in EAR Application
Within the Security API specification, an HttpAuthenticationMechanism can be defined to retrieve the user credentials from the HTTP Request. These credentials are then used by any configured identity stores to validate the user.
However, a restriction of the Security API specification is that only one HttpAuthenticationMechanism can be defined per application.
This restriction is also in place for EAR applications file where it’s possible to have multiple web modules.
Payara Server allows to circumvent this restriction so that multiple authentication mechanisms are used in an EAR application that hosts more than one Web module. To this effect, each web module must configure its own authentication mechanism separately.
In order to use this feature, there must not be any custom HttpAuthenticationMechanism implementations bundled in any of the modules hosted in the EAR artifact. If this is the case, the feature will not work as intended.
|
| This behaviour is specific to the Payara Platform and not compatible with the Jakarta Security specification. |
How to Configure
In order to configure a specific HttpAuthenticationMechanism for a Web application, define the fish.payara.security.mechanism parameter in the web.xml deployment descriptor like in the following case:
<context-param>
    <param-name>fish.payara.security.mechanism</param-name>
    <param-value>JWT</param-value>
</context-param>
The following mechanisms can be used:
| Value | Description |
|---|---|
|
Use BasicAuthenticationMechanism as mechanism. |
|
Use FormAuthenticationMechanism as mechanism. |
|
Use CustomFormAuthenticationMechanism as mechanism. |
|
Use the custom Payara JWTAuthenticationMechanism as mechanism. |
|
Use the custom Payara CertificateAuthenticationMechanism as mechanism. |
|
Use the custom Payara AzureOpenIdAuthenticationMechanism as mechanism. |
|
Use the custom Payara GoogleOpenIdAuthenticationMechanism as mechanism. |
|
Use the custom Payara OAuth2AuthenticationMechanism as mechanism. |
<any Fully Qualified Class Name> |
Use the |
| When no parameter is specified, the standard rules of Jakarta Security are active (only 1 mechanism allowed per application/module). |
Jakarta Authentication Support
Jakarta Authentication is part of the Jakarta EE specification and defined by its own specification.
Jakarta Authentication defines an interface for pluggable authorization providers. Specifically, it is used to plug in the Java policy provider used by the container to perform Jakarta EE caller access decisions. The Java policy provider performs Java policy decisions during application execution.
This provides third parties with a mechanism to develop and plug in modules that are responsible for answering authorization decisions during a Jakarta EE application execution. The interfaces and rules used for developing authentication providers are defined in the specification document.
Payara Server provides a simple file-based Jakarta Authentication engine as a default JACC provider (JACC stands for the previous name of the specification before its transition to Jakarta EE), named default.
To configure an alternate provider using the Administration Console, open the Security component under the relevant configuration, and select the JACC Providers component.
Payara Server and Jakarta Authentication
The Jakarta Authentication specification defines profiles that establish contracts for the use of the SPI in specific contexts.
Jakarta Authentication’s Servlet Container Profile defines the use of the SPI by a Servlet container such that:
-
The resulting container can be configured with new authentication mechanisms.
-
The container employs the configured mechanisms in its enforcement of the declarative servlet security model (declared in a
web.xmldeployment descriptor file usingsecurity-constraintelements or by specific annotations in the servlet implementation classes).
Jakarta Authentication defines a simple message processing model composed of four interaction points when processing an authentication request:
-
secureRequeston the client -
validateRequeston the server -
secureResponseon the server -
validateResponseon the client
A message processing runtime uses the SPI at these interaction points to delegate the corresponding message security processing to authentication providers, also called authentication modules, integrated into the runtime by way of the SPI.
A compatible server-side message processing runtime, such as the Payara Server servlet container, supports the validateRequest and secureResponse interaction points of the message processing model.
The servlet container uses the SPI at these interaction points to delegate the corresponding message security processing to a server authentication module (SAM), integrated by the SPI into the container.
Adding Authentication Modules to the Servlet Container
You can use Jakarta Authentication in the web tier to facilitate the injection of pluggable authentication modules within the servlet constraint processing engine. Payara Server includes implementations of a number of HTTP layer authentication mechanisms such as basic, form, and digest authentication.
You can add alternative implementations of the included mechanisms or implementations of new mechanisms such as Kerberos/SPNEGO or CAS for example.
Writing a Server Authentication Module
A key step in adding an authentication mechanism to a compatible server-side message processing runtime such as the servlet container is acquiring a SAM that implements the desired authentication mechanism. One way to do that is to write the SAM yourself.
A SAM implements the jakarta.security.auth.message.module.ServerAuthModule interface as defined by the specification. A SAM is invoked indirectly by the message processing runtime at the validateRequest and secureResponse interaction points. A SAM must implement the five methods of the ServerAuthModule interface:
getSupportedMessageTypes-
Returns an array of
Classobjects where each element defines a message type supported by the SAM.For a SAM to be compatible with the Servlet Container Profile, the returned array must include the HttpServletRequest.classandHttpServletResponse.classobjects. initialize(MessagePolicy requestPolicy, MessagePolicy responsePolicy, CallbackHandler cbh, Map options)-
The container calls this method to provide the SAM with configuration values and with a
CallbackHandler.The configuration values are returned in the policy arguments and in the options
Map. The SAM usesCallbackHandlerto access services, such as password validation, provided by the container. AuthStatus validateRequest(MessageInfo messageInfo, Subject clientSubject, Subject serviceSubject)-
The container calls this method to process each
HttpServletRequestreceived. The request and its associatedHttpServletResponseare passed by the container to the SAM in themessageInfoargument. The SAM processes the request and may establish the response to be returned by the container.The SAM uses the provided
Subjectarguments to convey its authentication results. The SAM returns different status values to control the container’s invocation processing. The status values and the circumstances under which they are returned are as follows:-
AuthStatus.SUCCESSis returned when the application request message is successfully validated. The container responds to this status value by using the returned clientSubjectto invoke the target of the request. When this value is returned, the SAM (provided a customAuthConfigProvideris not being used) must use itsCallbackHandlerto handle aCallerPrincipalCallbackusing theclientSubjectas an argument to the callback. -
AuthStatus.SEND_CONTINUEindicates that message validation is incomplete and that the SAM has established a preliminary response as the response message inmessageInfo. The container responds to this status value by sending the response to the client. -
AuthStatus.SEND_FAILUREindicates that message validation failed and that the SAM has established an appropriate failure response message inmessageInfo. The container responds to this status value by sending the response to the client. -
AuthStatus.SEND_SUCCESSis not typically returned. This status value indicates the end of a multi-message security dialog originating after the service interaction and during the processing of the application response. The container responds to this status value by sending the response to the client.The
validateRequestmethod may also throw anAuthExceptionto indicate that the message processing by the SAM failed without establishing a failure response message inmessageInfo.
-
secureResponse(MessageInfo messageInfo, Subject serviceSubject)-
The container calls this method before sending a response, resulting from an application invocation, to the client. The response is passed to the SAM in the
messageInfoargument. In most cases, this method should just return theSEND_SUCCESSstatus. cleanSubject(MessageInfo messageInfo, Subject subject)-
This method removes the mechanism-specific principals, credentials, or both from the subject. This method is not currently called by the container. A legitimate implementation could remove all the principals from the argument subject.
Sample Server Authentication Module
The class MySam.java is a sample SAM implementation. Notice that the sample implements the five methods of the ServerAuthModule interface. This SAM implements an emulation of HTTP basic authentication for demonstration purposes.
package fish.payara.samples.security;

import java.io.IOException;
import java.util.Map;
import jakarta.security.auth.Subject;
import jakarta.security.auth.callback.Callback;
import jakarta.security.auth.callback.CallbackHandler;
import jakarta.security.auth.callback.UnsupportedCallbackException;
import jakarta.security.auth.message.AuthException;
import jakarta.security.auth.message.AuthStatus;
import jakarta.security.auth.message.MessageInfo;
import jakarta.security.auth.message.MessagePolicy;
import jakarta.security.auth.message.callback.CallerPrincipalCallback;
import jakarta.security.auth.message.callback.GroupPrincipalCallback;
import jakarta.security.auth.message.callback.PasswordValidationCallback;
import jakarta.security.auth.message.module.ServerAuthModule;
import jakarta.servlet.http.HttpServletRequest;
import jakarta.servlet.http.HttpServletResponse;
import org.apache.catalina.util.Base64;

public class MySam implements ServerAuthModule {

    protected static final Class[] supportedMessageTypes = new Class[]{
            HttpServletRequest.class, HttpServletResponse.class
    };

    private MessagePolicy requestPolicy;
    private MessagePolicy responsePolicy;
    private CallbackHandler handler;
    private Map options;
    private String realmName = null;
    private String defaultGroup[] = null;

    private static final String REALM_PROPERTY_NAME = "realm.name";
    private static final String GROUP_PROPERTY_NAME = "group.name";
    private static final String BASIC = "Basic";
    private static final String AUTH_TYPE_INFO_KEY = "jakarta.servlet.http.authType";

    static final String AUTHORIZATION_HEADER = "authorization";
    static final String AUTHENTICATION_HEADER = "WWW-Authenticate";

    public void initialize(MessagePolicy requestPolicy, MessagePolicy responsePolicy, CallbackHandler handler, Map options) throws AuthException {
        if (options != null) {
            realmName = (String) options.get(REALM_PROPERTY_NAME);
            if (options.containsKey(GROUP_PROPERTY_NAME)) {
              defaultGroup = new String[]{(String) options.get(GROUP_PROPERTY_NAME)};
            }
        }
    }

    public Class[] getSupportedMessageTypes() {
      return supportedMessageTypes;
    }

    public AuthStatus validateRequest(MessageInfo msgInfo, Subject client, Subject server) throws AuthException {
        try {
          var username = processAuthorizationToken(msgInfo, client);
          if (username == null && requestPolicy.isMandatory()) {
              return sendAuthenticateChallenge(msgInfo);
          }
          setAuthenticationResult(username, client, msgInfo);
          return AuthStatus.SUCCESS;
        } catch (Exception e) {
          var ae = new AuthException();
          ae.initCause(e);
          throw ae;
        }
    }

    private String processAuthorizationToken(MessageInfo msgInfo, Subject s) throws AuthException {

        var request = (HttpServletRequest) msgInfo.getRequestMessage();
        var token = request.getHeader(AUTHORIZATION_HEADER);

        if (token != null && token.startsWith(BASIC + " ")) {
            token = token.substring(6).trim();

            // Decode and parse the authorization token
            var decoded = new String(Base64.decode(token.getBytes()));
            int colon = decoded.indexOf(':');
            if (colon <= 0 || colon == decoded.length() - 1) {
                return null;
            }

            var username = decoded.substring(0, colon);
            // use the callback to ask the container to validate the password
            var pVC = new PasswordValidationCallback(s, username, decoded.substring(colon + 1).toCharArray());
            try {
                handler.handle(new Callback[]{pVC});
                pVC.clearPassword();
            } catch (Exception e) {
                var ae = new AuthException();
                ae.initCause(e);
                throw ae;
            }

            if (pVC.getResult()) {
                return username;
            }
        }
        return null;
    }

    private AuthStatus sendAuthenticateChallenge(MessageInfo msgInfo) {

        var realm = realmName;

        // if the realm property is set use it, otherwise use the name of the server as the realm name.
        if (realm == null) {
            var request = (HttpServletRequest) msgInfo.getRequestMessage();
            realm = request.getServerName();
        }

        var response = (HttpServletResponse) msgInfo.getResponseMessage();

        response.setHeader(AUTHENTICATION_HEADER, BASIC + " realm=\"" + realm + "\"");
        response.setStatus(HttpServletResponse.SC_UNAUTHORIZED);
        return AuthStatus.SEND_CONTINUE;
    }

    public AuthStatus secureResponse(MessageInfo msgInfo, Subject service) throws AuthException {
        return AuthStatus.SEND_SUCCESS;
    }

    public void cleanSubject(MessageInfo msgInfo, Subject subject) throws AuthException {
        if (subject != null) {
            subject.getPrincipals().clear();
        }
    }

    // distinguish the caller principal and assign default groups
    private void setAuthenticationResult(String name, Subject s, MessageInfo m) throws IOException, UnsupportedCallbackException {
        handler.handle(new Callback[]{
           new CallerPrincipalCallback(s, name)
        });
        if (name != null) {
           // add the default group if the property is set
           if (defaultGroup != null) {
               handler.handle(new Callback[]{
                   new GroupPrincipalCallback(s, defaultGroup)
               });
           }
           m.getMap().put(AUTH_TYPE_INFO_KEY, "MySAM");
        }
    }
}
The initialize method looks for the group.name and realm.name properties. The group.name property configures the default group assigned as a result of any successful authentication.The realm.name property defines the realm value sent back to the browser in the WWW-Authenticate challenge.
|
Compiling and Installing a Server Authentication Module
Before you can use the sample SAM, you need to compile, install, and configure it. Then you can bind it to an application.
To compile the SAM, include the SPI in your classpath. After you compile the SAM, install it by copying a JAR file containing the compiled SAM to the $as-install/glassfish/lib directory.
Configuring a Server Authentication Module
You can configure a SAM in one of these ways:
-
In the Administration Console, open the Security component under the relevant configuration and go to the Message Security page. Set the following options:
-
Authentication Layer:
HttpServlet -
Provider Type:
serverorclient-server -
Provider ID: Specify a unique name for the SAM, for example
MySAM -
Class Name: Specify the fully qualified class name, for example
fish.payara.samples.security.MySam -
Additional Property:
-
Name:
group-name -
Value:
user
-
-
Additional Property:
-
Name:
realm-name -
Value:
Sam
-
-
-
Use the
asadmin create-message-security-providercommand to configure a SAM. Set the following options:-
--layer HttpServlet -
--providertype serveror--providertype client-server -
--classname fish.payara.samples.security.MySam -
--property group-name=user:realm-name=Sam -
Provider name operand — Specify a unique name for the SAM, for example
MySAM
-
Binding a Server Authentication Module to Your Application
After you install and configure the SAM, you can bind it for use by the container on behalf of one or more of your applications. You have two options in how you bind the SAM, depending on whether you are willing to repackage and redeploy your application:
-
If you are willing to repackage and redeploy, you can bind the SAM using the
glassfish-web.xmlorpayara-web.xmldeployment descriptor file. Set the value of thehttpservlet-security-providerattribute of theglassfish-web-app/payara-web-appelement to the SAM’s configured provider ID, for example,MySAM. This option leverages the nativeAuthConfigProviderimplementation that ships with Payara Server. -
Another approach is to develop your own
AuthConfigProviderand register it with the server’sAuthConfigFactoryfor use on behalf of your applications. For example, a simpleAuthConfigProvidercan obtain, through its initialization properties, the classname of a SAM to configure on behalf of the applications for which the provider is registered.
You can find a description of the functionality of an AuthConfigProvider and of the registration facilities provided by an AuthConfigFactory in the Jakarta Authentication specification.
|
| glassfish-web.xml is deprecated and support will be removed in a future release. It is recommended to use payara-web.xml instead. |
Advanced Groups Configuration
Payara Server allows the advanced configuration mapping of a client certificate’s distinguished name (DN) to specific realm groups, which allows the realm to automatically assign groups based on the values of each DN part to all principals registered in the realm.
This feature can be configured by using the dn-parts-used-for-groups property of any security realm of type com.sun.enterprise.security.auth.realm.certificate.CertificateRealm. It must define a comma separated list of identifiers of DN parts, i.e. EMAILADDRESS,DC,OU, and it is empty by default.
The default empty value means that only content of the assign-groups property value will be used as the list of assigned groups.
|
If both properties are set, a principal who completed the certificate validation will have all groups from both assign-groups settings.
Not all DN parts are supported. The following is the list of all parts that are supported, categorized by their OIDs:
| DN Part | Description | Object ID |
|---|---|---|
CN |
Common Name |
2.5.4.3 |
SURNAME |
Surname |
2.5.4.4 |
SERIALNUMBER |
Serial Number of the certificate |
2.5.4.5 |
C |
Country |
2.5.4.6 |
L |
Locality |
2.5.4.7 |
ST |
State |
2.5.4.8 |
STREET |
Street |
2.5.4.9 |
O |
Organisation |
2.5.4.10 |
OU |
Organisation Unit |
2.5.4.11 |
T |
Title |
2.5.4.12 |
GIVENNAME |
Given Name |
2.5.4.42 |
INITIALS |
Initials |
2.5.4.43 |
GENERATION |
Generation |
2.5.4.44 |
DNQUALIFIER |
DN Qualifier |
2.5.4.46 |
UID |
User ID |
0.9.2342.19200300.100.1.1 |
DC |
Domain Component |
0.9.2342.19200300.100.1.25 |
EMAILADDRESS |
E-Mail address |
1.2.840.113549.1.9.1 |
IP |
IP Address |
1.3.6.1.4.1.42.2.11.2.1 |
Configuration using the Admin Console
This feature can be configured on the default certificate realm with the following steps:
-
Navigate to the applicable configuration page for your use (e.g.
server-config) under theConfigurationsoption in the side menu -
Head to
Security→Realmsand select thecertificaterealm -
Click the
Add Propertybutton -
Set the property Name to be
dn-parts-used-for-groupsand set the Value to a comma separated list of OID names.
Configuration using the Asadmin CLI
You can also use the following asadmin command to set the value of the property in the security realm:
asadmin set configs.config.${YOUR_INSTANCE_CONFIG}.security-service.auth-realm.certificate.property.dn-parts-used-for-groups=EMAILADDRESS,DC,OU| After setting the value of the property, make sure that you restart the server instance for the changes to take effect. |
| Keep in mind that the set of DN parts used to configure the realm groups must be predictable to be useful, so be careful to use DN parts that do not create group name collisions. |
Mapping Groups to Security Roles in Applications
After configuring the realm groups, you can map these groups to application roles as you’d do by using the Payara Server specific deployment descriptors. You can even map these roles to principals that are configured as documented in the advanced Principal Name configuration section.
Here’s a quick summary of the authentication and authorization process would work in this scenario:
-
The principal receives principal name as configured (whole DN or only CN part)
-
The principal receives all groups from realm’s
assign-groupslist -
The principal receives all groups from certificate’s DN parts listed in
dn-parts-used-for-groupsrealm property (limited to those listed in table) -
The server allows the principal to access the application
-
The client receives all roles from application’s security role mapping, where at least one of his principal names or groups matches their respective element.
-
The security roles are then used for authorization to access application resources
For example, if user roles were mapped like this in the payara-web.xml deployment descriptor of an application, and we enabled using CN as a principal name and set the dn-parts-used-for-groups to OU:
<?xml version="1.0" encoding="UTF-8"?>
<!DOCTYPE payara-web-app PUBLIC "-//Payara.fish//DTD Payara Server 7 Servlet 6.1//EN" "https://raw.githubusercontent.com/payara/Payara-Documentation/main-7/docs/modules/ROOT/pages/Appendix/Schemas/payara-web-app_6_1-0.dtd">
<payara-web-app error-url="">
  <context-root>/health-services</context-root>
  <security-role-mapping>
    <role-name>role1</role-name>
    <principal-name>C=UK, S=lak, L=zak, OU=unitA, CN=foo1</principal-name>
    <principal-name>C=UK, S=lak, L=zak, OU=unitA, CN=foo2</principal-name>
    <principal-name>C=UK, S=lak, L=zak, OU=unitC, CN=foo4</principal-name>
    <principal-name>C=UK, S=lak, L=zak, OU=unitD, CN=foo-director</principal-name>
  </security-role-mapping>
  <security-role-mapping>
    <role-name>role2</role-name>
    <principal-name>C=UK, S=lak, L=zak, OU=unitB, CN=foo3</principal-name>
    <principal-name>C=UK, S=lak, L=zak, OU=unitD, CN=foo-director</principal-name>
  </security-role-mapping>
</payara-web-app>
Then the role mapping can be based on organizational unit in this case. But you can still use the principal name as in any normal case:
<?xml version="1.0" encoding="UTF-8"?>
<!DOCTYPE payara-web-app PUBLIC "-//Payara.fish//DTD Payara Server 7 Servlet 6.1//EN" "https://raw.githubusercontent.com/payara/Payara-Documentation/main-7/docs/modules/ROOT/pages/Appendix/Schemas/payara-web-app_6_1-0.dtd">
<payara-web-app error-url="">
  <context-root>/health-services</context-root>
  <security-role-mapping>
    <role-name>role1</role-name>
    <group-name>unitA</group-name>
    <group-name>unitC</group-name>
    <group-name>unitD</group-name>
  </security-role-mapping>
  <security-role-mapping>
    <role-name>role2</role-name>
    <group-name>unitB</group-name>
    <principal-name>foo-director</principal-name>
  </security-role-mapping>
</payara-web-app>
Advanced Principal Name Configuration
Payara Server allows the use of the Common-Name (CN) attribute of a client certificate’s DN to be used as the full principal’s name when the certificated is authenticated in an application. This simplifies the authentication process, as the common name will replace the full name in the validation process of the certificate’s authentication.
To configure this behaviour, the common-name-as-principal-name property can be used in any security realm of type com.sun.enterprise.security.auth.realm.certificate.CertificateRealm.
The common-name-as-principal-name property is set to false by default if no configuration is provided.
|
Configuration using the Admin Console
This feature can be configured on the default certificate realm as follows on the Admin Console:
-
Navigate to the applicable configuration page for your use (e.g.
server-config) under theConfigurationsoption in the side menu -
Head to
Security→Realmsand select thecertificaterealm -
Click the
Add Propertybutton -
Set the property Name to be
common-name-as-principal-nameand set the Value totrue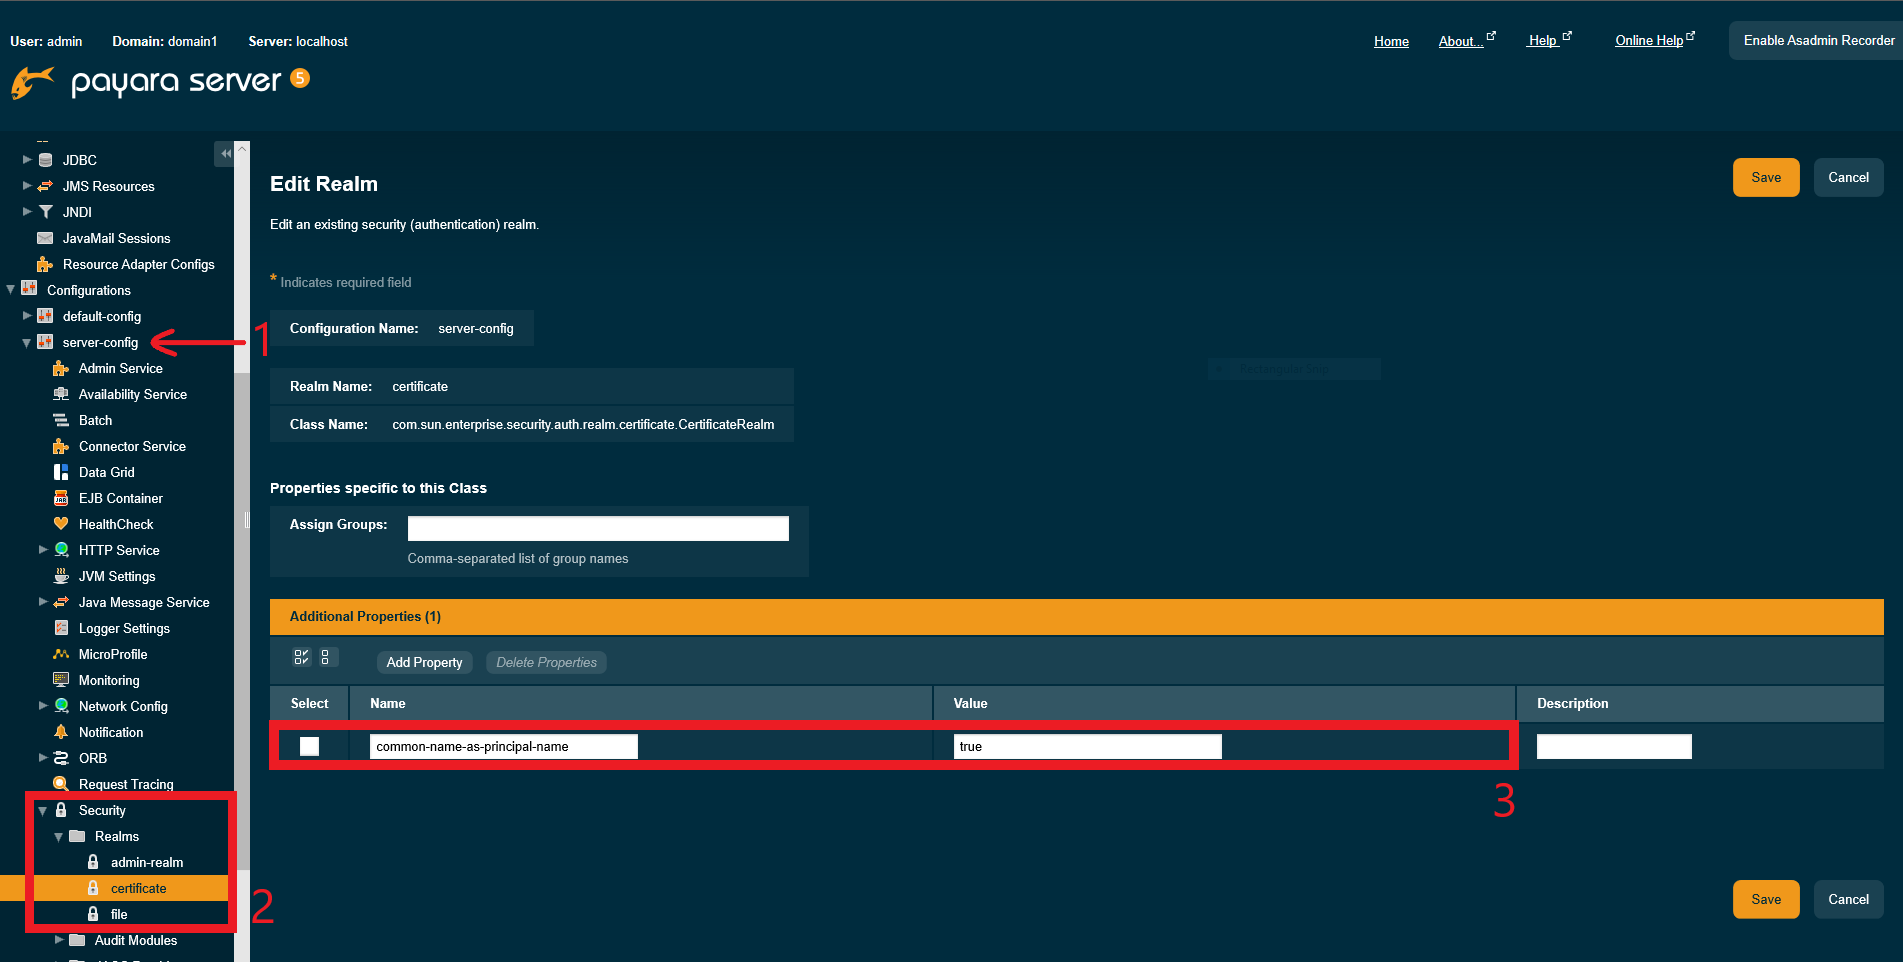
Configuration using the Asadmin CLI
You can also use the following asadmin command to set the value of the property:
asadmin set configs.config.${YOUR_INSTANCE_CONFIG}.security-service.auth-realm.certificate.property.common-name-as-principal-name=true| After setting the value of the property, make sure that you restart the server instance for the changes to take effect. |
Using CN as Subject in Applications
Once this feature is enabled, users can be authenticated when a valid certificate uses the common name instead of the full domain name. It is also possible to map users to roles in this directly.
For example, if user authorization roles were mapped like this in the payara-web.xml deployment descriptor:
<?xml version="1.0" encoding="UTF-8"?>
<!DOCTYPE payara-web-app PUBLIC "-//Payara.fish//DTD Payara Server 7 Servlet 6.1//EN" "https://raw.githubusercontent.com/payara/Payara-Documentation/main-7/docs/modules/ROOT/pages/Appendix/Schemas/payara-web-app_6_1-0.dtd">
<payara-web-app error-url="">
  <context-root>/health-services</context-root>
  <security-role-mapping>
    <role-name>gl</role-name>
    <principal-name>C=UK, S=lak, L=zak, O=kaz, CN=foo</principal-name>
  </security-role-mapping>
</payara-web-app>
Then the principal-name can be simplified by using only the common name like this:
<?xml version="1.0" encoding="UTF-8"?>
<!DOCTYPE payara-web-app PUBLIC "-//Payara.fish//DTD Payara Server 7 Servlet 6.1//EN" "https://raw.githubusercontent.com/payara/Payara-Documentation/main-7/docs/modules/ROOT/pages/Appendix/Schemas/payara-web-app_6_1-0.dtd">
<payara-web-app error-url="">
  <context-root>/health-services</context-root>
  <security-role-mapping>
    <role-name>gl</role-name>
    <principal-name>foo</principal-name>
  </security-role-mapping>
</payara-web-app>
Client Certificate Custom Validations
By default, the Payara Server runtime checks only if the submitted Client Certificate is present in the trust store and that it hasn’t expired already. If these conditions are met, it is accepted without any additional checks.
Custom Client Certificate Validation allows you to perform extra checks in addition to checking for the presence of the certificate in the trust store.
You can perform a check on the validity date, and use the Online Certificate Status Protocol (OCSP) to validate the certificate when it has a Certificate Revocation List entry (CRL), or lookup the DN name in a database for example, and determine based on this information if the certificate is still accepted.
Creating a Custom Validator
When you want to implement custom validation, implement the fish.payara.security.client.ClientCertificateValidator interface and define your class through the ServiceLoader mechanism.
To have the ClientCertificateValidator interface available in your application, add the payara-api artifact to your application with the provided scope. When using maven, add the following snippet if not already defined.
<dependency>
    <groupId>fish.payara.api</groupId>
    <artifactId>payara-api</artifactId>
    <version>{page-version}</version>
    <scope>provided</scope>
</dependency>
Now that you have the interface available, you can implement it in your application.
public class MyCertificateValidator implements ClientCertificateValidator {

    @Override
    public boolean isValid(Subject subject, X500Principal principal, X509Certificate certificate) {
         var isValid = true;
         //Determine if the subject is valid
         return isValid;
    }
}
The most important parameter here is the principal parameter which contains the user information contained in the Client Certificate presented in the request. The Certificate itself is in the last parameter and in the case you like to have access already to the Subject for this validation, it is passed in as the first parameter.
When you return true as the method result, the processing of the request continues. In the case false is returned, a LoginException is thrown resulting in a status 401 for the request.
This class is loaded through the Java ServiceLoader mechanism. Make sure you have the following file. META-INF/services/fish.payara.security.client.ClientCertificateValidator containing the fully qualified name of your implementation.
com.company.certificate.MyCertificateValidator
You can @Inject CDI and EJB beans in your validator implementation, however since the validator itself is not a Jakarta EE bean, @PostConstruct and @PreDestroy-annotated methods will not be called on the validator instance.
|
Certificate Expiration Validation
By default, certificate expiration validation is enabled. This validation checks if the certificates in the trust store haven’t expired yet. If the client certificate has expired or is not valid yet, a warning message will be printed in the server logs.
Configuration using the Asadmin CLI
You can use the following asadmin command to set the value of the property through:
asadmin> set configs.config.${YOUR_INSTANCE_CONFIG}.security-service.auth-realm.certificate.property.certificate-validation=[true/false]Configuration using the Admin Console
This feature can be configured on the default certificate realm as follows on the Admin Console:
-
Navigate to the applicable configuration page for your use (e.g.
server-config) under theConfigurationsoption in the side menu -
Head to
Security→Realmsand select thecertificaterealm -
Set the property
certificate-validationvalue to[true/false]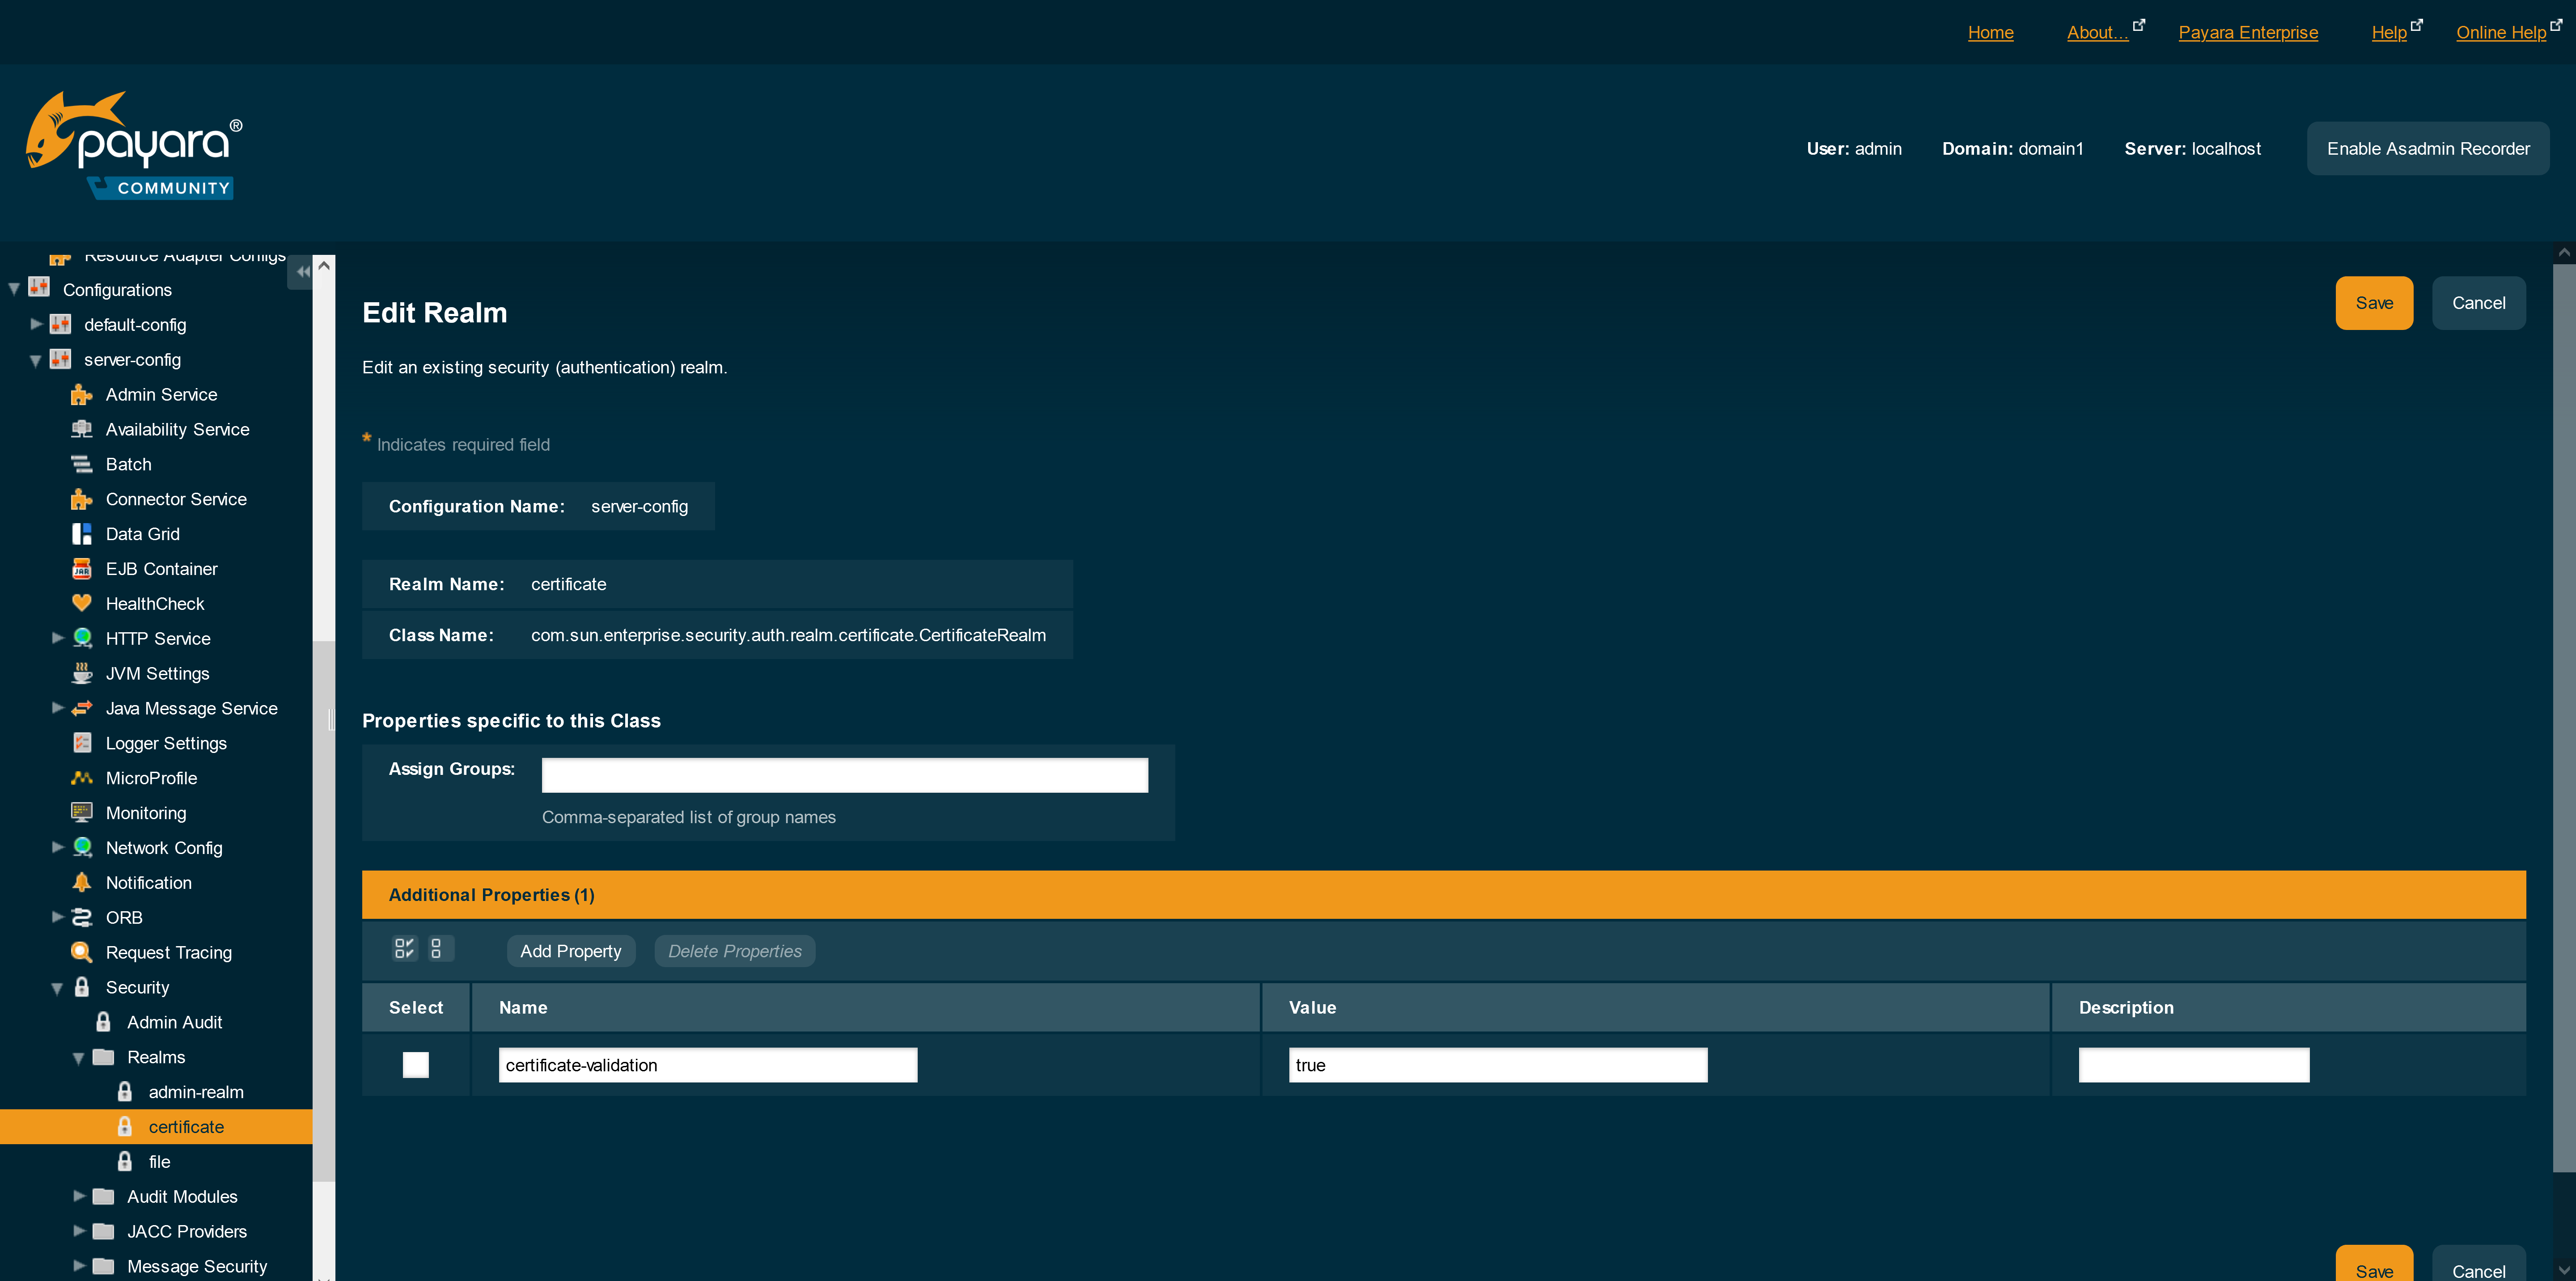
After setting the value of the property, make sure that you restart the server instance for the changes to take effect.
JCE Provider Support
Payara Server supports using the JCE framework to configure custom security providers. Custom providers can be installed statically in the JDK, via the service loader mechanism, or via the programmatic API.
| Although the provider can be changed while the server is running, this can influence other processes that already use the previous preferred provider. |
Example
The example below uses an existing provider (Bouncy Castle), to which a custom service is added programmatically. As suggested above, this is not the suggested way to do this since it is being changed dynamically. Rather, this example is here for an idea of how it could be used.
Custom Certificate Factory
public class MyJCECertificateFactory extends CertificateFactory {

    @Override
    public Certificate engineGenerateCertificate(InputStream in) throws CertificateException {
        Certificate certificate = super.engineGenerateCertificate(in);

        if (certificate instanceof X509Certificate == false) {
            return certificate;
        }

        return new MyJCEX509Certificate((X509Certificate) certificate);
    }

}
This factory is based on the CertificateFactory SPI type, but instead of implementing it fully the Bouncy Castle’s CertificateFactory is used.
The returned Certificate is then wrapped in our own. A custom certificate type might then look as follows:
public class MyJCEX509Certificate extends X509Certificate {

    private final X509Certificate certificate;

    public MyJCEX509Certificate(X509Certificate certificate) {
        this.certificate = certificate;
    }

    @Override
    public X500Principal getSubjectX500Principal() {

        var principal = certificate.getSubjectX500Principal();
        if ("C=UK,ST=lak,L=zak,O=kaz,OU=bar,CN=lfoo".equals(principal.getName())) {
            return new X500Principal("CN=u1");
        }
        return principal;
    }

    @Override
    public Principal getSubjectDN() {

        va principal = certificate.getSubjectDN();
        if ("CN=lfoo,OU=bar,O=kaz,L=zak,ST=lak,C=UK".equals(principal.getName())) {
            return new X500Principal("CN=u1");
        }
        return principal;
    }

    // Other methods omitted for brevity
}
This custom certificate is where the "principal mapping" is performed. For the example only CN=lfoo,OU=bar,O=kaz,L=zak,ST=lak,C=UK to CN=u1 is mapped though.
The example above overrides two methods. The getSubjectDN() method is actually deprecated (or denigrated as in the Certificate’s terminology), but it’s still being used. getSubjectX500Principal() is the preferred method to use.
|
Finally, the factory can be installed for example via a Servlet that we can easily ping (as mentioned, this would not normally be the advisory way to do this):
@WebServlet(urlPatterns = { "/BouncyServlet" })
public class BouncyServlet extends HttpServlet {

    private static final long serialVersionUID = 1L;

    @Override
    protected void doGet(HttpServletRequest request, HttpServletResponse response) throws ServletException, IOException {

        var provider = new BouncyCastleProvider();
        provider.put("CertificateFactory.X.509", MyJCECertificateFactory.class.getName());

        int pos = Security.insertProviderAt(provider, 1);
        response.getWriter().print("pos:" + pos);
    }
}
The above code instantiates the bouncy castle provider, and registers the previous custom certificate factory with it. In this example you can see the type and algorithm being combined into the single key for registering our factory class.
The modified provider is then inserted at provider position 1 (the first, there’s no 0), using a static method of the Security class.
After pinging this Servlet, and requesting another Servlet over HTTPS that’s protected with the client-cert authentication mechanism, a principal with name CN=lfoo,OU=bar,O=kaz,L=zak,ST=lak,C=UK will be replaced at nearly the lowest level in the system with CN=u1, and the server runtime will only see this principal name. We can use this principal name for instance to map groups and roles to it:
<payara-web-app>
    <security-role-mapping>
        <role-name>g1</role-name>
        <group-name>g1</group-name>
        <principal-name>CN=u1</principal-name>
    </security-role-mapping>
</payara-web-app>
A fully working sample demonstrating exactly this can be found in the Java EE 7 samples repo.