This chapter provides procedures for performing database connectivity tasks in the Payara Server environment.
About Database Connectivity
A database management system (DBMS) provides facilities for storing, organizing, and retrieving data. The information in databases is often described as persistent data because it is saved on disk and exists after the application process ends. Most business applications store data in relational databases. Applications can access database information by using the Java Database Connectivity (JDBC) API.
The key elements of database connectivity are the following:
-
Database. The repository where data is stored for an enterprise. Jakarta EE applications access relational databases through the JDBC API. For administration procedures, see Setting Up the Database.
-
JDBC Connection Pool. A JDBC connection pool is a group of reusable connections for a particular database. For administration procedures, see Administering JDBC Connection Pools.
-
JDBC Resource. A JDBC resource (data source) provides applications with a means of connecting to a database. To create a JDBC resource, specify the connection pool with which it is associated. Multiple JDBC resources can specify a single connection pool. A JDBC resource is identified by its Java Naming and Directory Interface (JNDI) name. For administration procedures, see Administering JDBC Resources.
-
JDBC Driver. A database driver is a software component that enables a Java application to interact with a database connectivity API . Each database requires its own driver. For administration procedures, see Integrating the JDBC Driver.
At runtime, the following sequence occurs when an application connects to a database:
-
The application gets the JDBC resource associated with the database by making a call through the JNDI API.
Using the JNDI name of the resource, the naming and directory service locates the JDBC resource. Each JDBC resource specifies a connection pool. -
Using the JDBC resource, the application gets a database connection.
Payara Server retrieves a physical connection from the connection pool that corresponds to the database. The pool defines connection attributes such as the database name (URL), username, and password. -
After the database connection is established, the application can read, modify, and add data to the database.
The application accesses the database by making calls to the JDBC API. The JDBC driver translates the application’s JDBC calls into the protocol of the database server. -
When the application is finished accessing the database, the application closes the connection and returns the connection to the connection pool.
Setting Up the Database
Most applications use relational databases to store, organize, and retrieve data. Applications access relational databases through the Java Database Connectivity (JDBC) API.
To Install the Database and Database Driver
-
Install a compatible JDBC relational database product.
-
Install a supported JDBC driver for the database product.
For a list of drivers supported by Payara Server, see Configuration Specifics for JDBC Drivers.
-
Make the JDBC driver JAR file accessible to the domain administration server (DAS).
-
Create the database. The application provider usually delivers scripts for creating and populating the database.
Next Steps
You are now ready to create a connection pool for the database, and a JDBC resource that points to the connection pool. See To Create a JDBC Connection Pool and To Create a JDBC Resource. The final step is to integrate the JDBC driver into an administrative domain as described in Integrating the JDBC Driver.
To Start the Database
Payara Server includes an implementation of the H2 Database, however, you can use any JDBC-compliant database. The database is not started automatically when you start Payara Server, so if you have applications that require a database, you need to start H2 database manually by using the local start-database subcommand.
Start the database by using the start-database subcommand.
When the database server starts, or a client connects to it successfully, the following files are created at the location that is specified by the --dbhome option:
-
The
h2.logfile contains the database server process log along with its standard output and standard error information. -
The database files contain your schema (for example, database tables).
Example 11-1 To Start a Database
This example starts the H2 database on the host host1 and port 5001.
asadmin> start-database --dbhost=localhost --dbport=5001
Starting database in Network Server mode on host localhost and port 5001.
tcp://192.168.0.110:5001
Starting database in the background.
Log redirected to C:\payara-server\_WORKDIR\6.2022.2\payara6\glassfish\databases\h2.log.
Command start-database executed successfully.
You can also view the full syntax and options of the subcommand by typing asadmin help start-database at the command line.
To Stop the Database
Use the local stop-database subcommand to stop the H2 database on a specified port. A single host can have multiple database server processes running on different ports.
-
If necessary, notify users that the database is being stopped.
-
Stop the database by using the
stop-databasesubcommand.
Troubleshooting
For a laptop that roams between networks, you might have trouble shutting down the database. If you start the H2 database and then change your IP address, you will not be able to stop the H2 database unless you add a specific --dbhost argument. For example, if you run asadmin start-database dbhost = 0.0.0.0, and then disconnect Ethernet and switch to Wi-Fi, you should run a command similar to the following to stop the database:
asadmin> stop-database dbhost localhostYou can also view the full syntax and options of the subcommand by typing asadmin help stop-database at the command line.
H2 Database documentation
For further details on how to configure the embedded H2 database you can visit the following: H2 Database Documentation.
Configuring Access to the Database
After establishing the database, you are ready to set up access for Payara Server applications. The high-level steps include creating a JDBC connection pool, creating a JDBC resource for the connection pool, and integrating a JDBC driver into an administrative domain.
Administering JDBC Connection Pools
A JDBC connection pool is a group of reusable connections for a particular database. Because creating each new physical connection is time-consuming, Payara Server maintains a pool of available connections. When an application requests a connection, it obtains one from the pool. When an application closes a connection, the connection is returned to the pool. JDBC connection pools can be globally accessible or be scoped to an enterprise application, web module, EJB module, connector module or application client module, as described in "Application-Scoped Resources" in the Payara Server Application Deployment section.
A JDBC resource is created by specifying the connection pool with which the resource is associated. Multiple JDBC resources can specify a single connection pool. The properties of connection pools can vary with different database vendors. Some common properties are the database name (URL), the username, and the password.
To Create a JDBC Connection Pool
It is possible to create a JDBC connection pool using administration commands or on the web administration console.
Using administration commands
Use the create-jdbc-connection-pool subcommand in remote mode to register a new JDBC connection pool with the specified JDBC connection pool name. A JDBC connection pool or a connector connection pool can be created with authentication. You can either use a subcommand option to specify user, password, or other connection information using the asadmin utility, or specify the connection information in the XML descriptor file.
One connection pool is needed for each database, possibly more depending on the application. When you are building the connection pool, certain data specific to the JDBC driver and the database vendor is required. You can find some of the following specifics in Configuration Specifics for JDBC Drivers:
-
Database vendor name
-
Resource type, such as
javax.sql.DataSource(local transactions only)javax.sql.XADataSource(global transactions) -
Data source class name
-
Required properties, such as the database name (URL), username, and password
Creating a JDBC connection pool is a dynamic event and does not require server restart. However, there are some parameters that do require server restart. See Configuration Changes That Require Restart.
Before You Begin
Before creating the connection pool, you must first install and integrate the database and its associated JDBC driver. For instructions, see Setting Up the Database.
-
Ensure that the server is running.
Remote subcommands require a running server. -
Create the JDBC connection pool by using the
create-jdbc-connection-poolsubcommand. -
If needed, restart the server. Some parameters require server restart. See Configuration Changes That Require Restart.
Example 11-3 To Create a JDBC Connection Pool
This example creates a JDBC connection pool named sample_derby_pool on localhost.
asadmin> create-jdbc-connection-pool --datasourceclassname org.apache.derby.jdbc.ClientDataSource --restype javax.sql.XADataSource --property portNumber=1527:password=APP:user=APP:serverName=localhost:databaseName=sun-appserv-samples:connectionAttributes=\;create\\=true sample_derby_pool

Command create-jdbc-connection-pool executed successfully.
You can also view the full syntax and options of the subcommand by typing asadmin help create-jdbc-connection-pool at the command line.
Using Admin Console
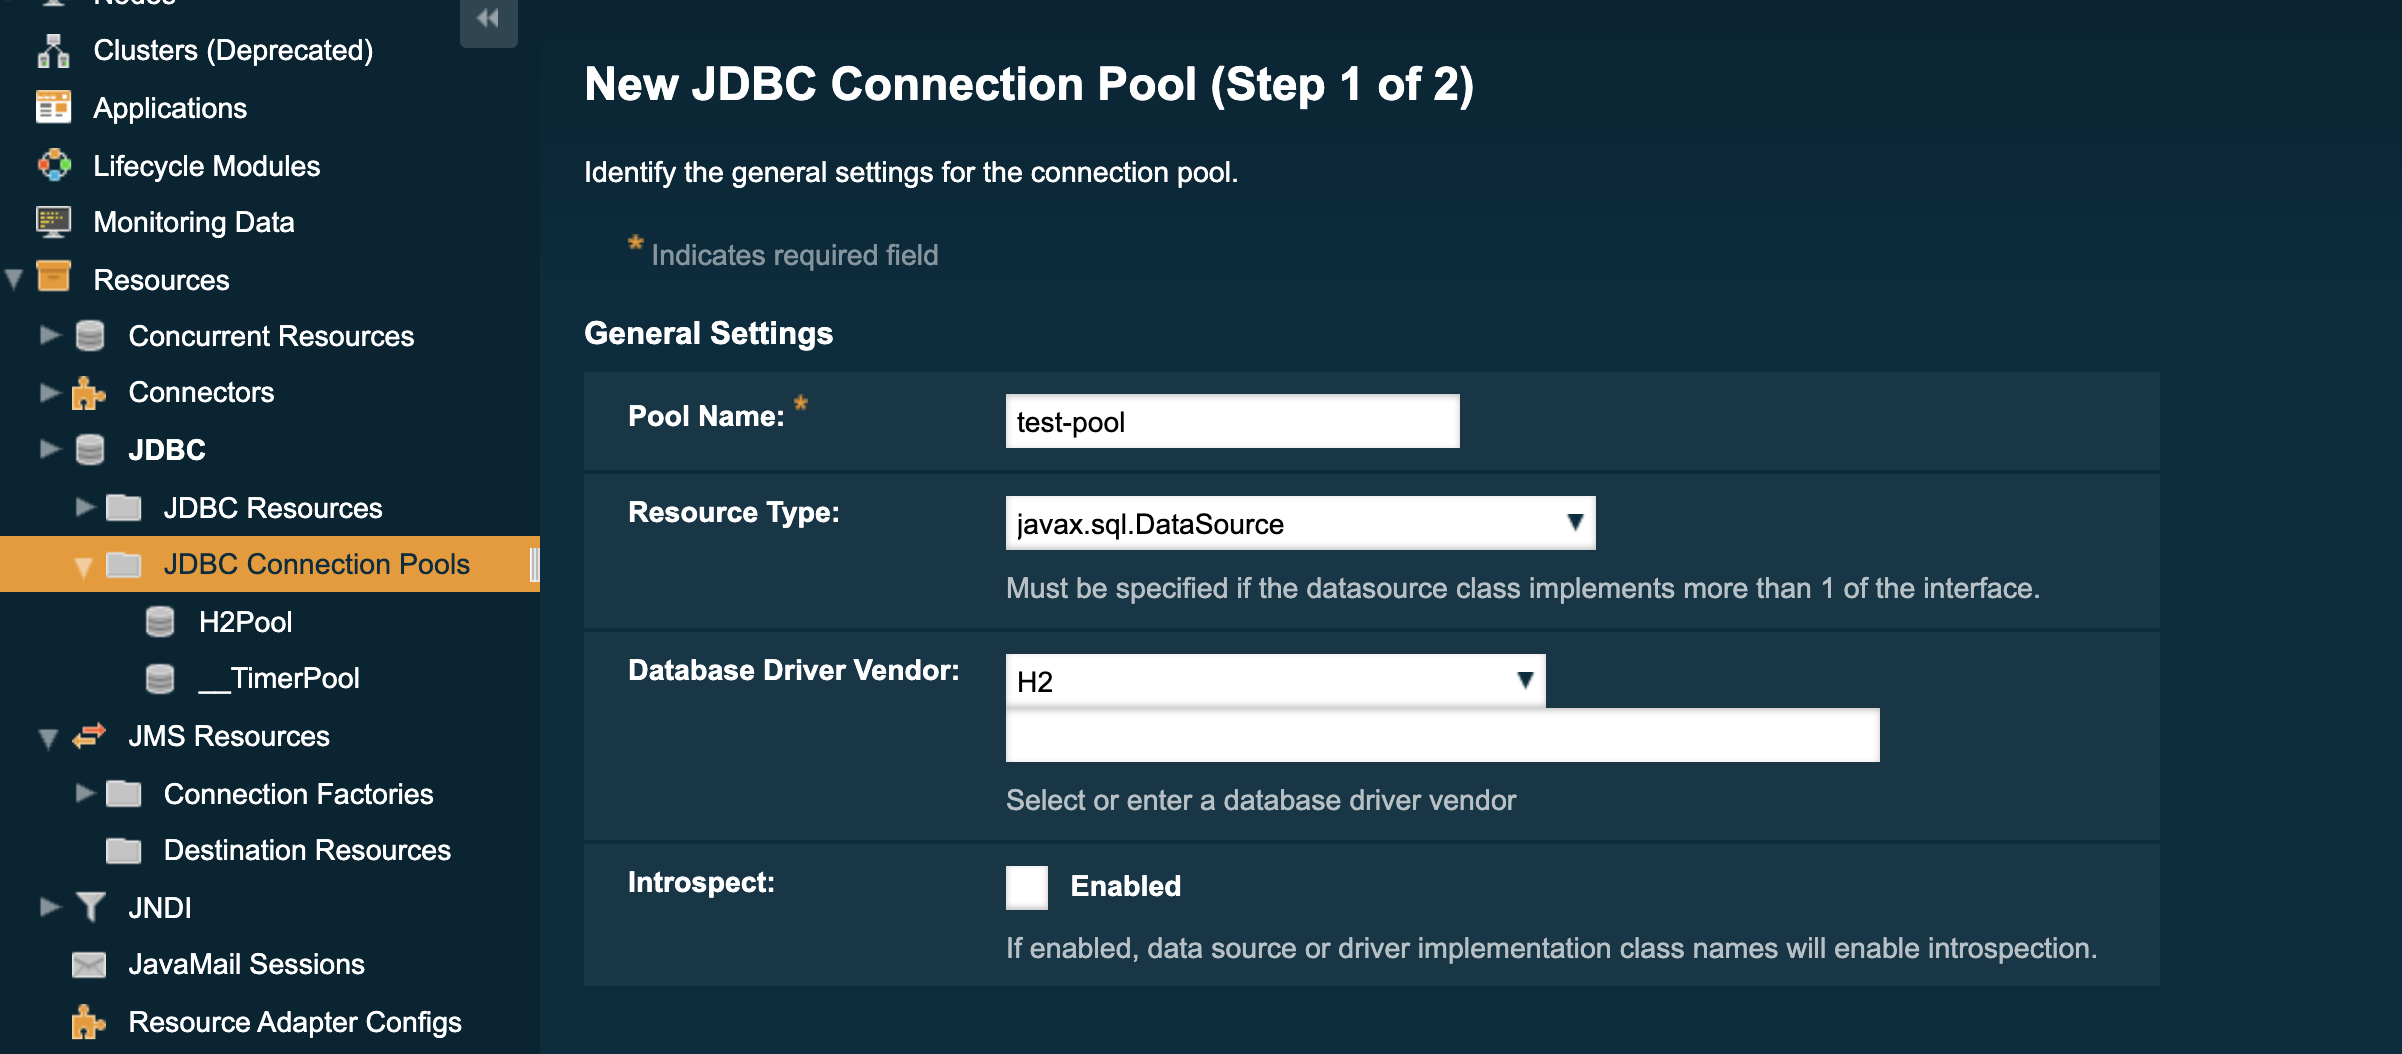
In the left hand panel of the Admin console go to Resources → JDBC → JDBC Connection Pools
Click the New button and enter the following values:
| Setting Name | Value |
|---|---|
Pool Name |
test-pool |
Resource Type |
|
Driver Vendor |
(value for the driver, e.g. Derby30 for a Derby DB, MySQL for a MySQL DB) |
Click Next and then click Finish on the next screen, accepting the default values.
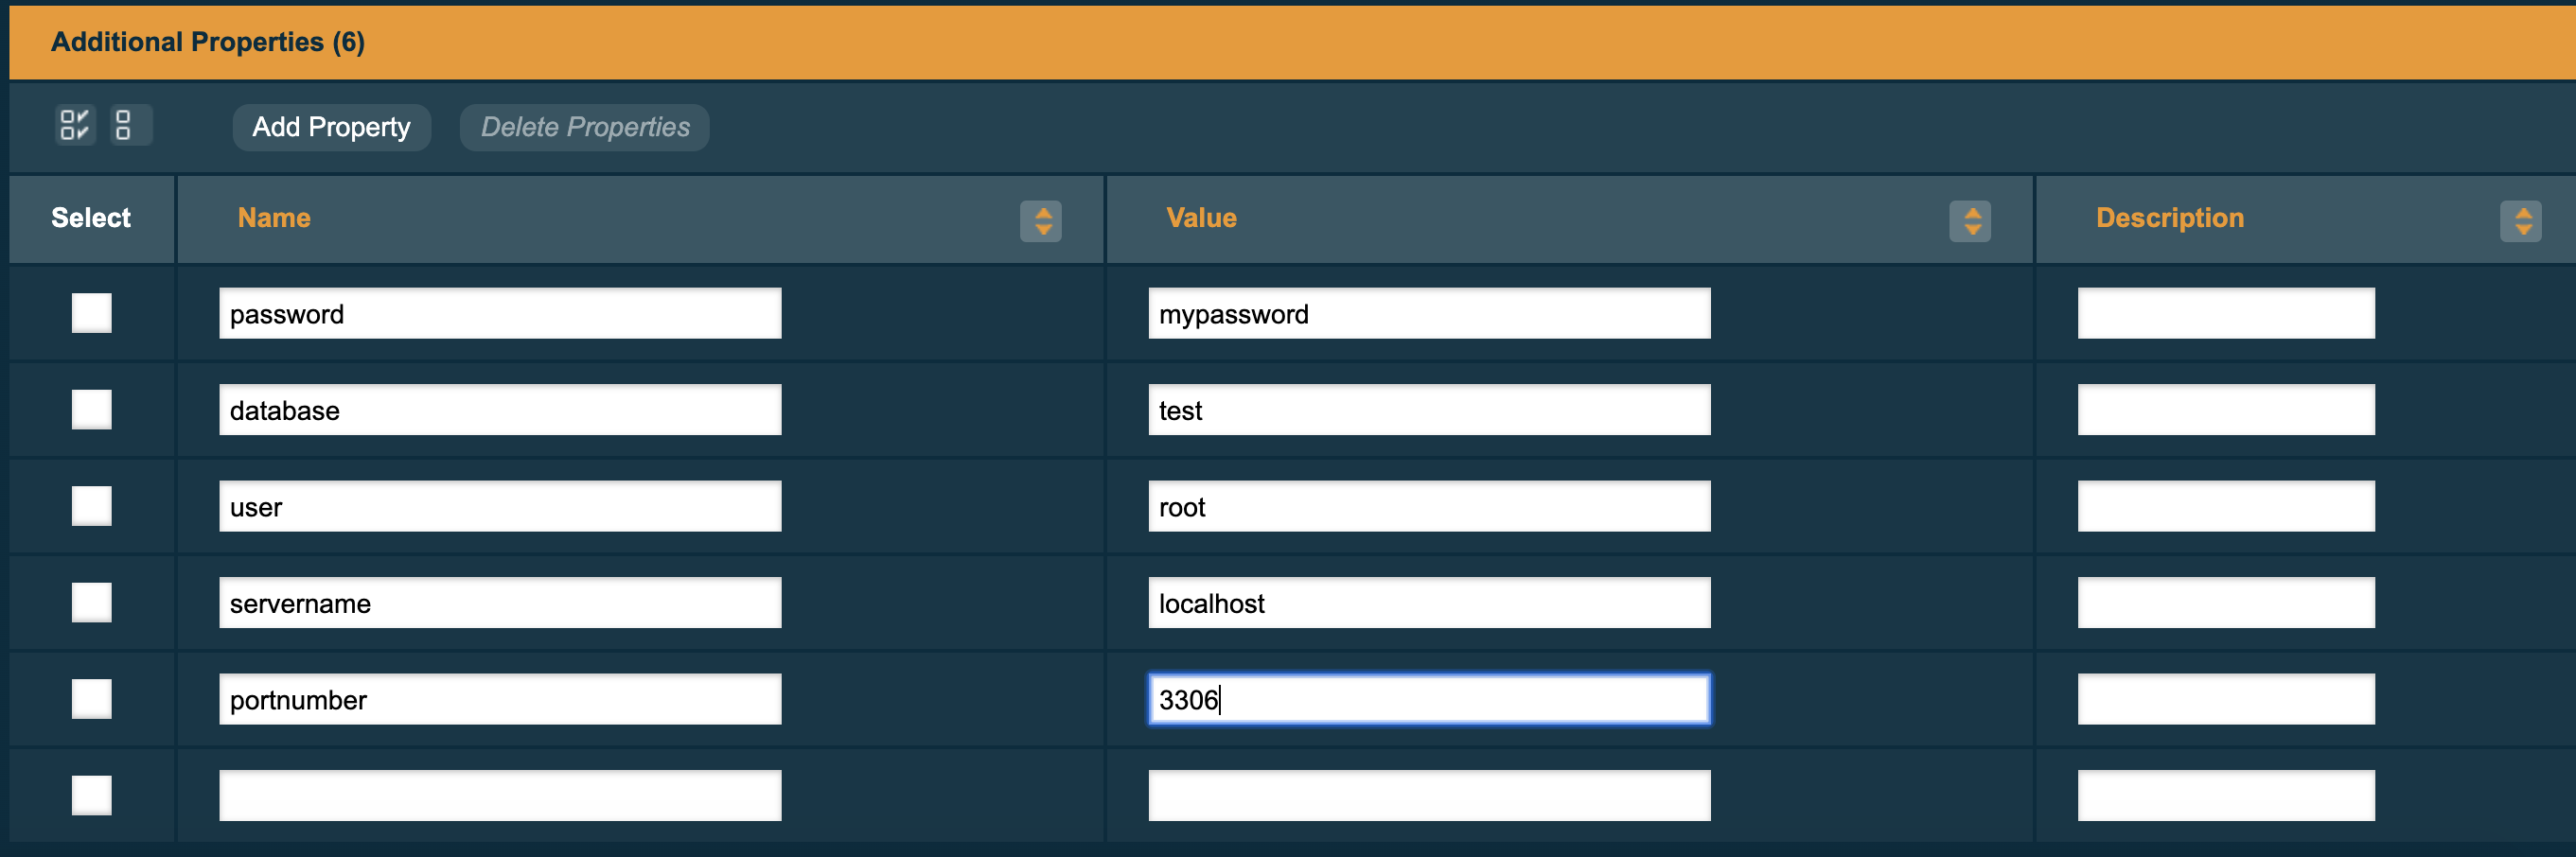
Add the following properties to the connection pool by going to the Additional Properties tab of the connection pool:
| Setting name | Value | Description |
|---|---|---|
PortNumber |
3306 |
Database port |
Password |
|
Database password |
User |
root |
Database user |
serverName |
localhost |
Database address |
DatabaseName |
test |
Name of the database |
connectionAttributes |
Other connection attributes (supported by the JDBC driver) |
To test the connection attributes, go back to the General tab and click the Ping button at the top of the screen. You should see a message stating that the ping succeeded.
To List JDBC Connection Pools
Use the list-jdbc-connection-pools subcommand in remote mode to list all existing JDBC connection pools.
-
Ensure that the server is running. Remote subcommands require a running server.
-
List the JDBC connection pools by using the
list-jdbc-connection-poolssubcommand.
Example 11-4 To List a JDBC Connection Pool
This example lists the JDBC connection pools that are on localhost.
asadmin> list-jdbc-connection-pools
sample_derby_pool2
poolA
__TimerPool
H2Pool
sample_derby_pool
Command list-jdbc-connection-pools executed successfully.
You can also view the full syntax and options of the subcommand by typing asadmin help list-jdbc-connection-pools at the command line.
To Contact (Ping) a Connection Pool
Use the ping-connection-pool subcommand in remote mode to test if a connection pool is usable. For example, if you create a new JDBC connection pool for an application that is expected to be deployed later, you can test the JDBC pool with this subcommand before the application is deployed.
| Running a ping will force the creation of the pool if it hasn’t already been created. |
Before You Begin
Before you can contact a connection pool, the connection pool must be created with authentication, and the server or database must be running.
-
Ensure that the server is running. Remote subcommands require a running server.
-
Ping a connection pool by using the
ping-connection-poolsubcommand.
Example 11-5 To Contact (Ping) a Connection Pool
This example tests to see if the DerbyPool connection pool is usable.
asadmin> ping-connection-pool DerbyPool
Command ping-connection-pool executed successfully
You can also view the full syntax and options of the subcommand by typing asadmin help ping-connection-pool at the command line.
You can also specify that a JDBC connection pool is automatically tested when created or reconfigured by setting its --ping option to true(the default is false). See To Create a JDBC ConnectionPool or To Update a JDBC Connection Pool.
To Reset (Flush) a Connection Pool
Use the flush-connection-pool in remote mode to reinitialize all connections established in the specified connection pool without the need for reconfiguring the pool. Connection pool reconfiguration can result in application redeployment, which is a time-consuming operation.
The JDBC connection pool or connector connection pool is reset to its initial state. Any existing live connections are destroyed, which means that the transactions associated with these connections are lost and must be retried. The subcommand then recreates the initial connections for the pool, and restores the pool to its steady pool size.
-
Ensure that the server is running. Remote subcommands require a running server.
-
Reset a connection pool by using the
flush-connection-poolsubcommand.
Example 11-6 Resetting (Flushing) a Connection Pool
This example resets the JDBC connection pool named __TimerPool to its steady pool size.
asadmin> flush-connection-pool __TimerPool
Command flush-connection-pool executed successfully.
You can also view the full syntax and options of the subcommand by typing asadmin help flush-connection-pool at the command line.
To Update a JDBC Connection Pool
You can change all settings for an existing pool except its name. Use the get and set subcommands to view and change the values of the JDBC connection pool properties.
-
List the JDBC connection pools by using the
list-jdbc-connection-poolssubcommand. -
View the attributes of the JDBC connection pool by using the get subcommand.
For example:
asadmin get resources.jdbc-connection-pool.H2Pool.property -
Set the attribute of the JDBC connection pool by using the
setsubcommand.For example:
asadmin set resources.jdbc-connection-pool.H2Pool.steady-pool-size=9 -
If needed, restart the server.
Some parameters require server restart. See
Configuration Changes That Require Restart.
Connection pool sizing
Connection pools should be sized to cater for the maximum number of concurrent connections.
The maximum size should be set in accordance with the maximum number of client requests your system or application can process. If your application receives 100 requests and each of those requires a database connection then if your connection pool is anything less than 100 some of those requests will have to wait for a connection to either be created or become available.
The minimum size of the connection pool ensures that a number of connections to the database are always established - this means that if you have a pool with a minimum size of 10, and you receive 10 requests then all can retrieve a database connection without waiting for the pool to create a new connection.
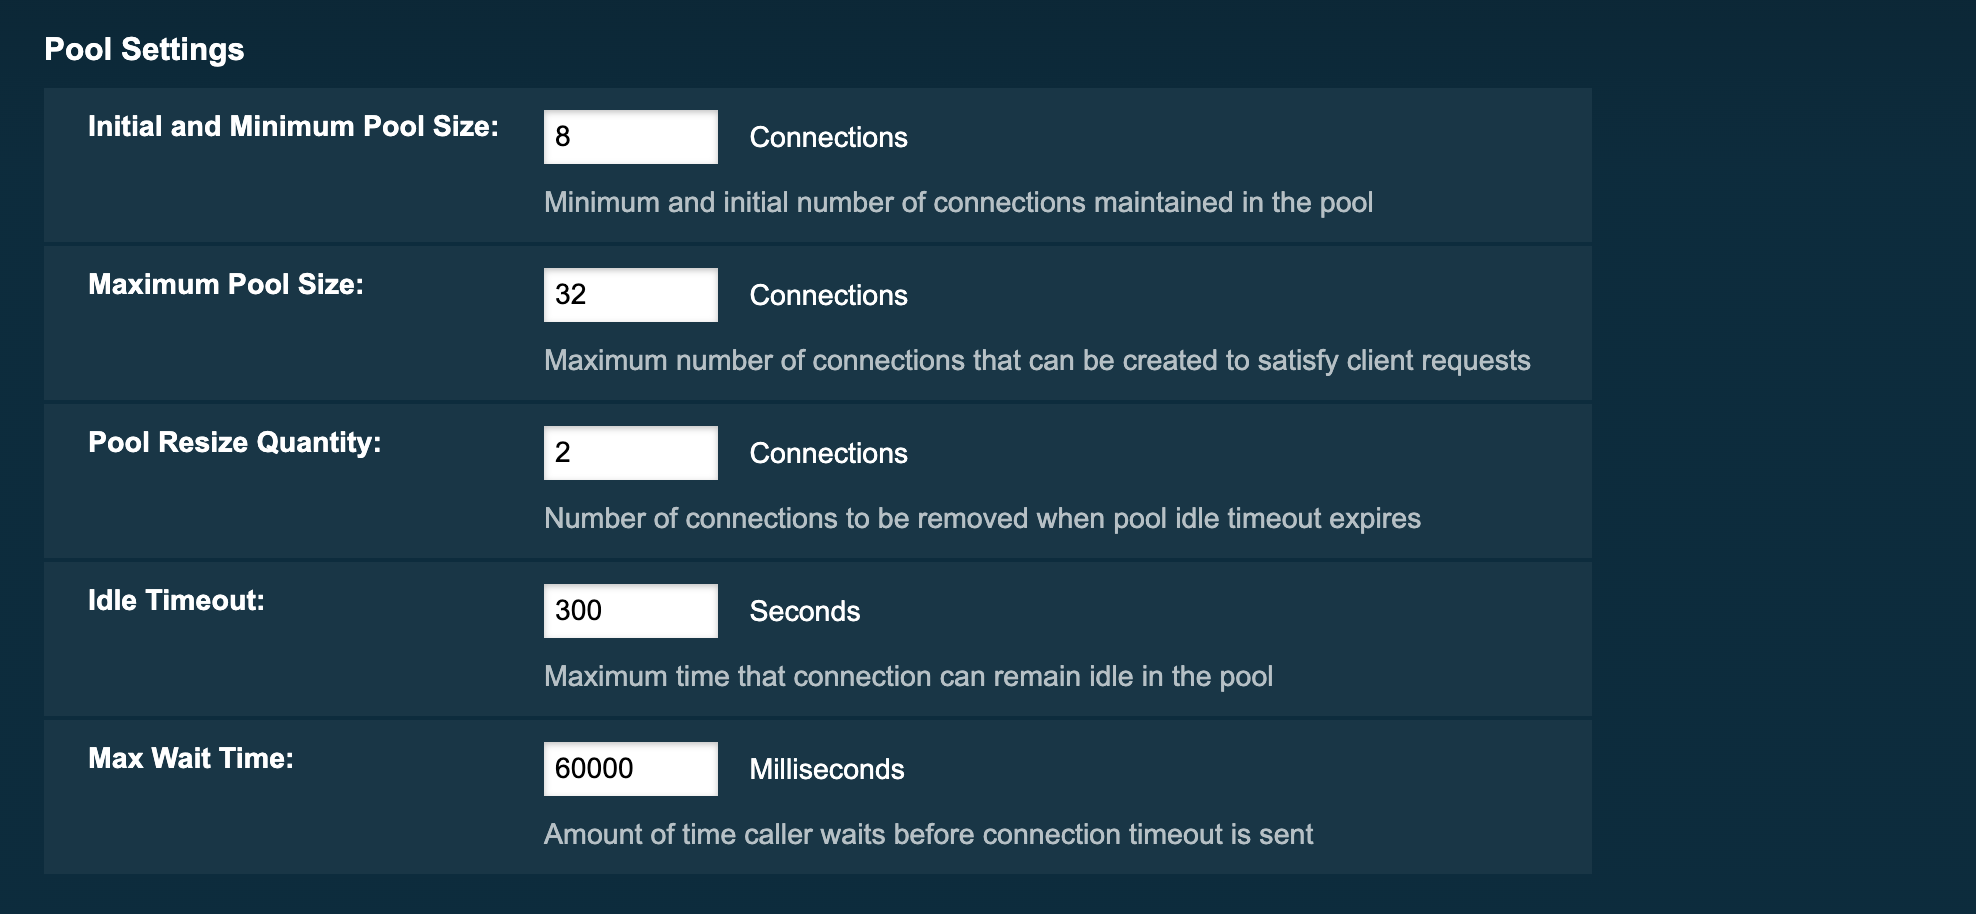
Setting the sizes using the admin console
Click on the connection pool name and under the Pool Settings section you will find Initial and Minimum Pool Size and Maximum Pool Size. Set these to your required sizes:
Setting the sizes using administration commands
To set the initial and minimum pool size (to the value of 10 for example), use the following administration commands:
asadmin> set resources.jdbc-connection-pool.test-pool.steady-pool-size=10To set the maximum pool size (to the value of 200 for example), use the following administration commands:
asadmin> set resources.jdbc-connection-pool.test-pool.max-pool-size=200Connection validation
Connection validation ensures that connections aren’t assigned to your application after the connection has already gone stale.
Connection validation is always a trade-off between how sure you want to be that a connection is valid and the performance impact that the validation mechanism can exert into application that use the pool. There will be a negative performance impact by having to return an invalid connection by your application and borrow a new one, so finding the right balance is key.
Before using a connection from the pool a simple query is sent to test the connection. If there is an issue with the connection, it is removed from the pool and another one is used. If you have an issue such as the database being down, and you have a large number of connections then each of those connections will be tested and removed.
In order to avoid this, you can set a connection validation so that if a connection fails, all remaining open connections are closed.
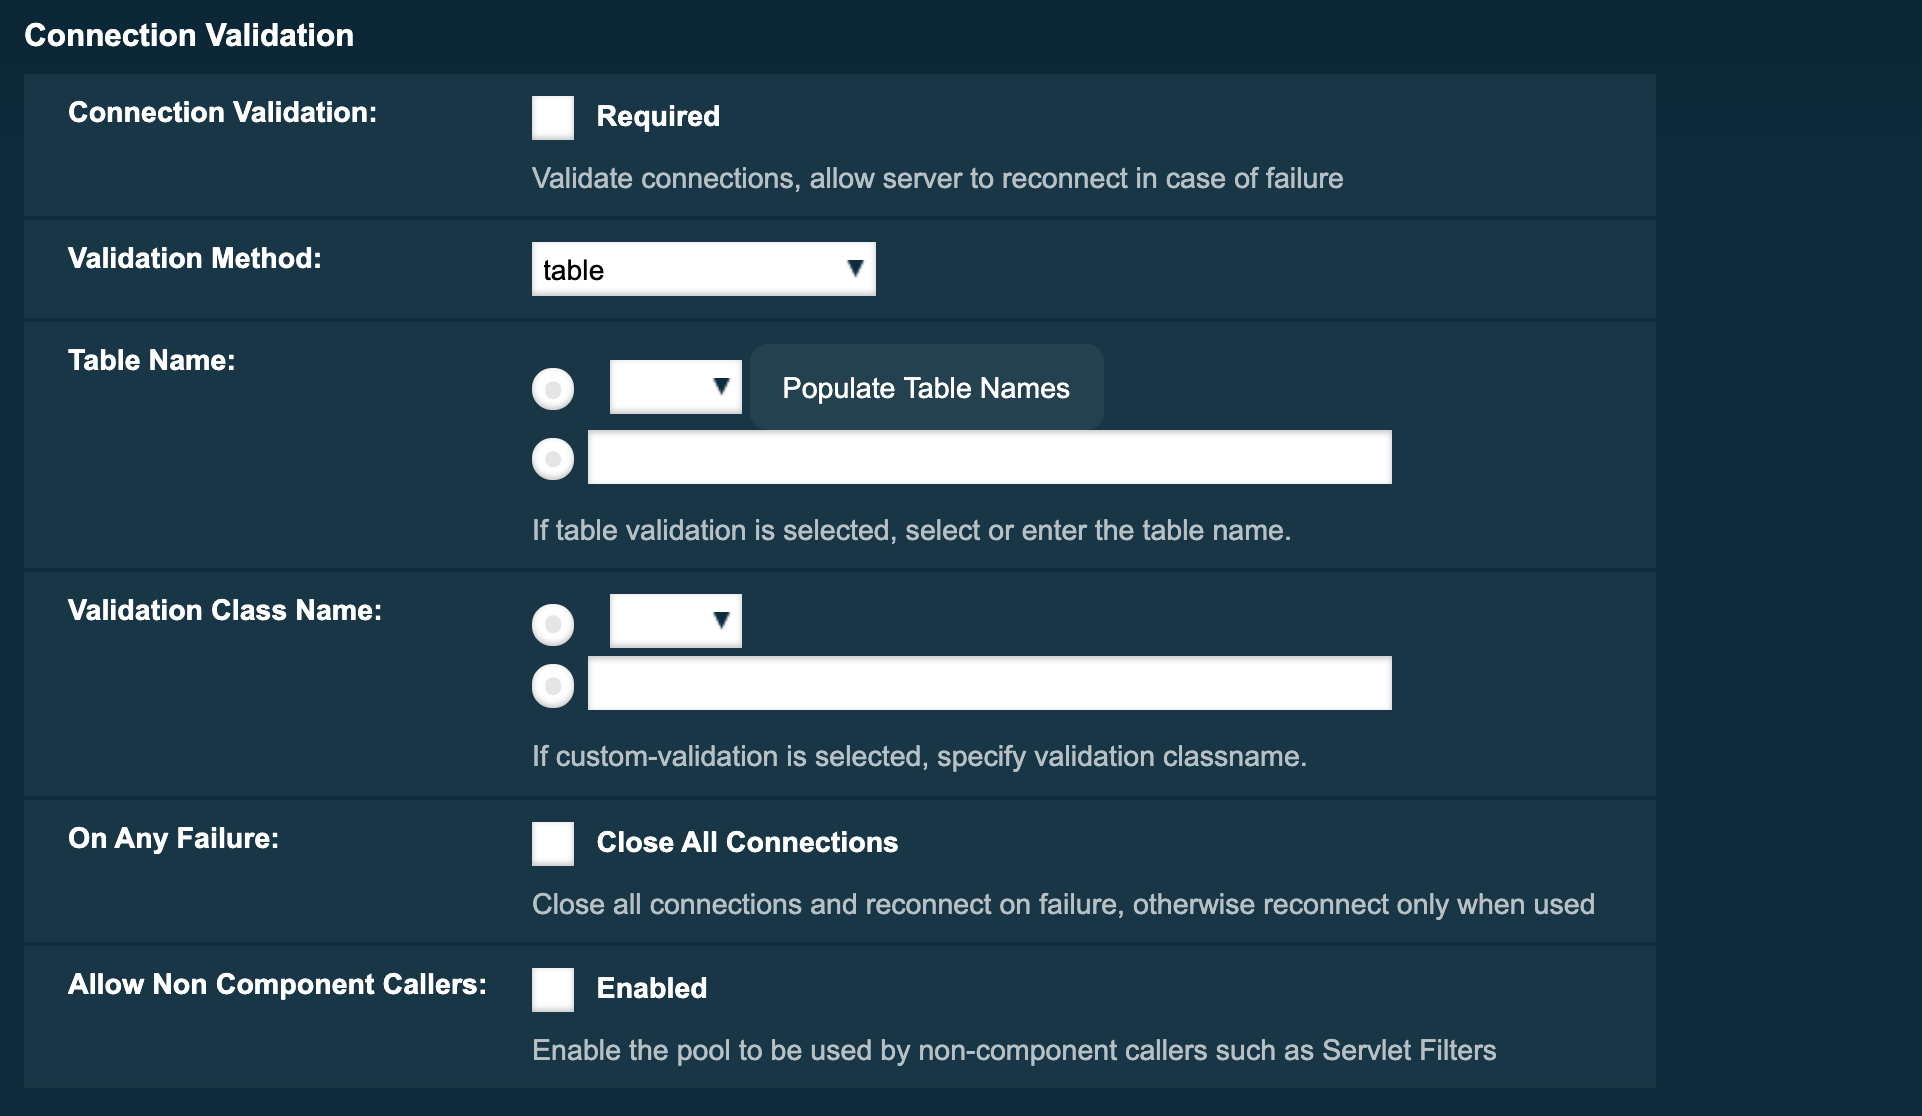
Set up the validation using the admin console
-
Click on the name of the connection pool
-
Select the Advanced tab
-
Scroll down to the Connection Validation section and select the following settings:
-
Connection Validation required
-
Validation method - custom-validation
-
Validation class name – a proper class name for the chosen JDBC driver, such as
org.glassfish.api.jdbc.validation.DerbyConnectionValidationfor a Derby DB
-
From the same screen, you can also set whether to close all connections on failure.
Additional information regarding enabling connection validation through 'asadmin' commands, along with various options, is elaborated in the the Handling Invalid Connections section of our Payara Server Application Development JDBC documentation.
To Delete a JDBC Connection Pool
Use the delete-jdbc-connection-pool subcommand in remote mode to delete an existing JDBC connection pool. Deleting a JDBC connection pool is a dynamic event and does not require server restart.
Before You Begin
Before deleting a JDBC connection pool, all associations to the resource must be removed.
-
Ensure that the server is running. Remote subcommands require a running server.
-
List the JDBC connection pools by using the
list-jdbc-connection-poolssubcommand. -
If necessary, notify users that the JDBC connection pool is being deleted.
-
Delete the connection pool by using the
delete-jdbc-connection-poolsubcommand.
Example 11-7 To Delete a JDBC Connection Pool
This example deletes the JDBC connection pool named H2Pool.
asadmin> delete-jdbc-connection-pool jdbc/H2Pool
Command delete-jdbc-connection-pool executed successfully.
You can also view the full syntax and options of the subcommand by typing asadmin help delete-jdbc-connection-pool at the command line.
Configuring Specific JDBC Connection Pool Features
In Payara Server, JDBC Connection Pools support a variety of features to simplify administration, monitoring and performance tuning.
Transparent Pool Reconfiguration
When the properties or attributes of a JDBC connection pool are changed, the connection pool is destroyed and re-created. Normally, applications using the connection pool must be redeployed as a consequence. This restriction can be avoided by enabling transparent JDBC connection pool reconfiguration. When this feature is enabled, applications do not need to be redeployed. Instead, requests for new connections are blocked until the reconfiguration operation completes. Connection requests from any in-flight transactions are served using the old pool configuration to complete the transaction. Then, connections are created using the pool’s new configuration, and any blocked connection requests are served with connections from the re-created pool.
To enable transparent JDBC connection pool reconfiguration, set the dynamic-reconfiguration-wait-timeout-in-seconds property of the JDBC connection pool to a positive, nonzero value in one of the following ways:
-
Add it as a property in the Edit JDBC Connection Pool Properties page in the Administration Console.
-
Specify it using the
--propertyoption in thecreate-jdbc-connection-poolsubcommand. For more information, seecreate-jdbc-connection-pool. -
Set it using the
setsubcommand. For example:asadmin set resources.jdbc-connection-pool.pool-name.property.dynamic-reconfiguration-wait-timeout-in-seconds=15
This property specifies the time in seconds to wait for in-use connections to close and in-flight transactions to complete. Any connections in use or transaction in flight past this time must be retried.
Using an Initialization Statement
You can specify a statement that executes each time a physical connection to the database is created (not reused) from a JDBC connection pool. This is useful for setting request or session specific properties and is suited for homogeneous requests in a single application. Set the Init SQL attribute of the JDBC connection pool to the SQL string to be executed in one of the following ways:
-
Enter an Init SQL value in the Edit Connection Pool Advanced Attributes page in the Administration Console.
-
Specify the
--initsqloption in theasadmin create-jdbc-connection-poolcommand. For more information, seecreate-jdbc-connection-pool. -
Specify the
init-sqloption in theasadmin setcommand. For example:asadmin set domain1.resources.jdbc-connection-pool.H2Pool.init-sql="sql-string"
Setting a Statement Timeout
An abnormally long-running JDBC query executed by an application may leave it in a hanging state unless a timeout is explicitly set on the statement. Setting a statement timeout guarantees that all queries automatically time out if not completed within the specified period.
When statements are created, the queryTimeout is set according to the statement timeout setting. This works only when the underlying JDBC driver supports queryTimeout for Statement, PreparedStatement, CallableStatement, and ResultSet.
You can specify a statement timeout in the following ways:
-
Enter a Statement Timeout value in the Edit Connection Pool Advanced Attributes page in the Administration Console.
-
Specify the
--statementtimeoutoption in theasadmin create-jdbc-connection-poolcommand. For more information, seecreate-jdbc-connection-pool.
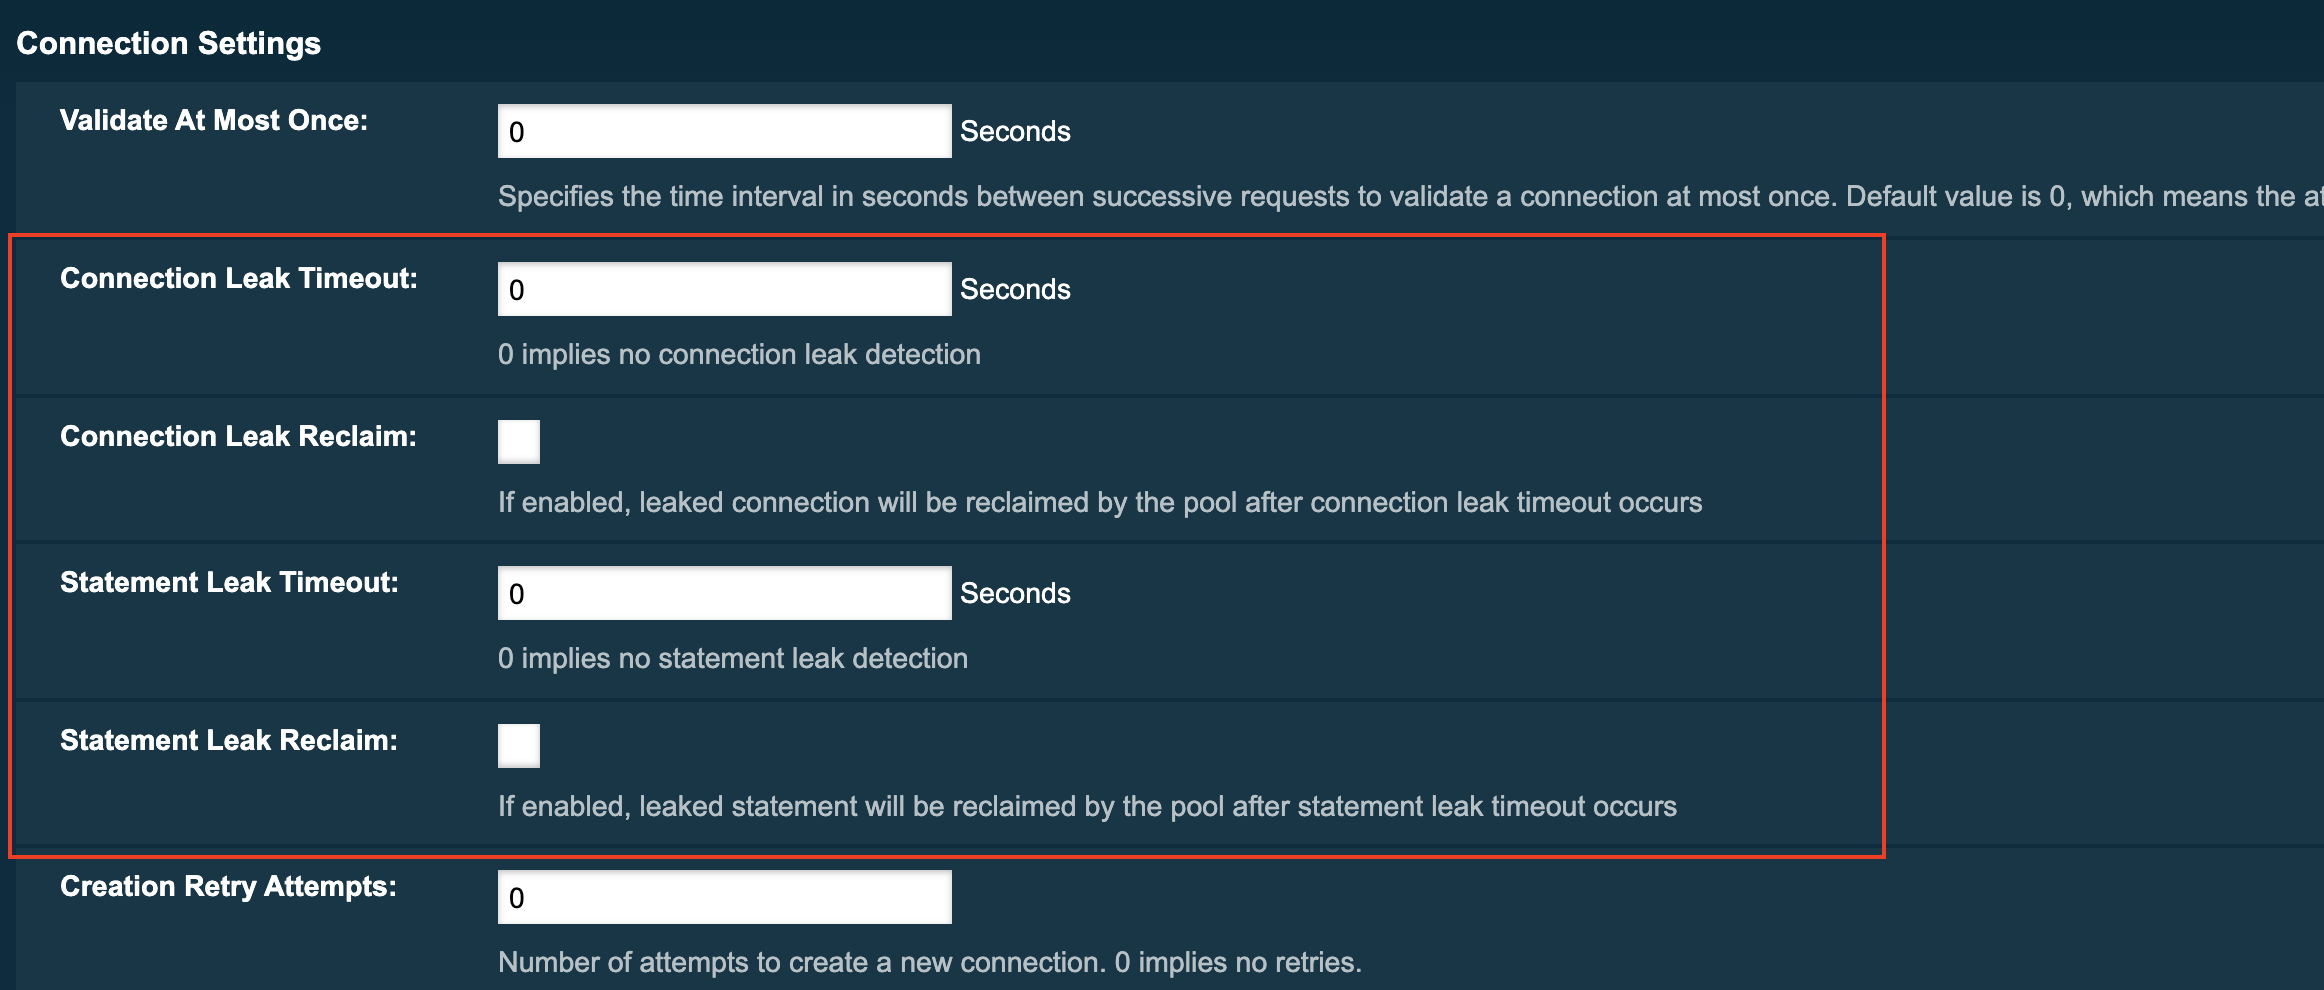
Statement and Connection Leak Detection and Reclamation
This feature allows you to set specific time-outs so that if SQL statements or JDBC connections haven’t been closed by an application (potentially leading to a memory leak) they can be logged and/or closed.
If statements are not closed by an application after use, it is possible for the application to run out of cursors. Enabling statement leak detection causes statements to be considered as leaked if they are not closed within a specified period. Additionally, leaked statements can be reclaimed automatically.
By default, these values are set to 0 meaning this detection feature is turned off.
| When working on a test or staging environment, it is recommended that leaks are logged after a short timeout but not closed. On production environments, it is recommended that leaks are closed and all logged leaks are monitored instead. |
When selecting a value for Statement Leak Timeout In Seconds, make sure that:
-
It is less than the Connection Leak Timeout; otherwise, the connection could be closed before the statement leak is recognized.
-
It is greater than the Statement Timeout; otherwise, a long-running query could be mistaken as a statement leak.
Configuring Leak Detection using the admin console
-
Click on the name of the JDBC connections pool
-
Select the Advanced tab
-
Scroll down to Connection Settings
-
Set the Connection Leak Timeout and Statement Leak Timeout value in seconds
Configuring Leak Detection using administration commands
You also can set the time-out values using the following asadmin commands:
asadmin> set resources.jdbc-connection-pool.test-pool.statement-leak-timeout-in-seconds=5
asadmin> set resources.jdbc-connection-pool.test-pool.connection-leak-timeout-in-seconds=5
You can turn on reclaiming of the leaking resources with the following commands:
asadmin> set resources.jdbc-connection-pool.DerbyPool.connection-leak-reclaim=true
asadmin> setresources.jdbc-connection-pool.DerbyPool.statement-leak-reclaim=true
Once these values are set, if connection or statement leaks are detected, you will see messages similar to the example below in the application log:
WARNING: A potential connection leak detected for connection pool test-pool. The stack trace of the thread is provided below:
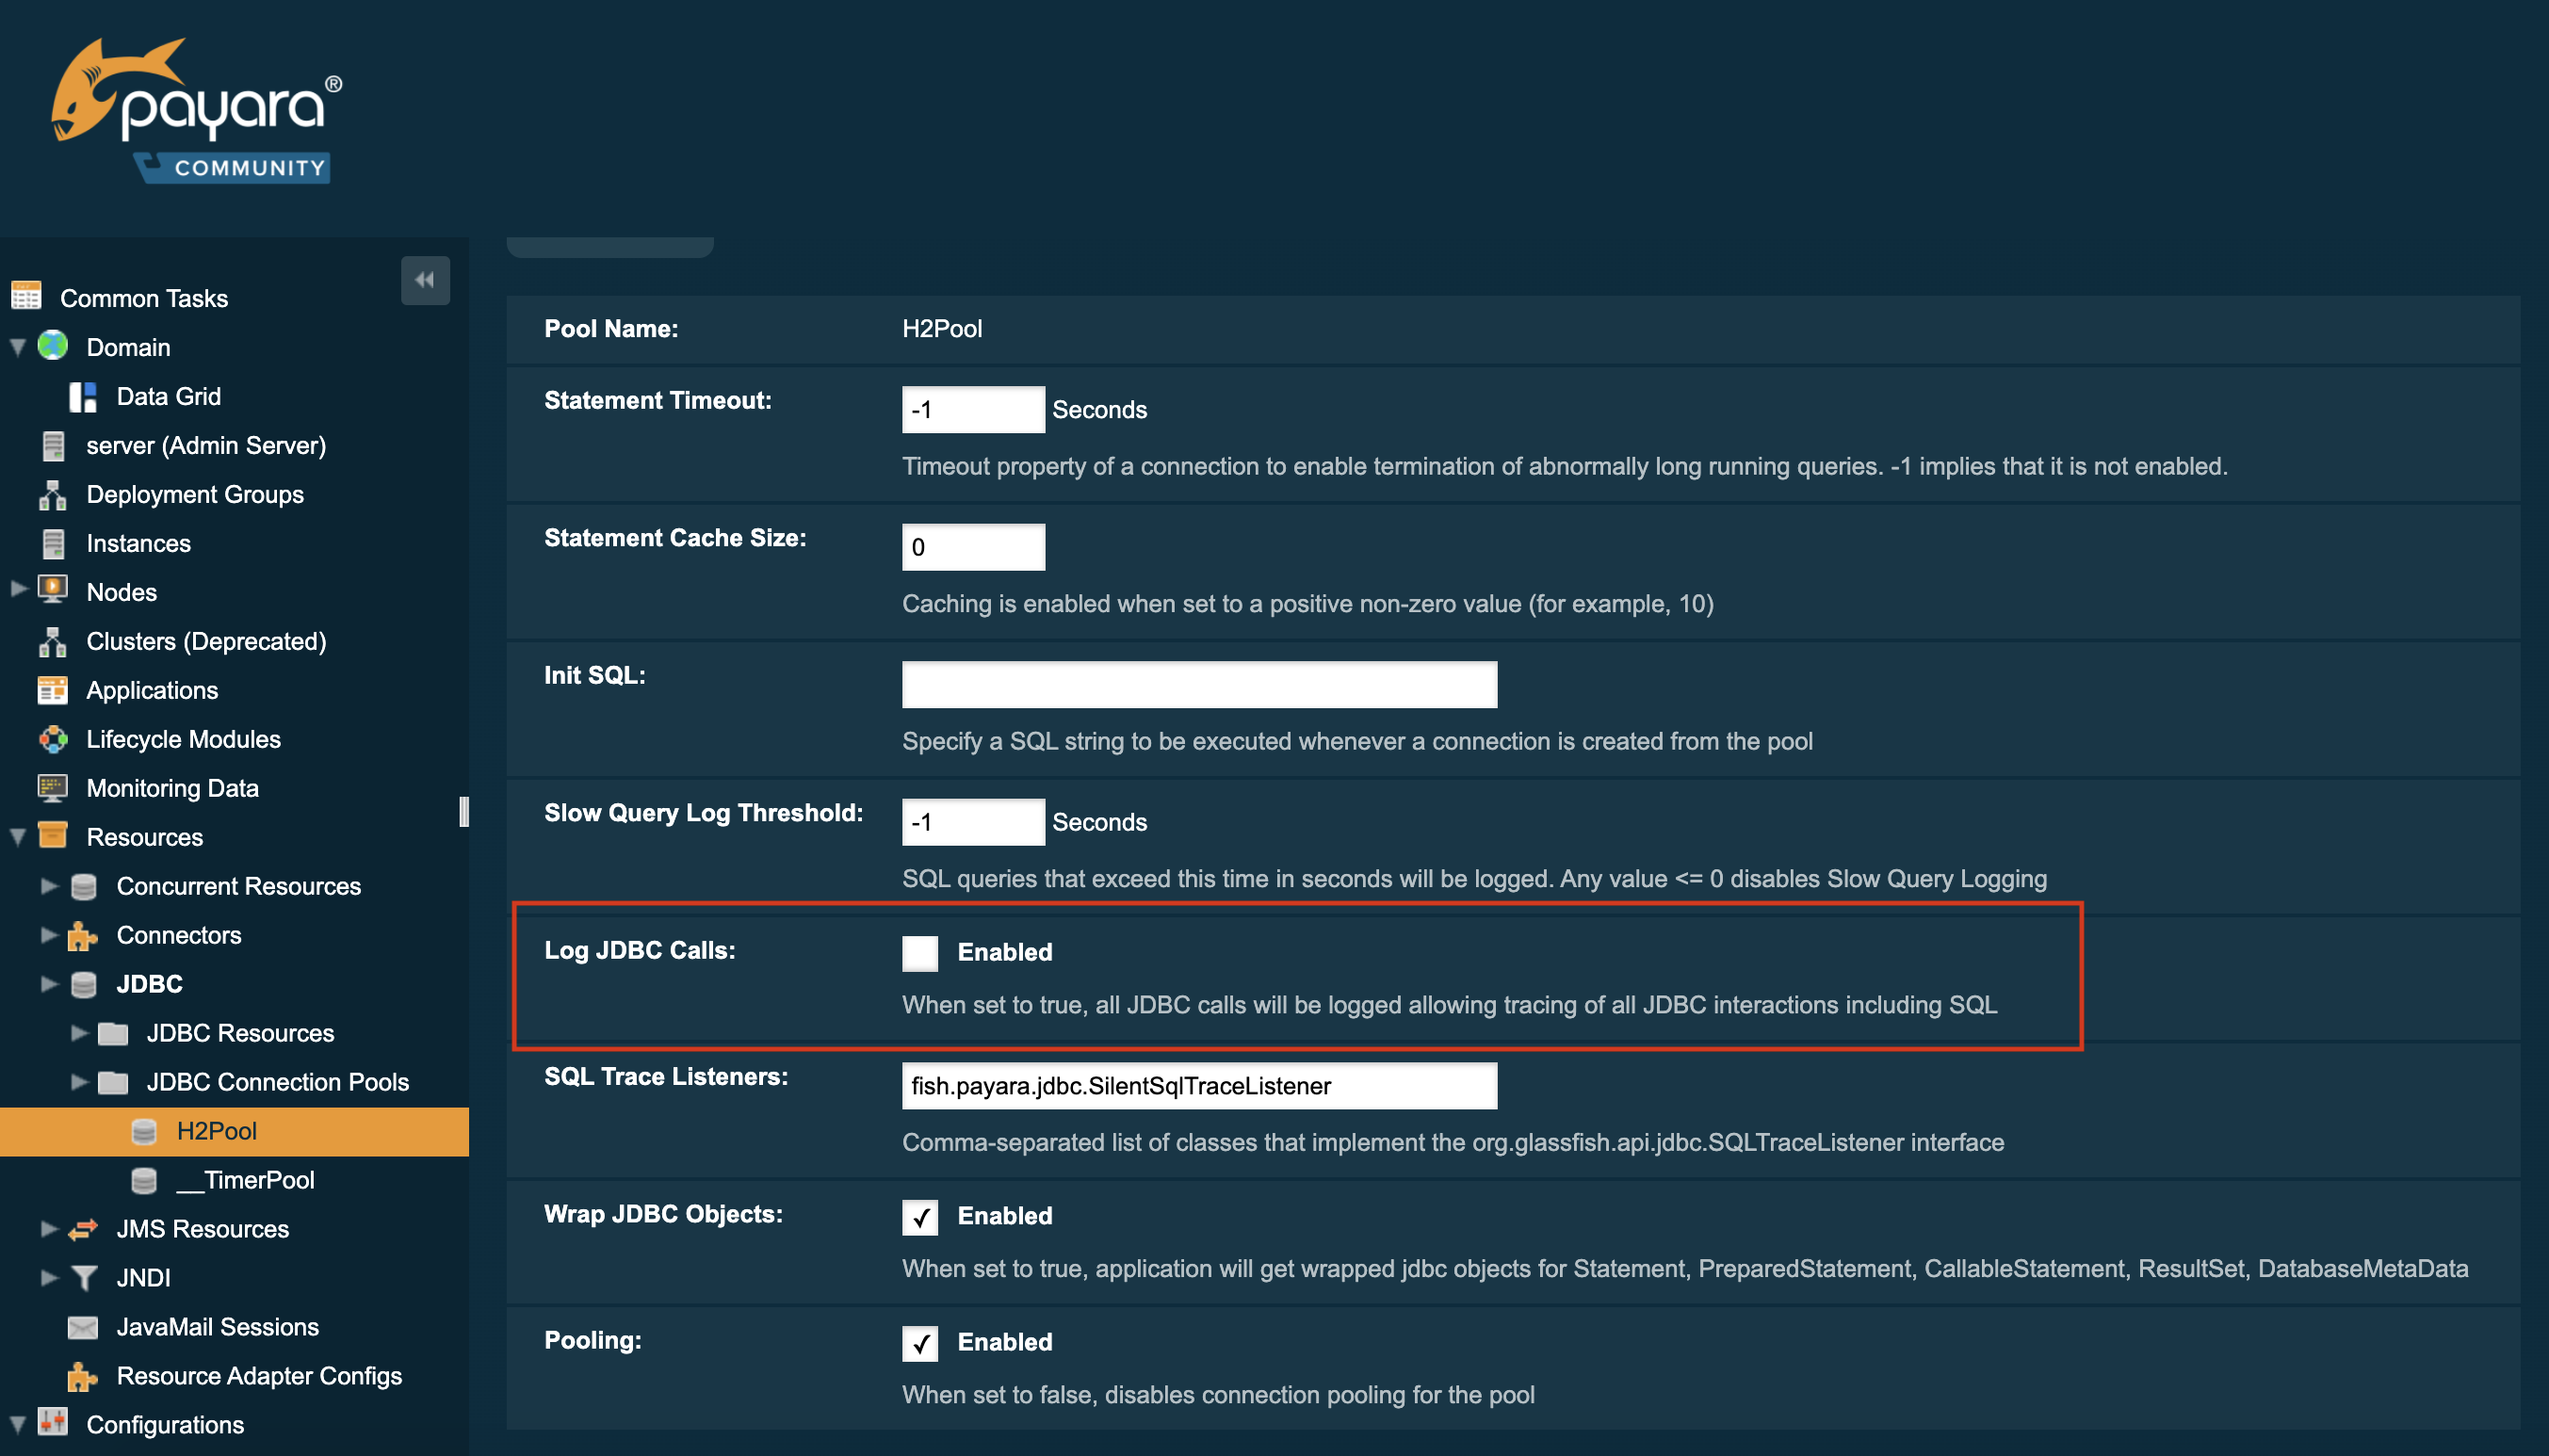
...Enabling JDBC Call Logging
With Log JDBC Calls configured on the connection call each call into the connection pool is timed and logged to the server log at the FINE level. A typical log message with Log JDBC Enabled is shown below:
[#|2016-02-04T18:51:01.467+0000|FINE|Payara 6.2022.1|javax.enterprise.resource.sqltrace.com.sun.gjc.util|_ThreadID=35;_ThreadName=http-listener-1(5);_TimeMillis=1454611861467;_LevelValue=500;ClassName=com.sun.gjc.util.SQLTraceLogger;MethodName=sqlTrace;|
  PoolName=H2Pool | ExecutionTime=1ms | ClassName=org.apache.derby.client.net.NetConnection40 | MethodName=prepareStatement | arg[0]=SELECT ID, AGE, BIO, BIRTHDATE, BIRTHDAY, DATEFORMAT, DATEOFBIRTH, DATEOFHIRE, EMAIL, HIREDATE, HIREDAY, MEMBERAGE, NAME, TODAYSDATE FROM MEMBERENTITY WHERE (NAME = ?) | arg[1]=1003 | arg[2]=1007 | |#]
Using the Administration Console
SQL Tracing can be enabled through the Payara Server Web administration console. First, navigate to the advanced table of your JDBC connection pool, then select the JDBC > JDBC Connection pools > ${Your Connection pool}.
Then select the Advanced Tab in the main window of the administration console. Then select the checkbox next to Log JDBC Calls to enable logging of all SQL calls:
Using Asadmin Commands
The Log JDBC Calls setting for a JDBC connection pool can also be configured via asadmin using the set command to set the fish.payara.log-jdbc-calls property of your connection pool to true, like in the following example:
asadmin set domain.resources.jdbc-connection-pool.__TimerPool.log-jdbc-calls=trueAdvanced Connection Pool Properties in Deployment Descriptors
Payara Server supports setting advanced JDBC connection pool properties directly on data source definitions made with the @DataSourceDefinition annotation or directly on deployment descriptors.
Setting Properties in the Deployment Descriptor
In a Jakarta EE application, a data source definition can be added to a deployment descriptor of an application. For a web application, you would this in the standard web.xml deployment descriptor. To set advanced properties just add a property element as shown in the following example:
<data-source>
    <name>java:global/ExampleDataSource</name>
    <class-name>com.mysql.jdbc.jdbc2.optional.MysqlXADataSource</class-name>
    <server-name>localhost</server-name>
    <port-number>3306</port-number>
    <database-name>mysql</database-name>
    <user>test</user>
    <password>test</password>
    <!-- Example of how to use a Payara specific custom connection pool setting -->
    <property>
       <name>fish.payara.is-connection-validation-required</name>
       <value>true</value>
    </property>
</data-source>
Setting Properties on the @DataSourceDefinition Annotation.
In Jakarta EE applications, a JDBC data source can be deployed by adding the @DataSourceDefinition annotation to a managed component (like and @Stateless EJB bean for example). To configure advanced JDBC properties, use the properties attribute of the annotation to define an array of the properties to configure:
@DataSourceDefinition(
    name = "java:app/MyApp/MyDS",
    className = "org.h2.jdbcx.JdbcDataSource",
    url = "jdbc:h2:mem:test",
    properties = {"fish.payara.is-connection-validation-required=true"})
public class ApplicationComponent{
}
Full List of Properties
The complete list of configurable properties is the following:
| Property | Value Type | Default | Notes |
|---|---|---|---|
|
|
|
|
|
|
The method of connection validation table,
|
|
|
|
The name of the table used for validation if the validation method is set to |
|
|
|
The name of the custom class used for validation if the |
|
|
|
|
Close all connections and reconnect on failure, otherwise reconnect only when used |
|
|
|
Enable the pool to be used by non-component callers such as Servlet Filters |
|
|
|
Specifies the time interval in seconds between successive requests to
validate a connection at most once. Default value is |
|
|
|
|
|
|
|
If enabled, leaked connection will be reclaimed by the pool after connection leak timeout occurs |
|
|
|
Number of attempts to create a new connection. 0 implies no retries |
|
|
|
Time interval between retries while attempting to create a connection. Effective when Creation Retry Attempts is greater than 0. |
|
|
|
Timeout property
of a connection to enable termination of abnormally long-running
queries. |
|
|
|
Enlist a resource to the transaction only when it is actually used in a method |
|
|
|
Connections are lazily associated when an operation is performed on them |
|
|
|
When the same thread is in need of a connection, it can reuse the connection already associated with that thread |
|
|
|
When set to |
|
|
|
Caching is enabled when
set to a positive non-zero value (for example, |
|
|
|
Turns connection matching for the pool ON or OFF |
|
|
|
Connections will be
reused by the pool for the specified number of times, after which they
will be closed. |
|
|
|
When set to |
|
|
Comma-separated list of classes that implement the
|
|
|
|
|
When enabled, the pool is pinged during creation or reconfiguration to identify and warn of any erroneous values for its attributes |
|
|
Specify a SQL string to be executed whenever a connection is created from the pool |
|
|
|
|
|
|
|
|
If enabled, leaked statement will be reclaimed by the pool after statement leak timeout occurs |
|
|
||
|
|
|
SQL queries that exceed this time in seconds will be logged. Any value ⇐ 0 disables Slow Query Logging |
|
|
|
When set to |
Example Data Source Configuration
An example data source configured on the web.xml and deployed with a custom SQL Trace Listener is shown below. This data source is configured to also validate all connections returned from the connection pool before giving them to the application using the built-in MySQL Connection Validation class. The data source is also configured to log any queries that exceed 5 seconds and also logs ALL JDBC statements:
<?xml version="1.0" encoding="UTF-8"?>
<web-app xmlns="http://xmlns.jcp.org/xml/ns/javaee"
     xmlns:xsi="http://www.w3.org/2001/XMLSchema-instance"
     xsi:schemaLocation="http://xmlns.jcp.org/xml/ns/javaee http://xmlns.jcp.org/xml/ns/javaee/web-app_3_1.xsd"
     version="3.1">
    <session-config>
        <session-timeout>30</session-timeout>
    </session-config>
    <data-source>
      <name>java:global/ExampleDataSource</name>
      <class-name>com.mysql.jdbc.jdbc2.optional.MysqlXADataSource</class-name>
      <server-name>localhost</server-name>
      <port-number>3306</port-number>
      <database-name>mysql</database-name>
      <user>test</user>
      <password>test</password>
      <!-- Example of how to use a Payara specific custom connection pool setting -->
      <property>
          <name>fish.payara.slow-query-threshold-in-seconds</name>
          <value>5</value>
      </property>
      <property>
          <name>fish.payara.log-jdbc-calls</name>
          <value>true</value>
      </property>
      <property>
          <name>fish.payara.sql-trace-listeners </name>
          <value>fish.payara.examples.payaramicro.datasource.example.CustomSQLTracer</value>
      </property>
      <property>
          <name>fish.payara.is-connection-validation-required</name>
          <value>true</value>
      </property>
      <property>
          <name>fish.payara.connection-validation-method</name>
          <value>custom-validation</value>
      </property>
      <property>
          <name>fish.payara.validation-classname</name>
          <value>org.glassfish.api.jdbc.validation.MySQLConnectionValidation</value>
      </property>
    </data-source>
</web-app>
Administering JDBC Resources
A JDBC resource, also known as a data source, provides an application with a means of connecting to a database. Typically, you create a JDBC resource for each database that is accessed by the applications deployed in a domain. Multiple JDBC resources can be specified for a database. JDBC resources can be globally accessible or be scoped to an enterprise application, web module, EJB module, connector module or application client module, as described in "Application-Scoped Resources" in the Payara Server Application Deployment section.
A JDBC resource is created by specifying the connection pool with which the resource will be associated. Use a unique Java Naming and Directory Interface (JNDI) name to identify the resource. For example, the JNDI name for the resource of a payroll database might be java:comp/env/jdbc/payrolldb.
The Jakarta EE standard specifies that certain default resources be made available to applications, and defines specific JNDI names for these default resources. Payara Server makes these names available through the use of logical JNDI names, which map Jakarta EE standard JNDI names to specific Payara Server resources. For JDBC resources, the Jakarta EE standard name java:comp/DefaultDataSource is mapped to the jdbc/__default resource.
To Create a JDBC Resource
Use the create-jdbc-resource subcommand in remote mode to create a JDBC resource. Creating a JDBC resource is a dynamic event and does not require server restart.
Because all JNDI names are in the java:comp/env subcontext, when specifying the JNDI name of a JDBC resource in the Administration Console, use only the jdbc/`name format. For example, a payrolldatabase might be specified as `jdbc/payrolldb.
Before You Begin
Before creating a JDBC resource, you must first create a JDBC connection pool. For instructions, see To Create a JDBC Connection Pool.
-
Ensure that the server is running. Remote subcommands require a running server.
-
Create a JDBC resource by using the
create-jdbc-resourcesubcommand.Information about properties for the subcommand is included in this help page.
-
If necessary, notify users that the new resource has been created.
Example 11-8 To Create a JDBC Resource
This example creates a JDBC resource named H2Pool.
asadmin> create-jdbc-resource --connectionpoolid H2Pool jdbc/H2Pool
Command create-jdbc-resource executed successfully.
You can also view the full syntax and options of the subcommand by typing asadmin help create-jdbc-resource at the command line.
To List JDBC Resources
Use the list-jdbc-resources subcommand in remote mode to list the existing JDBC resources.
-
Ensure that the server is running. Remote subcommands require a running server.
-
List JDBC resources by using the
list-jdbc-resourcessubcommand.
Example 11-9 To List a JDBC Resource
This example lists JDBC resources for localhost.
asadmin> list-jdbc-resources
jdbc/__TimerPool
jdbc/H2Pool
jdbc/__default
jdbc1
Command list-jdbc-resources executed successfully.
You can also view the full syntax and options of the subcommand by typing asadmin help list-jdbc-resources at the command line.
To Update a JDBC Resource
You can enable or disable a JDBC resource by using the set subcommand. The JDBC resource is identified by its dotted name.
-
List JDBC resources by using the
list-jdbc-resourcessubcommand. -
Modify the values for the specified JDBC resource by using the
setsubcommand.
For example:
To Delete a JDBC Resource
Use the delete-jdbc-resource subcommand in remote mode to delete an existing JDBC resource. Deleting a JDBC resource is a dynamic event and does not require server restart.
Before You Begin
Before deleting a JDBC resource, all associations with this resource must be removed.
-
Ensure that the server is running. Remote subcommands require a running server.
-
List JDBC resources by using the
list-jdbc-resourcessubcommand. -
If necessary, notify users that the JDBC resource is being deleted.
-
Delete a JDBC resource by using the
delete-jdbc-resourcesubcommand.
Example 11-11 To Delete a JDBC Resource
This example deletes a JDBC resource named H2Pool.
asadmin> delete-jdbc-resource jdbc/H2Pool
Command delete-jdbc-resource executed successfully.
You can also view the full syntax and options of the subcommand by typing asadmin help delete-jdbc-resource at the command line.
Enabling the jdbc/__default Resource in a Clustered Environment
Payara Server includes a preconfigured JDBC resource with the JNDI name jdbc/default. This jdbc/default resource is not enabled by default in a traditional cluster, so you need to explicitly enable it if you want to use it in a cluster.
To Enable the jdbc/__default Resource for a Clustered Environment
Instructions for creating JDBC resources in general are provided in To Create a JDBC Resource. Use the following procedure to enable the preconfigured jdbc/__default resource for a clustered Payara Server environment.
-
Create the
jdbc/defaultresource reference for the cluster. for example: 'asadmin create-resource-ref --target cluster-name jdbc/default' -
Enable the resource on the DAS that manages the cluster, for example: 'asadmin set resources.jdbc-connection-pool.DerbyPool.property.serverName=DAS-machine-name'
This step is only required if the cluster includes remote instances. Restart the DAS and the target cluster(s).
asadmin stop-cluster cluster-name
asadmin stop-domain domain-name
asadmin start-domain domain-name
asadmin start-cluster cluster-name
Integrating the JDBC Driver
To use JDBC features, you must choose a JDBC driver to work with Payara Server, then you must set up the driver.
Supported Database Drivers
For a list of the JDBC drivers currently supported by the Payara Server, see the Payara Release Notes. For configurations of supported and other drivers, see Configuration Specifics for JDBC Drivers.
| Because the drivers and databases supported by the Payara Server are constantly being updated, and because database vendors continue to upgrade their products, always check with Oracle technical support for the latest database support information. |
Making the JDBC Driver JAR Files Accessible
To integrate the JDBC driver into a Payara Server domain, copy the JAR files into the domain-dir/lib directory, then restart the server. This makes classes accessible to all applications or modules deployed on servers that share the same configuration. For more information about Payara Server class loaders, see "Class Loaders" in the Payara Server Application Development section.
Automatic Detection of Installed Drivers
The Administration Console detects installed JDBC Drivers automatically when you create a JDBC connection pool. To create a JDBC connection pool using the Administration Console, open the Resources component, open the JDBC component, select Connection Pools, and click on the New button. This displays the New JDBC Connection Pool page.
Based on the Resource Type and Database Vendor you select on the New JDBC Connection Pool page, data source or driver implementation class names are listed in the Datasource Classname or Driver Classname field when you click on the Next button. When you choose a specific implementation class name on the next page, additional properties relevant to the installed JDBC driver are displayed in the Additional Properties section.
Configuration Specifics for JDBC Drivers
Payara Server is designed to support connectivity to any database management system by using a corresponding JDBC driver.
IBM DB2 Database Type 4 Driver
The JAR file for the DB2 driver is db2jcc.jar. Configure the connection pool using the following settings:
-
Name: Use this name when you configure the JDBC resource later.
-
Resource Type: Specify the appropriate value.
-
Database Vendor: DB2
-
DataSource Classname:
com.ibm.db2.jcc.DB2SimpleDataSource -
Properties:
-
databaseName- Set as appropriate. -
user- Set as appropriate. -
password- Set as appropriate. -
driverType- Set to4.
-
Apache Derby DB/Derby Type 4 Driver
The JAR file for the Apache Derby DB driver is derbyclient.jar. Configure the connection pool using the following settings:
-
Name: Use this name when you configure the JDBC resource later.
-
Resource Type: Specify the appropriate value.
-
Database Vendor: Apache Derby
-
DataSource Classname: Specify one of the following:
org.apache.derby.jdbc.ClientDataSource40 org.apache.derby.jdbc.ClientXADataSource40 -
Properties:
-
serverName- Specify the host name or IP address of the database server. -
portNumber- Specify the port number of the database server if it is different from the default. -
databaseName- Specify the name of the database. -
user- Specify the database user.
This is only necessary if the Apache Derby database is configured to use authentication. The Apache Derby database does not use authentication by default. When the user is provided, it is the name of the schema where the tables reside. -
password- Specify the database password.
This is only necessary if the Apache Derby database is configured to use authentication.
-
MySQL Server Database Type 4 Driver
The JAR file for the MySQL driver is mysql-connector-java-5.1.14-bin.jar. Configure the connection pool using the following settings:
-
Name: Use this name when you configure the JDBC resource later.
-
Resource Type: Specify the appropriate value.
-
Database Vendor: MySql
-
DataSource Classname:
com.mysql.jdbc.jdbc2.optional.MysqlDataSource com.mysql.jdbc.jdbc2.optional.MysqlXADataSource -
Properties:
-
serverName- Specify the host name or IP address of the database server. -
portNumber- Specify the port number of the database server. -
databaseName- Set as appropriate. -
user- Set as appropriate. -
password- Set as appropriate.
-
Oracle 10 Database Driver
The JAR file for the Oracle 10 database driver is ojdbc14.jar. Make sure that the shared library is available through LD_LIBRARY_PATH and that the ORACLE_HOME property is set.
To make the Oracle driver behave in a Jakarta EE-compliant manner, you must define the following JVM property:
-Doracle.jdbc.J2EE13Compliant=trueConfigure the connection pool using the following settings:
-
Name: Use this name when you configure the JDBC resource later.
-
Resource Type: Specify the appropriate value.
-
Database Vendor: Oracle
-
DataSource Classname: Specify one of the following:
oracle.jdbc.pool.OracleDataSource oracle.jdbc.xa.client.OracleXADataSource -
Properties:
-
user- Set as appropriate. -
password- Set as appropriate.
-
Oracle 11 Database Driver
The JAR file for the Oracle 11 database driver is ojdbc6.jar.
To make the Oracle driver behave in a Jakarta EE-compliant manner, you must define the following JVM property:
-Doracle.jdbc.J2EE13Compliant=trueConfigure the connection pool using the following settings:
-
Name: Use this name when you configure the JDBC resource later.
-
Resource Type: Specify the appropriate value.
-
Database Vendor: Oracle
-
DataSource Classname: Specify one of the following:
oracle.jdbc.pool.OracleDataSource oracle.jdbc.xa.client.OracleXADataSource -
Properties:
-
user- Set as appropriate. -
password- Set as appropriate.
-
For this driver, the XAResource.recover method repeatedly returns the
same set of in-doubt Xids regardless of the input flag. According to the
XA specifications, the Transaction Manager initially calls this method
with TMSTARTSCAN and then with TMNOFLAGS repeatedly until no Xids
are returned. The XAResource.commit method also has some issues.To disable this Payara Server workaround, the oracle-xa-recovery-workaround property value must be set to false.Additionally, in order for the transaction manager to recover transactions, the JDBC connection pool’s database user must be given certain Oracle permissions: SELECT permission on DBA_PENDING_TRANSACTIONS, PENDING_TRANS$, DBA_2PC_PENDING and DBA_2PC_NEIGHBORS. EXECUTE permissions on DBMS_XA and DBMS_SYSTEM. |
PostgreSQL Type 4 Driver
The JAR file for the PostgreSQL driver is postgresql-9.0-801.jdbc4.jar. Configure the connection pool using the following settings:
-
Name: Use this name when you configure the JDBC resource later.
-
Resource Type: Specify the appropriate value.
-
Database Vendor: Postgresql
-
DataSource Classname:
org.postgresql.ds.PGSimpleDataSource -
Properties:
-
serverName- Specify the host name or IP address of the database server. -
portNumber- Specify the port number of the database server. -
databaseName- Set as appropriate. -
user- Set as appropriate. -
password- Set as appropriate.
-
DataDirect Type 4 Driver for IBM DB2 Database
The JAR file for DataDirect driver is db2.jar. Configure the connection pool using the following settings:
-
Name: Use this name when you configure the JDBC resource later.
-
Resource Type: Specify the appropriate value.
-
Database Vendor: DataDirect-DB2
-
DataSource Classname:
com.ddtek.jdbcx.db2.DB2DataSource -
Properties:
-
serverName- Specify the host name or IP address of the database server. -
portNumber- Specify the port number of the database server. -
databaseName- Set as appropriate. -
user- Set as appropriate. -
password- Set as appropriate.
-
DataDirect Type 4 Driver for IBM Informix
Configure the connection pool using the following settings:
-
Name: Use this name when you configure the JDBC resource later.
-
Resource Type: Specify the appropriate value.
-
Database Vendor: DataDirect-Informix
-
DataSource Classname: Specify one of the following:
com.informix.jdbcx.IfxDataSource
com.informix.jdbcx.IfxXADataSource
DataDirect DataSource Classname:
com.ddtek.jdbcx.informix.InformixDataSourcee -
Properties:
-
serverName- Specify the Informix database server name. -
portNumber- Specify the port number of the database server. -
databaseName- Set as appropriate. This is optional. -
user- Set as appropriate. -
password- Set as appropriate. -
IfxIFXHost- Specify the host name or IP address of the database server.
-
DataDirect Type 4 Driver for Microsoft SQL Server Database
The JAR file for the DataDirect driver is sqlserver.jar. Configure the connection pool using the following settings:
-
Name: Use this name when you configure the JDBC resource later.
-
Resource Type: Specify the appropriate value.
-
Database Vendor: DataDirect-Microsoft SQL Server
-
DataSource Classname:
com.ddtek.jdbcx.sqlserver.SQLServerDataSource -
Properties:
-
serverName- Specify the host name or IP address and the port of the database server. -
portNumber- Specify the port number of the database server. -
user- Set as appropriate. -
password- Set as appropriate. -
selectMethod- Set tocursor.
-
DataDirect Type 4 Driver for MySQL Server Database
The JAR file for the DataDirect driver is mysql.jar. Configure the connection pool using the following settings:
-
Name: Use this name when you configure the JDBC resource later.
-
Resource Type: Specify the appropriate value.
-
Database Vendor: DataDirect-MySQL
-
DataSource:
com.ddtek.jdbcx.mysql.MySQLDataSource -
Properties:
-
serverName- Specify the host name or IP address and the port of the database server. -
portNumber- Specify the port number of the database server. -
user- Set as appropriate. -
password- Set as appropriate. -
selectMethod- Set tocursor.
-
DataDirect Type 4 Driver for Oracle 11 Database
The JAR file for the DataDirect driver is oracle.jar.
To make the Oracle driver behave in a Jakata EE-compliant manner, you must define the following JVM property:
-Doracle.jdbc.J2EE13Compliant=trueConfigure the connection pool using the following settings:
-
Name: Use this name when you configure the JDBC resource later.
-
Resource Type: Specify the appropriate value.
-
Database Vendor: DataDirect-Oracle
-
DataSource Classname:
com.ddtek.jdbcx.oracle.OracleDataSource -
Properties:
-
serverName- Specify the host name or IP address of the database server. -
portNumber- Specify the port number of the database server. -
user- Set as appropriate. -
password- Set as appropriate.
-
DataDirect Type 4 Driver for Sybase Database
The JAR file for the DataDirect driver is sybase.jar. Configure the connection pool using the following settings:
-
Name: Use this name when you configure the JDBC resource later.
-
Resource Type: Specify the appropriate value.
-
Database Vendor: DataDirect-Sybase
-
DataSource Classname:
com.ddtek.jdbcx.sybase.SybaseDataSource -
Properties:
-
serverName- Specify the host name or IP address of the database server. -
portNumber- Specify the port number of the database server. -
databaseName- Set as appropriate. This is optional. -
user- Set as appropriate. -
password- Set as appropriate.
-
In some situations, using this driver can cause exceptions to be thrown because the driver creates a stored procedure for every parameterized PreparedStatement by default. If this situation arises, add the property PrepareMethod, setting its value to direct.
|
Inet Merlia Driver for Microsoft SQL Server Database
The JAR file for the Inet Microsoft SQL Server driver is Merlia.jar. Configure the connection pool using the following settings:
-
Name: Use this name when you configure the JDBC resource later.
-
Resource Type: Specify the appropriate value.
-
Database Vendor: MicrosoftSqlServer
-
DataSource Classname:
com.inet.tds.TdsDataSource -
Properties:
-
serverName- Specify the host name or IP address and the port of the database server. -
portNumber- Specify the port number of the database server. -
user- Set as appropriate. -
password- Set as appropriate.
-
Inet Sybelux Driver for Sybase Database
The JAR file for the Inet Sybase driver is Sybelux.jar. Configure the connection pool using the following settings:
-
Name: Use this name when you configure the JDBC resource later.
-
Resource Type: Specify the appropriate value.
-
Database Vendor: Sybase
-
DataSource Classname:
com.inet.syb.SybDataSource -
Properties:
-
serverName- Specify the host name or IP address of the database server. -
portNumber- Specify the port number of the database server. -
databaseName- Set as appropriate. Do not specify the complete URL, only the database name. -
user- Set as appropriate. -
password- Set as appropriate.
-
JConnect Type 4 Driver for Sybase ASE 12.5 Database
The JAR file for the Sybase driver is jconn4.jar. Configure the connection pool using the following settings:
-
Name: Use this name when you configure the JDBC resource later.
-
Resource Type: Specify the appropriate value.
-
Database Vendor: Sybase
-
DataSource Classname: Specify one of the following:
com.sybase.jdbc4.jdbc.SybDataSource
com.sybase.jdbc4.jdbc.SybXADataSource-
Properties:
-
serverName- Specify the host name or IP address of the database server. -
portNumber- Specify the port number of the database server. -
databaseName- Set as appropriate. Do not specify the complete URL, only the database name. -
user- Set as appropriate. -
password- Set as appropriate. -
BE_AS_JDBC_COMPLIANT_AS_POSSIBLE- Set totrue. -
FAKE_METADATA- Set totrue.
-
SQL Management in Payara Server
Payara Server keeps track of the recently executed SQL statements for monitoring purposes. This way, one can review which SQL statements are executed, how many times the same statement is executed and how long it took.
Activate Overview
The activation of the collection is controlled by the monitoring service.
When using the Web Administration console, go to Configuration → [instance-configuration (like server-config)] → Monitoring: and select the level High for the JDBC Connection pool component.
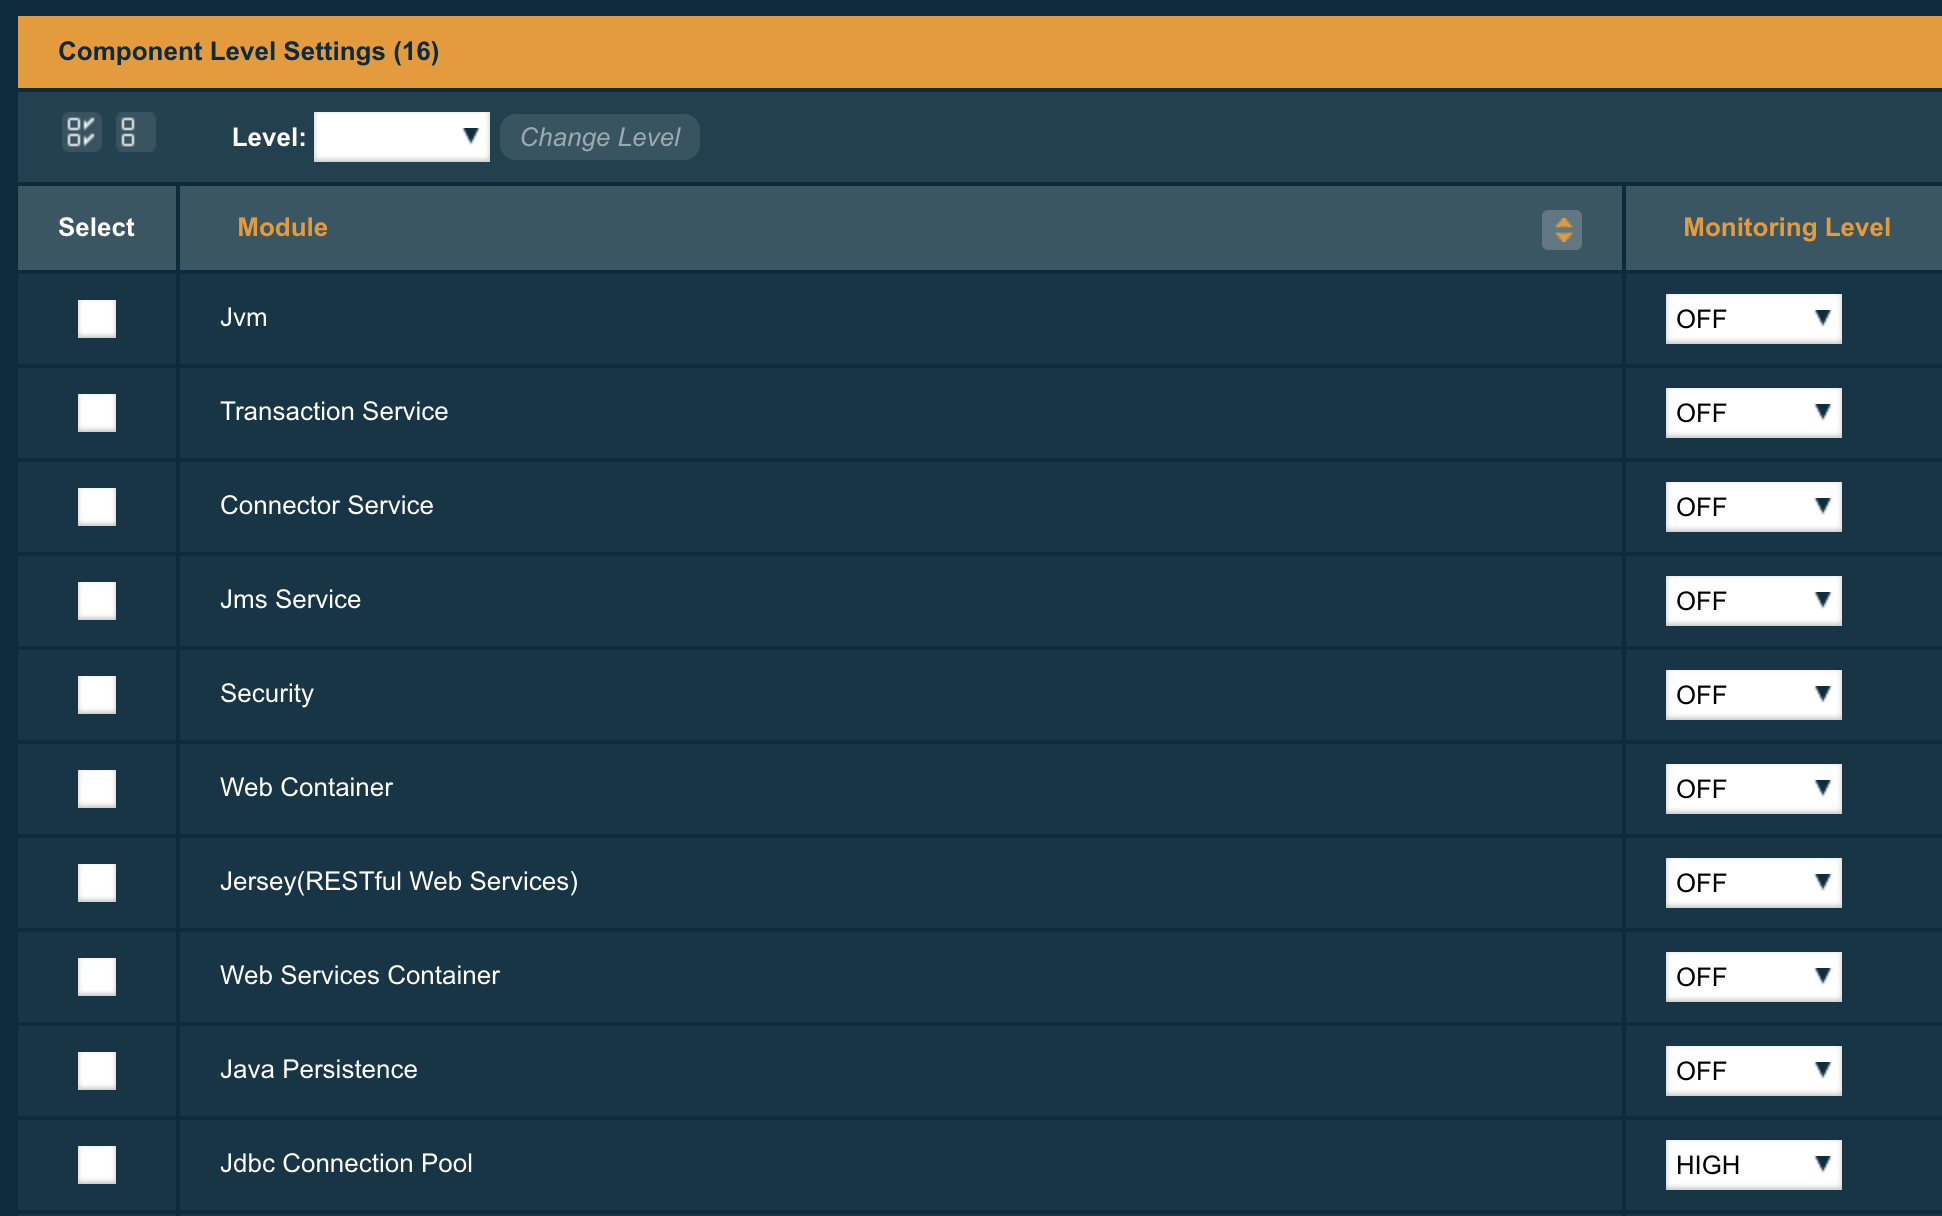
When using the asadmin CLI, you can execute the following command to set the Level Value
set configs.config.server-config.monitoring-service.module-monitoring-levels.jdbc-connection-pool=HIGHThe information can be consulted via the JMX beans or the Rest monitoring interface. These need to be activated also, see jmx monitoring configuration and rest monitoring configuration on how to do this.
Viewing statements
When you want to retrieve the information through the JMX channel, you can find the information in the following MBean:
amx:pp=/mon/server-mon[server],type=jdbcra-mon,name=resources/<pool-name>
When using the Rest monitoring interface, you can access the following URL
http://localhost:4848/monitoring/domain/server/resources/<pool-name>
In both cases, the <pool-name> is the actual pool name you have created within Payara Server and which you like to retrieve the information for.
The properties we want to highlight here are
frequsedsqlqueries-
Contains the list of all SQL statements and their execution count, which are executed during the collection time frame.
slowSqlQueries-
Contains again the list of all SQL statements but this time with the maximum execution time they took.
Configuring parameters
The SQL statement collection has a few configuration values which have default values.
-
Timeframe: By default, the info about the SQL statements are retained during 5 minutes
-
Cache size: The information is kept in a cache which has by default place for 100000 items.
These values can be configured by defining some key-value pairs in the properties for the connection pool. This can be done during the creation or afterward by updating the pool.
-
TIME-TO-KEEP-QUERIES-IN-MINUTES: This defines the number of minutes the SQL statement info is retained.
-
MAX-CACHE-SIZE: This defines the maximum size of the cache.
Setting the maximum size of the cache to 0 will disable it completely.
|
When the cache size is too small, you see an information message in the log to indicate that not all statements could be retained.
Slow SQL Logger
Many performance problems in Enterprise Applications can be traced to slow database access. Payara Server includes capabilities to detect and log slow SQL queries executed via a JDBC Connection pool. The Slow SQL logger monitors all queries executed on the connection pool and if they exceed a configurable execution time in seconds a warning message is logged into the server log.
The warning message (see below) logs the SQL query and the stack trace to the code executing the query. This enables rapid diagnosis by pinpointing the exact lines of code to investigate.
Configuring the Slow SQL Logger
Ensure Wrap JDBC Objects is enabled in your JDBC Connection Pool (enabled by default) for the Slow SQL Logger to function correctly.
There are a number of ways to configure the slow SQL threshold time on a JDBC connection pool.
Using the Administration Console
To configure slow SQL logging on a JDBC connection pool via the administration console, navigate to the Connection Pool’s Advanced Properties tab. Then specify the Slow Query Log Threshold time in seconds or use a decimal value to signify milliseconds.
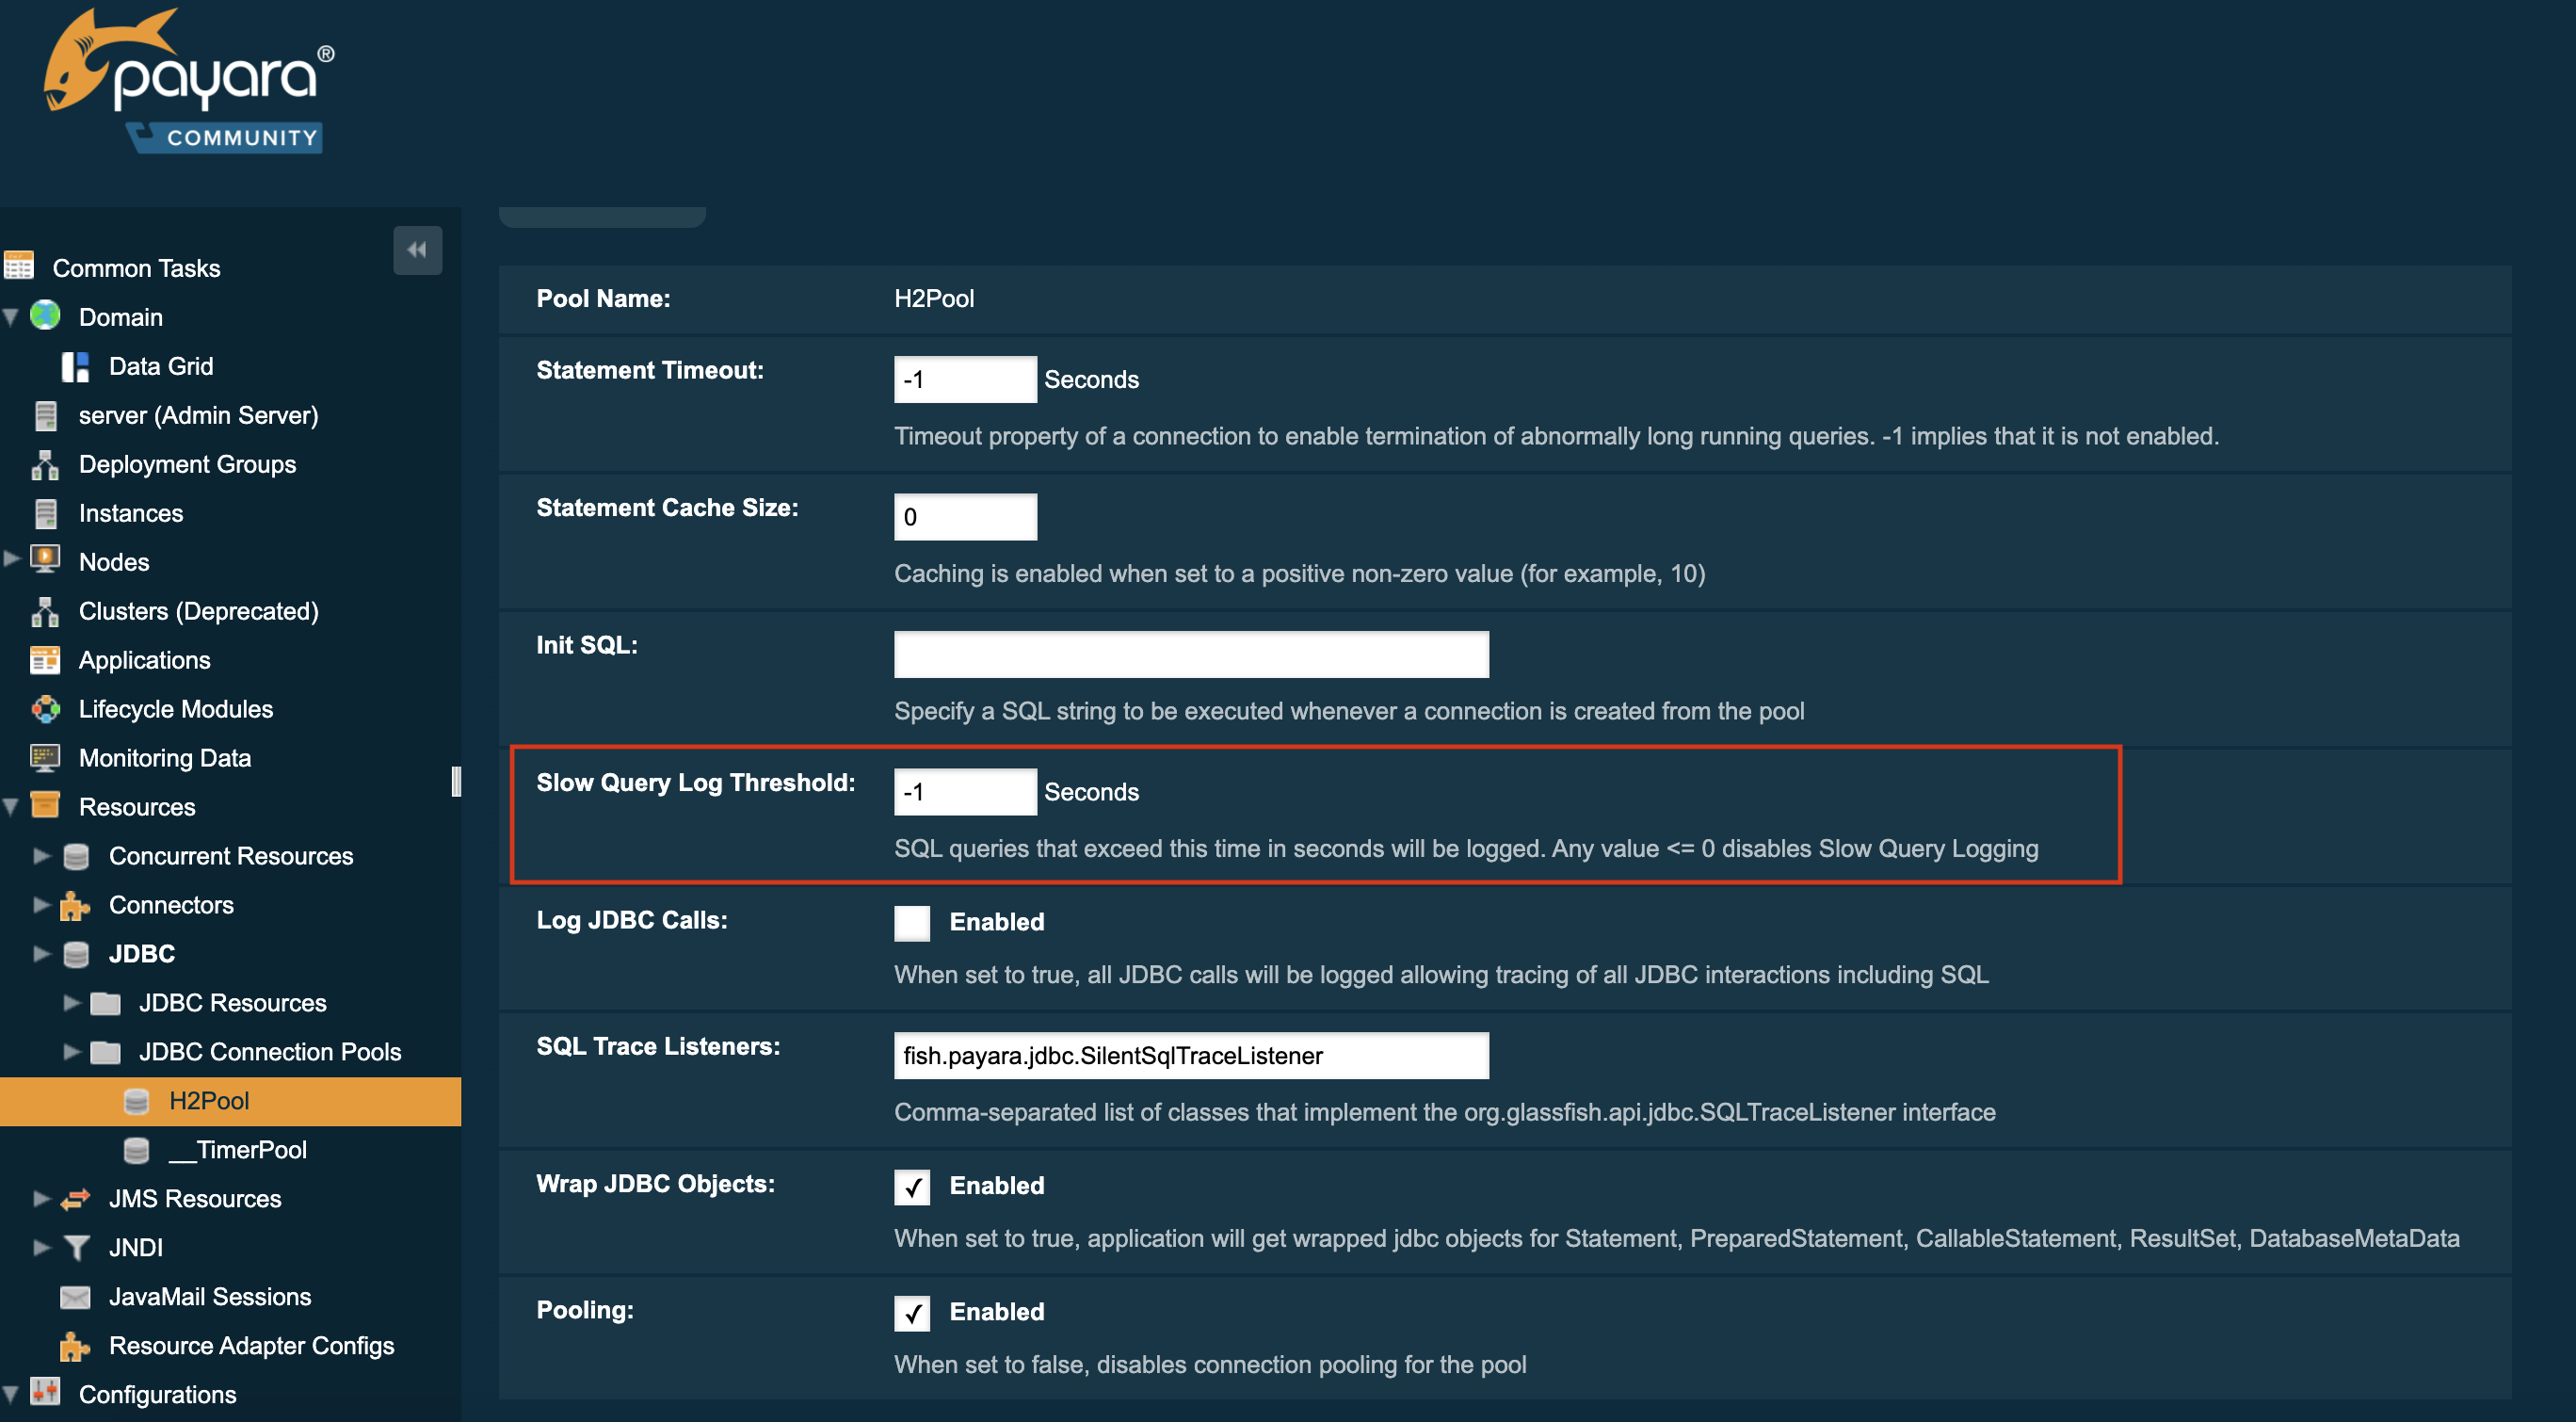
setting the threshold to -1 will disable the feature
|
Using Asadmin commands
The Slow Query Log Threshold time for a JDBC connection pool can also be configured with an asadmin command, by using the set command to set the slow-query-threshold-in-seconds property, like in the following example:
asadmin set domain.resources.jdbc-connection-pool.__TimerPool.slow-query-threshold-in-seconds=50You can also set the threshold time to milliseconds simply by passing a decimal value. Below is an example of setting the threshold on the __TimerPool JDBC connection pool to 200 milliseconds:
asadmin set domain.resources.jdbc-connection-pool.__TimerPool.slow-query-threshold-in-seconds=0.2Configuring SQL Trace Listeners
Payara Server provides support for custom SQL Trace Listeners. A SQL Trace Listener is registered against a data source and is called after each method call made on the JDBC connection pool.
More information on how to implement a SQL Trace listener can be found in the Application Development section.
Using the Administration Console
SQL Trace Listeners can be enabled on a JDBC connection pool through the administration web console. Navigate to the Advanced Tab of your connection pool by selecting the JDBC → JDBC Connection Pools → <Your Connection pool>.
Proceed to add the fully qualified class name of your SQL Trace Listener implementation class in the SQL Trace Listeners field:
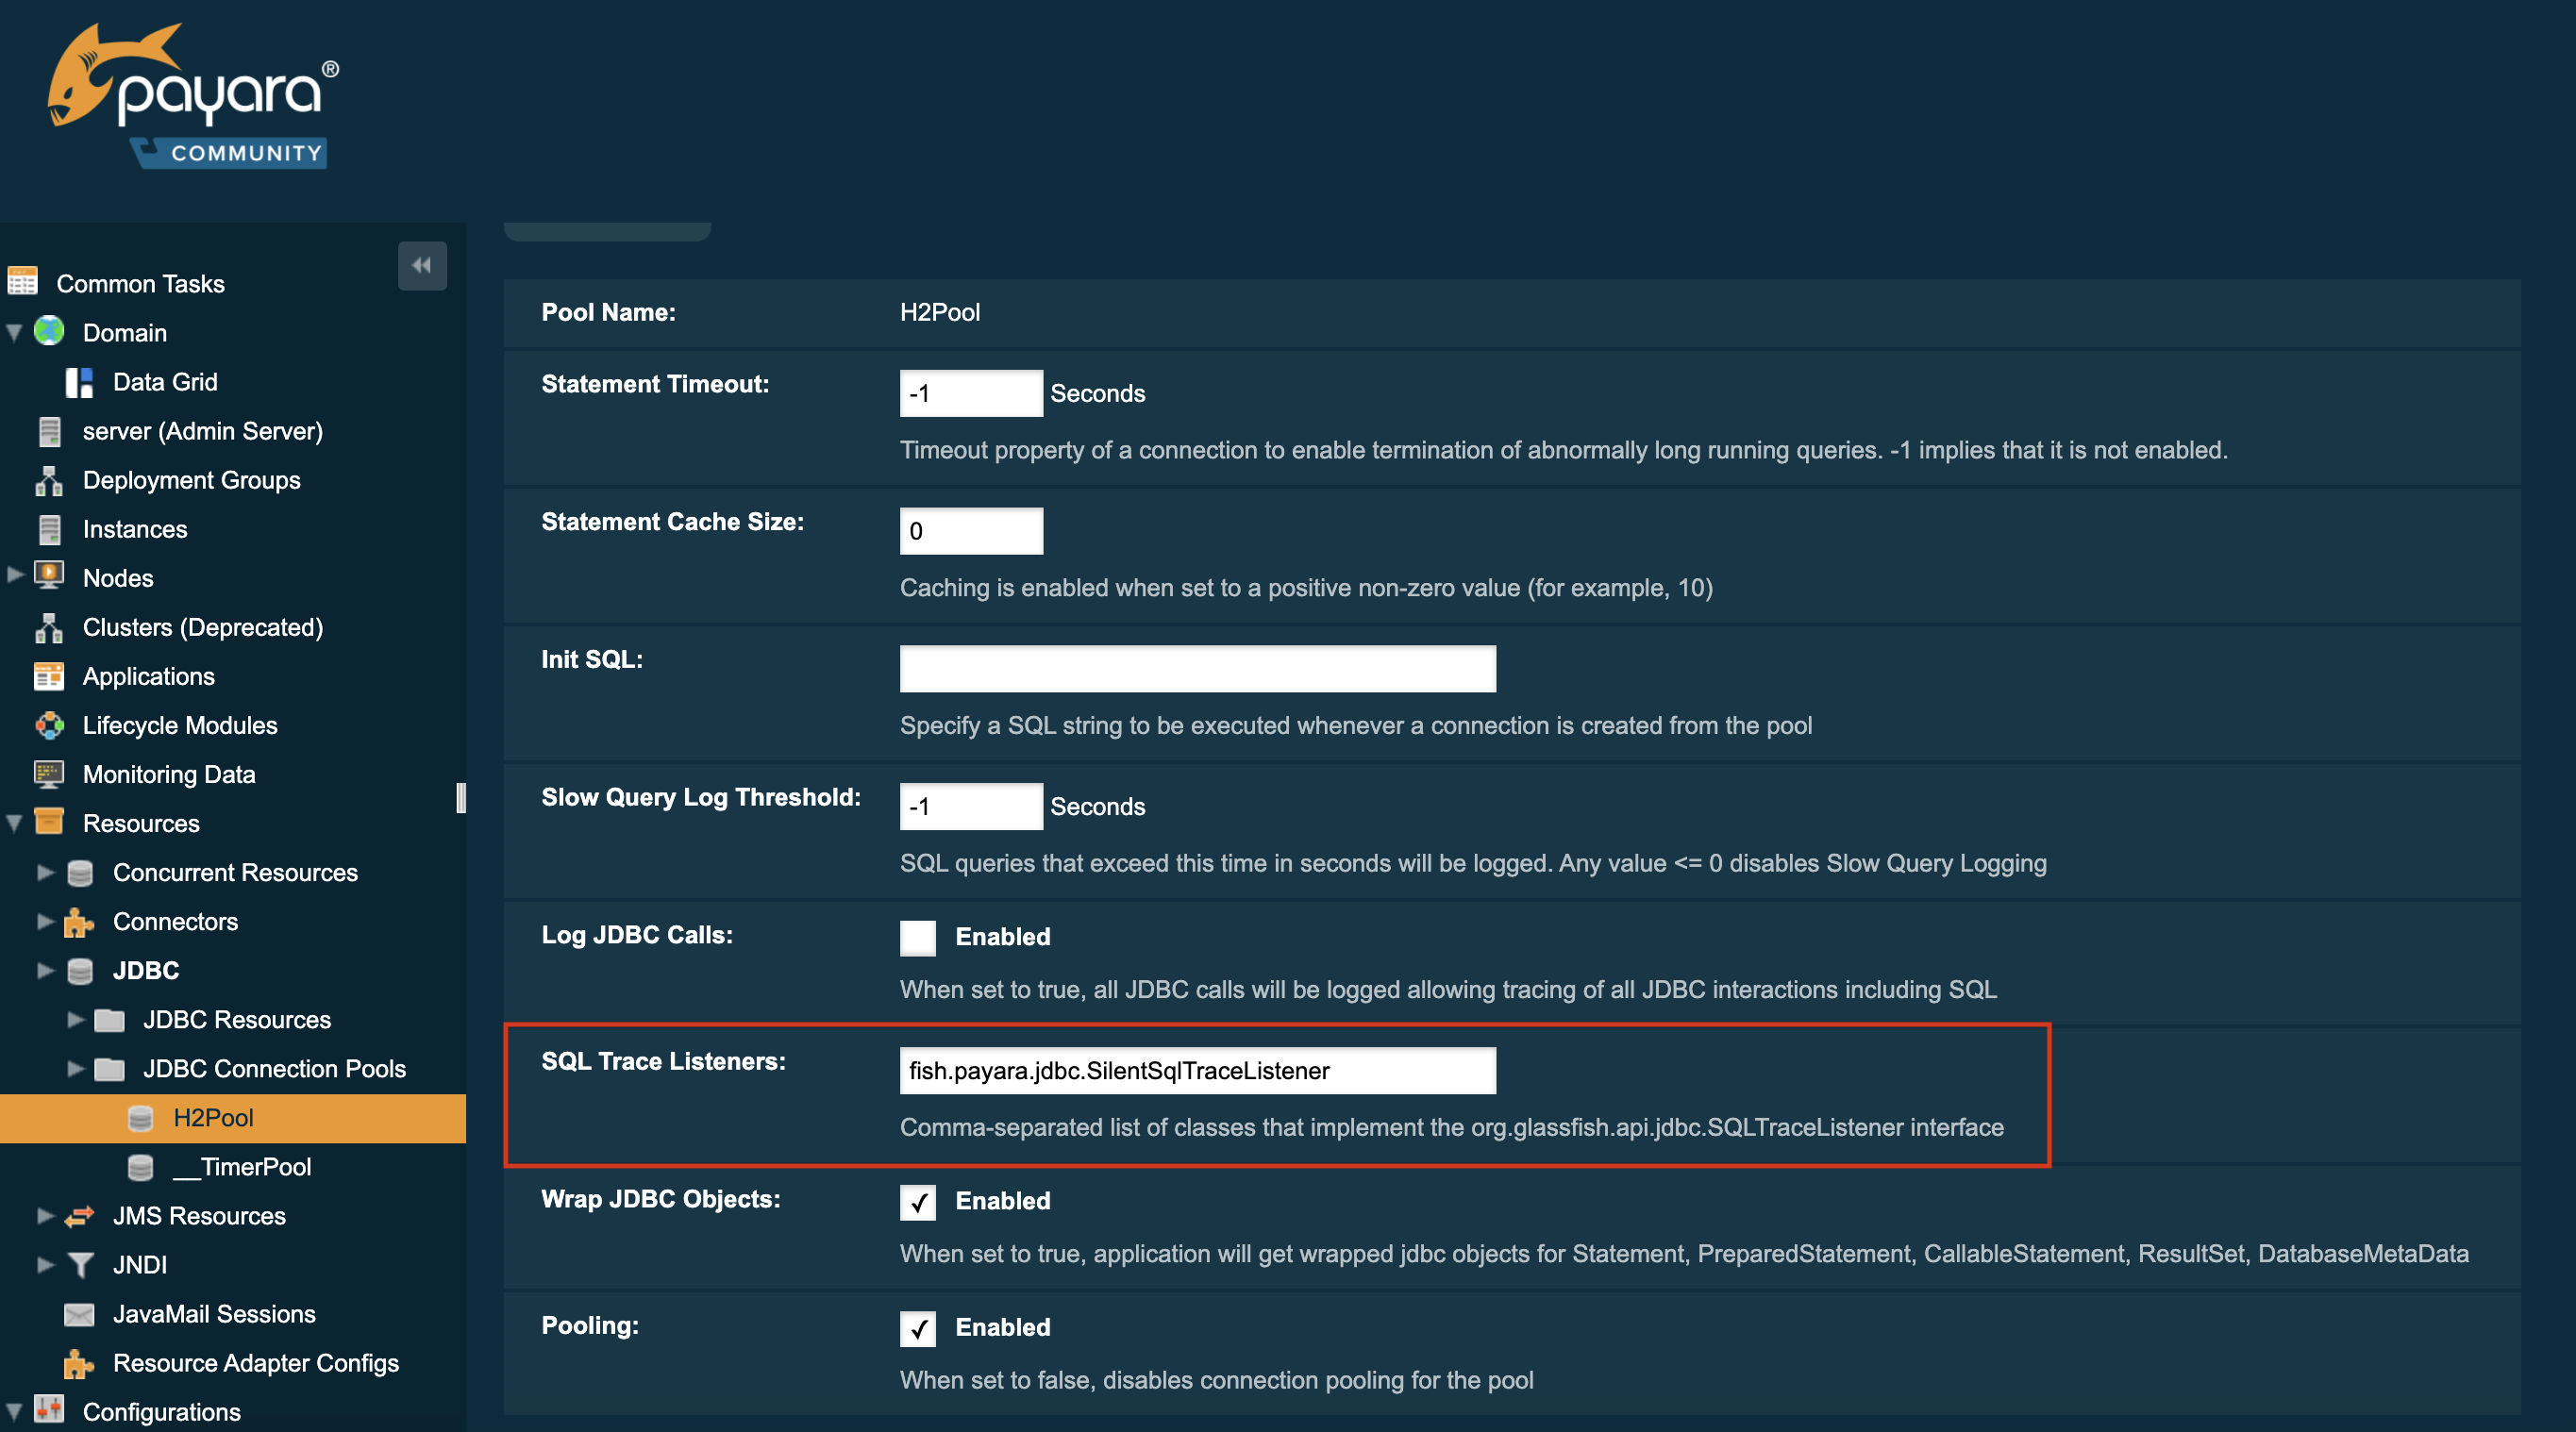
| The implementation class must be on the server’s classpath for it to work correctly. |
Using asadmin commands
SQL Trace Listeners can be enabled on a JDBC connection pool using with an asadmin commands by using the set command to set the fish.payara.lsql-trace-listeners to the fully qualified class name of your listener implementation, like on the following example:
asadmin set domain.resources.jdbc-connection-pool.__TimerPool.sql-trace-listeners=fish.payara.examples.payaramicro.datasource.example.CustomSQLTracer