This chapter provides procedures for administering concurrent resources in the Payara Server environment by using the asadmin command-line utility.
Instructions for accomplishing these tasks by using the Administration Console are contained in the Administration Console online help.
About Concurrent Resources
Concurrent resources are managed objects that provide concurrency capabilities to Jakarta EE applications. In Payara Server, you configure concurrent resources and make them available for use by application components such as servlets and EJBs. Concurrent resources are accessed through JNDI lookup or resource injection.
Concurrent resources are resources of the following types:
-
Context services
-
Managed thread factories
-
Managed executor services
-
Managed scheduled executor services
For detailed information about concurrent resources, see "Concurrency Specs" in the Jakarta EE specifications.
Default Concurrent Resources
When you create a concurrent resource, you specify a unique JNDI name for the resource. Applications use this name to access the resource.
The Jakarta EE standard specifies that certain default resources be made available to applications, and defines specific JNDI names for these default resources. Payara Server makes these names available through the use of logical JNDI names, which map Jakarta EE standard JNDI names to specific Payara Server resources. For concurrent resources, the mappings are as follows:
- java:comp/DefaultContextService
-
This Jakarta EE standard name is mapped to the
concurrent/__defaultContextServiceresource. - java:comp/DefaultManagedThreadFactory
-
This Jakarta EE standard name is mapped to the
concurrent/__defaultManagedThreadFactoryresource. - java:comp/DefaultManagedExecutorService
-
This Jakarta EE standard name is mapped to the
concurrent/__defaultManagedExecutorServiceresource. - java:comp/DefaultManagedScheduledExecutorService
-
This Jakarta EE standard name is mapped to the
concurrent/__defaultManagedScheduledExecutorServiceresource.
Configuring Context Services
Context services are used to create dynamic proxy objects that capture the context of a container and enable applications to run within that context at a later time. The context of the container is propagated to the thread executing the task.
|
Jakarta Concurrency specifies that certain default resources be made available to applications, and defines specific JNDI names for these default resources. Payara Server makes these names available through the use of logical JNDI names, which map Jakarta EE JNDI names to specific Payara Server resources.
For context services, the mapping is as follows: java:comp/DefaultContextService This Jakarta Concurrency standard name is mapped to the concurrent/__defaultContextService resource |
To Create a Context Service
Context services can be created by using Admin Console or Asadmin commands.
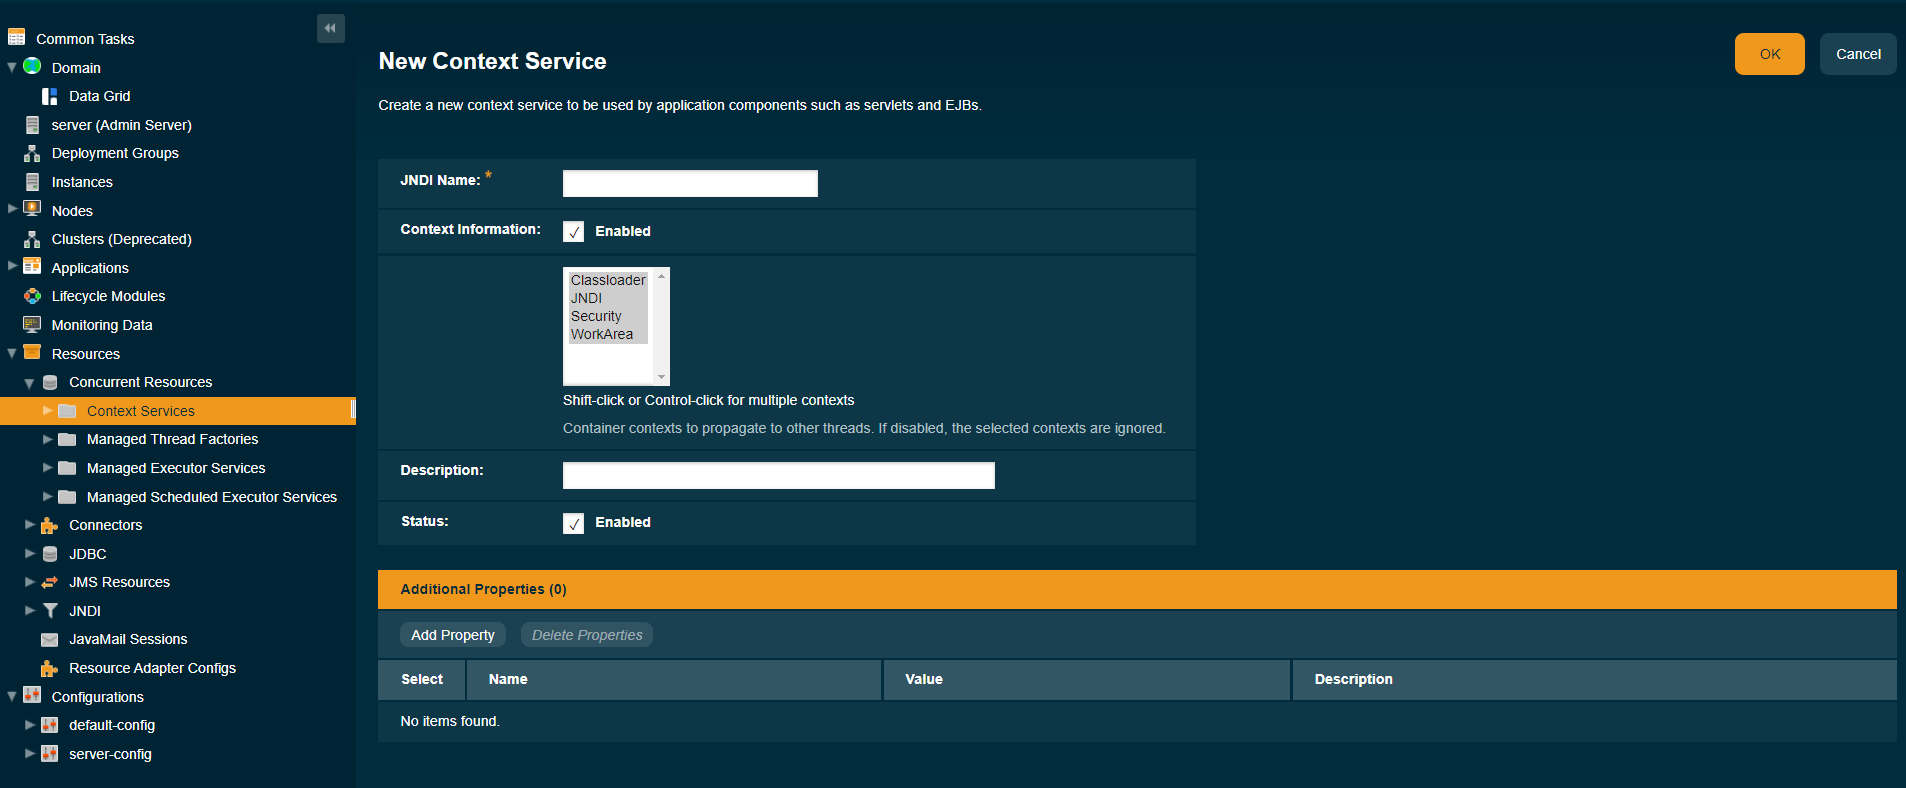
To create a new Context Service in the Admin Console, go to Resources → Concurrent Resources → Context Services → New:

Alternatively, you can use the create-context-service asadmin command to create a context service resource.
Because all JNDI names are in the java:comp/env subcontext, when specifying the JNDI name of a context service, use only the concurrent/`name format. For example, `concurrent/Context1.
| Creating a context service resource is a dynamic event and typically does not require server restart. Applications can use a resource as soon as it is created. However, if an application tried to use a resource before it was created, and that resource is created later, the application or the server must be restarted. Otherwise, the application will not be able to locate the resource. |
-
Ensure that the server is running. Remote subcommands require a running server.
-
Create a context service by using the
create-context-servicesubcommand. -
If necessary, notify users that the new resource has been created.
Example 14-1 To Create a Context Service
This example creates a context service resource named concurrent/Context1.
asadmin> create-context-service concurrent/Context1
Context service concurrent/Context1 created successfully.
Command create-context-service executed successfully.
You can also view the full syntax and options of the subcommand by typing asadmin help create-context-service at the command line.
To List Context Services
Use the list-context-services subcommand in remote mode to list the existing context service resources.
-
Ensure that the server is running.
Remote subcommands require a running server. -
List context service resources by using the
list-context-servicessubcommand.
To Update a Context Service
You can change all of the settings for an existing context service resource except its JNDI name. Use the get and set subcommands to view and change the values of the context service attributes.
| When a resource is updated, the existing resource is shut down and recreated. If an application used the resource prior to the update, the application or the server must be restarted. |
-
Ensure that the server is running. Remote subcommands require a running server.
-
List the context service resources by using the
list-context-servicessubcommand. -
View the attributes of a specific context service by using the
getsubcommand.
For example:asdmin> get resources.context-service.concurrent/Context1.* -
Set an attribute of the context service by using the
setsubcommand.
For example:asdmin> set resources.context-service.concurrent/Context1.deployment-order=120
To Delete a Context Service
Use the delete-context-service subcommand in remote mode to delete an existing context service. Deleting a context service is a dynamic event and does not require server restart.
Before deleting a context service resource, all associations to the resource must be removed.
-
Ensure that the server is running. Remote subcommands require a running server.
-
List the context service resources by using the
list-context-servicessubcommand. -
If necessary, notify users that the context service is being deleted.
-
Delete the context service by using the
delete-context-servicesubcommand.
Example 14-3 To Delete a Context Service
This example deletes the context service resource named concurrent/Context1.
asadmin> delete-context-service concurrent/Context1
Context service concurrent/Context1 deleted successfully.
Command delete-context-service executed successfully.
You can also view the full syntax and options of the subcommand by typing asadmin help delete-context-service at the command line.
Configuring Managed Thread Factories
Managed thread factories are used by applications to create managed threads on demand. The threads are started and managed by the container. The context of the container is propagated to the thread executing the task.
|
Jakarta Concurrency specifies that certain default resources be made available to applications, and defines specific JNDI names for these default resources. Payara Server makes these names available through the use of logical JNDI names, which map Jakarta EE JNDI names to specific Payara Server resources.
For managed thread factories, the mapping is as follows: java:comp/DefaultManagedThreadFactory This Jakarta Concurrency standard name is mapped to the concurrent/__defaultManagedThreadFactory resource. |
To Create a Managed Thread Factory
Managed Thread Factories can be created by using Admin Console or Asadmin commands.
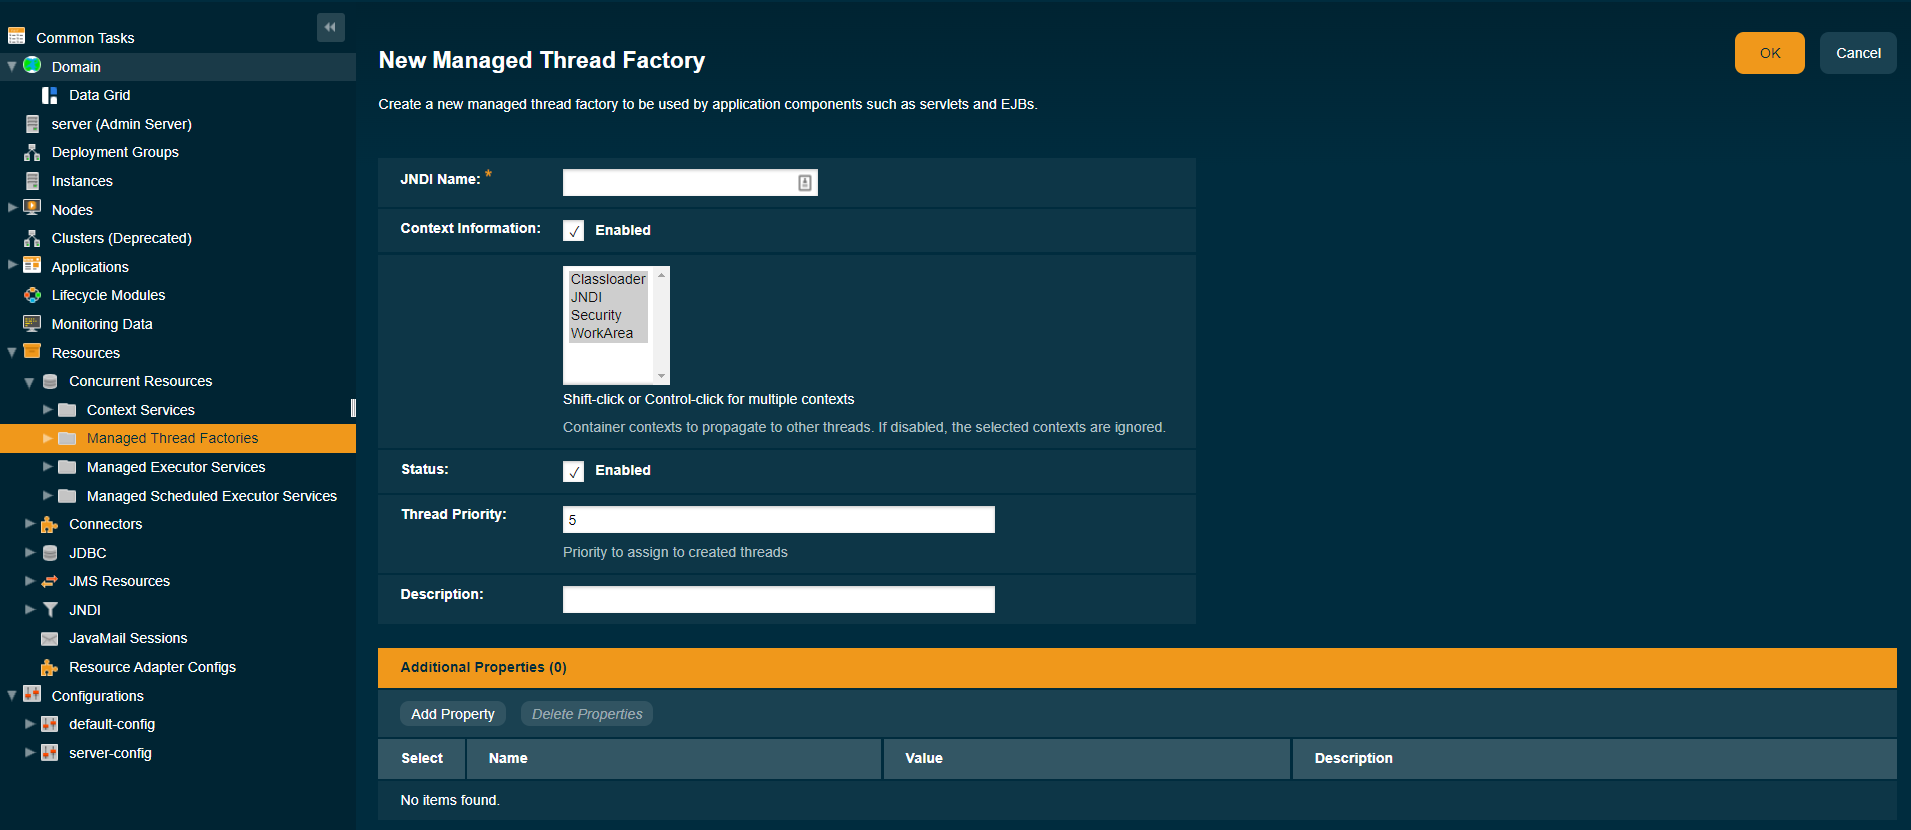
To create a new Managed Thread Factory in the Admin Console, go to Resources → Concurrent Resources → Managed Thread Factories → New:

Because all JNDI names are in the java:comp/env subcontext, when specifying the JNDI name of a managed thread factory, use only the concurrent/ name format. For example, concurrent/Factory1.
For more information about the default managed thread factory resource included with Payara Server, see Default Concurrent Resources.
| Creating a managed thread factory resource is a dynamic event and typically does not require server restart. Applications can use a resource as soon as it is created. However, if an application tried to use a resource before it was created, and that resource is created later, the application or the server must be restarted. Otherwise, the application will not be able to locate the resource. |
-
Ensure that the server is running. Remote subcommands require a running server.
-
Create a managed thread factory by using the
create-managed-thread-factorysubcommand. -
If necessary, notify users that the new resource has been created.
Example 14-4 To Create a Managed Thread Factory
This example creates a managed thread factory resource named concurrent/Factory1.
asadmin> create-managed-thread-factory concurrent/Factory1
Managed thread factory concurrent/Factory1 created successfully.
Command create-managed-thread-factory executed successfully.
You can also view the full syntax and options of the subcommand by typing asadmin help create-managed-thread-factory at the command line.
To List Managed Thread Factories
Use the list-managed-thread-factories subcommand in remote mode to list the existing managed thread factory resources.
-
Ensure that the server is running. Remote subcommands require a running server.
-
List managed thread factory resources by using the
list-managed-thread-factoriessubcommand.
Example 14-5 To List a Managed Thread Factory
This example lists managed thread factory resources on the default server instance, server.
asadmin> list-managed-thread-factories
concurrent/__defaultManagedThreadFactory
concurrent/Factory1
concurrent/Factory2
Command list-managed-thread-factories executed successfully.
You can also view the full syntax and options of the subcommand by typing asadmin help list-managed-thread-factories at the command line.
To Update a Managed Thread Factory
You can change all of the settings for an existing managed thread factory resource except its JNDI name. Use the get and set subcommands to view and change the values of the managed thread factory attributes.
| When a resource is updated, the existing resource is shut down and recreated. If applications used the resource prior to the update, the application or the server must be restarted. |
-
Ensure that the server is running. Remote subcommands require a running server.
-
List the managed thread factory resources by using the
list-managed-thread-factoriessubcommand. -
View the attributes of a managed thread factory by using the
getsubcommand.
For example:asdmin> get resources.managed-thread-factory.{resource-JNDI-name}.* -
Set an attribute of the managed thread factory by using the
setsubcommand.
For example:asdmin> set resources.managed-thread-factory.{resource-JNDI-name}.deployment-order=120
To Delete a Managed Thread Factory
The delete-managed-thread-factory asadmin command can be used to delete an existing managed thread factory. Deleting a managed thread factory is a dynamic event and does not require server restart.
Before deleting a managed thread factory resource, all associations to the resource must be removed.
Before deleting a managed thread factory resource, all associations to the resource must be removed.
-
Ensure that the server is running. Remote subcommands require a running server.
-
List the managed thread factory resources by using the
list-managed-thread-factoriessubcommand. -
If necessary, notify users that the managed thread factory is being deleted.
-
Delete the managed thread factory by using the
delete-managed-thread-factorysubcommand.
Example 14-6 To Delete a Managed Thread Factory
This example deletes the managed thread factory resource named concurrent/Factory1.
asadmin> delete-managed-thread-factory concurrent/Factory1
Managed thread factory concurrent/Factory1 deleted successfully.
Command delete-managed-thread-factory executed successfully.
You can also view the full syntax and options of the subcommand by typing asadmin help delete-managed-thread-factory at the command line.
Configuring Managed Executor Services
Managed executor services are used by applications to execute submitted tasks asynchronously. Tasks are executed on threads that are started and managed by the container. The context of the container is propagated to the thread executing the task.
|
Jakarta Concurrency specifies that certain default resources be made available to applications, and defines specific JNDI names for these default resources. Payara Server makes these names available through the use of logical JNDI names, which map Jakarta EE JNDI names to specific Payara Server resources.
For managed executor services, the mapping is as follows: java:comp/DefaultManagedExecutorService This Jakarta Concurrency standard name is mapped to the concurrent/__defaultManagedExecutorService resource. |
To Create a Managed Executor Service
Managed Executor Services can be created by using Admin Console or Asadmin commands.
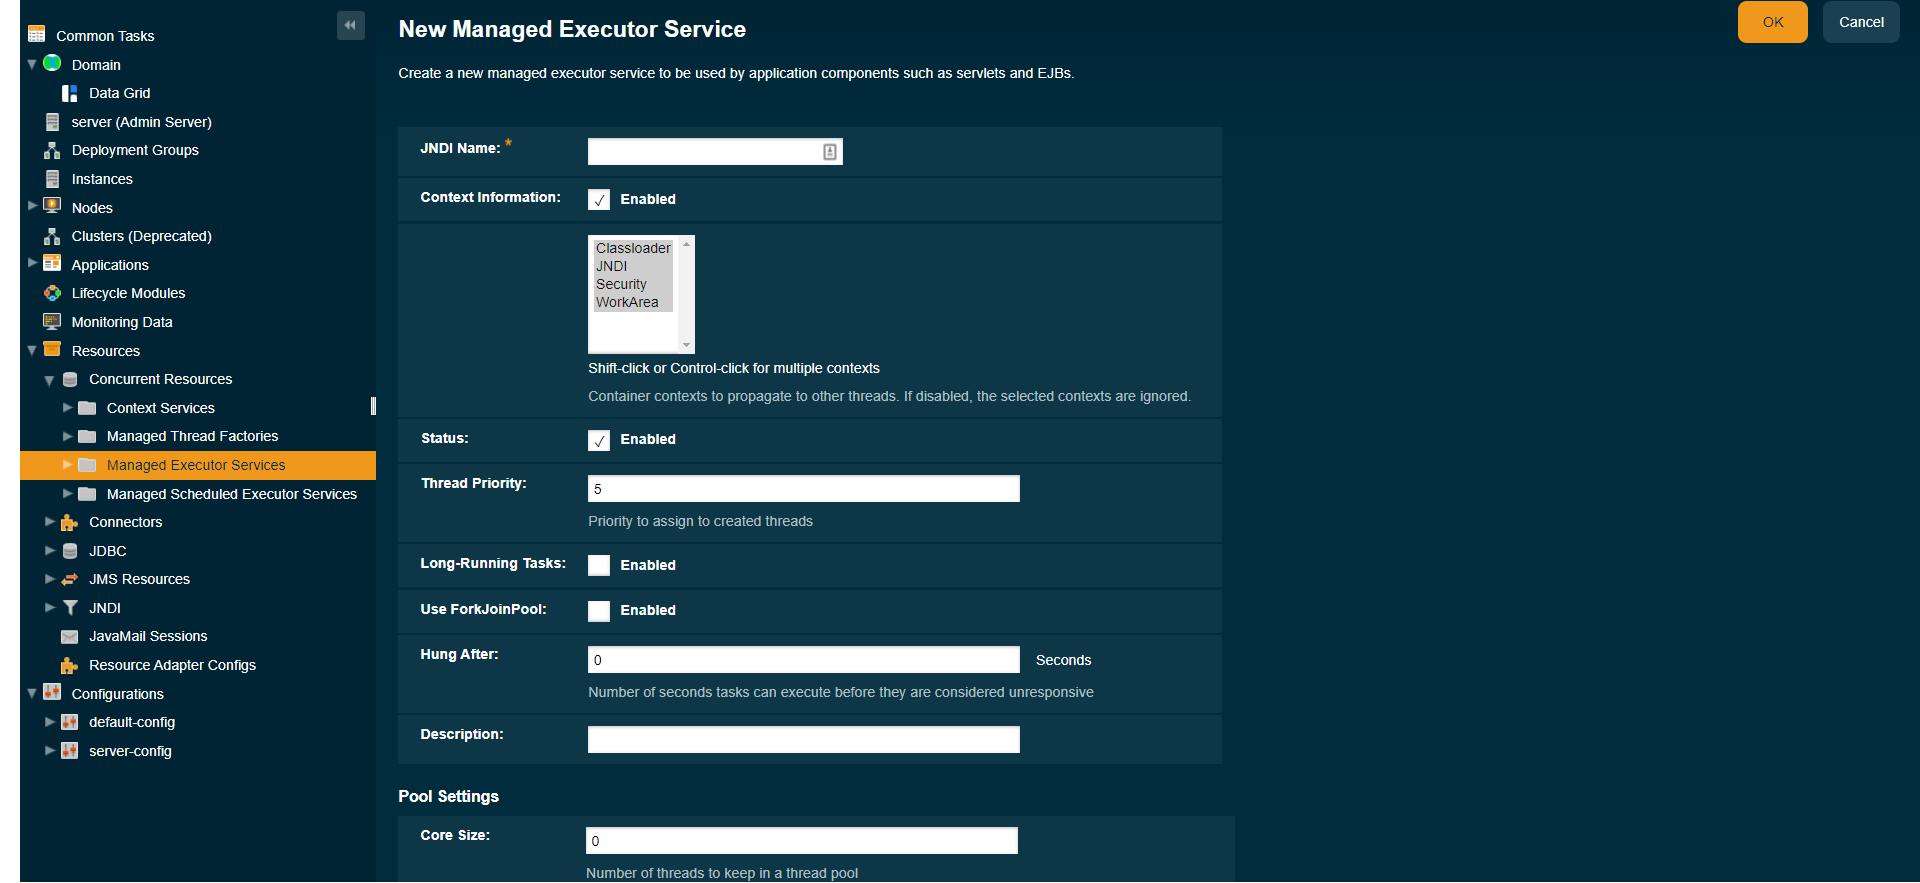
To create a new Managed Executor Service in the Admin Console, go to Resources → Concurrent Resources → Managed Executor Services → New:

Use the create-managed-executor-service subcommand in remote mode to create a managed executor service resource.
Because all JNDI names are in the java:comp/env subcontext, when specifying the JNDI name of a managed executor service, use only the concurrent/`name format. For example, `concurrent/Executor1.
For more information about the default managed executor service resource included with Payara Server, see Default Concurrent Resources.
| Creating a managed executor service resource is a dynamic event and typically does not require server restart. Applications can use a resource as soon as it is created. However, if an application tried to use a resource before it was created, and that resource is created later, the application or the server must be restarted. Otherwise, the application will not be able to locate the resource. |
-
Ensure that the server is running. Remote subcommands require a running server.
-
Create a managed executor service by using the
create-managed-executor-servicesubcommand. -
If necessary, notify users that the new resource has been created.
Example 14-7 To Create a Managed Executor Service
This example creates a managed executor service resource named concurrent/Executor1.
asadmin> create-managed-executor-service concurrent/Executor1
Managed executor service concurrent/Executor1 created successfully.
Command create-managed-executor-service executed successfully.
You can also view the full syntax and options of the subcommand by typing asadmin help create-managed-executor-service at the command line.
To List Managed Executor Services
The list-managed-executor-services asadmin command can be used to list the existing managed executor service resources.
-
Ensure that the server is running. Remote subcommands require a running server.
-
List managed executor service resources by using the
list-managed-executor-servicessubcommand.
Example 14-8 To List a Managed Executor Service
This example lists managed executor service resources on the default server instance, server.
asadmin> list-managed-executor-services
concurrent/__defaultManagedExecutorService
concurrent/Executor1
concurrent/Executor2
Command list-managed-executor-services executed successfully.
You can also view the full syntax and options of the subcommand by typing asadmin help list-managed-executor-services at the command line.
To Update a Managed Executor Service
You can change all of the settings for an existing managed executor service resource except its JNDI name. Use the get and set subcommands to view and change the values of the managed executor service attributes respectively.
| When a resource is updated, the existing resource is shut down and recreated. If applications used the resource prior to the update, the application or the server must be restarted. |
-
Ensure that the server is running. Remote subcommands require a running server.
-
List the managed executor service resources by using the
list-managed-executor-servicessubcommand. -
View the attributes of a managed executor service by using the
getsubcommand.
For example:asdmin> get resources.managed-executor-service.{resource-JNDI-name}.* -
Set an attribute of the managed executor service by using the
setsubcommand.
For example:asdmin> set resources.managed-executor-service.{resource-JNDI-name}.deployment-order=120
To Delete a Managed Executor Service
Use the delete-managed-executor-service subcommand in remote mode to delete an existing managed executor service. Deleting a managed executor service is a dynamic event and does not require server restart.
Before deleting a managed executor service resource, all associations to the resource must be removed.
-
Ensure that the server is running. Remote subcommands require a running server.
-
List the managed executor service resources by using the
list-managed-executor-servicessubcommand. -
If necessary, notify users that the managed executor service is being deleted.
-
Delete the managed executor service by using the
delete-managed-executor-servicesubcommand.
Example 14-9 To Delete a Managed Executor Service
This example deletes the managed executor service resource named concurrent/Executor1.
asadmin> delete-managed-executor-service concurrent/Executor1
Managed executor service concurrent/Executor1 deleted successfully.
Command delete-managed-executor-service executed successfully.
You can also view the full syntax and options of the subcommand by typing asadmin help delete-managed-executor-service at the command line.
Configuring Managed Scheduled Executor Services
Managed scheduled executor services are used by applications to execute submitted tasks asynchronously at specific times. Tasks are executed on threads that are started and managed by the container. The context of the container is propagated to the thread executing the task.
|
Jakarta Concurrency specifies that certain default resources be made available to applications, and defines specific JNDI names for these default resources. Payara Server makes these names available through the use of logical JNDI names, which map Jakarta EE JNDI names to specific Payara Server resources.
For managed scheduled executor services, the mapping is as follows: java:comp/DefaultManagedScheduledExecutorService This Jakarta Concurrency standard name is mapped to the concurrent/__defaultManagedScheduledExecutorService resource. |
To Create a Managed Scheduled Executor Service
Managed Scheduled Executor Services can be created by using Admin Console or Asadmin commands.
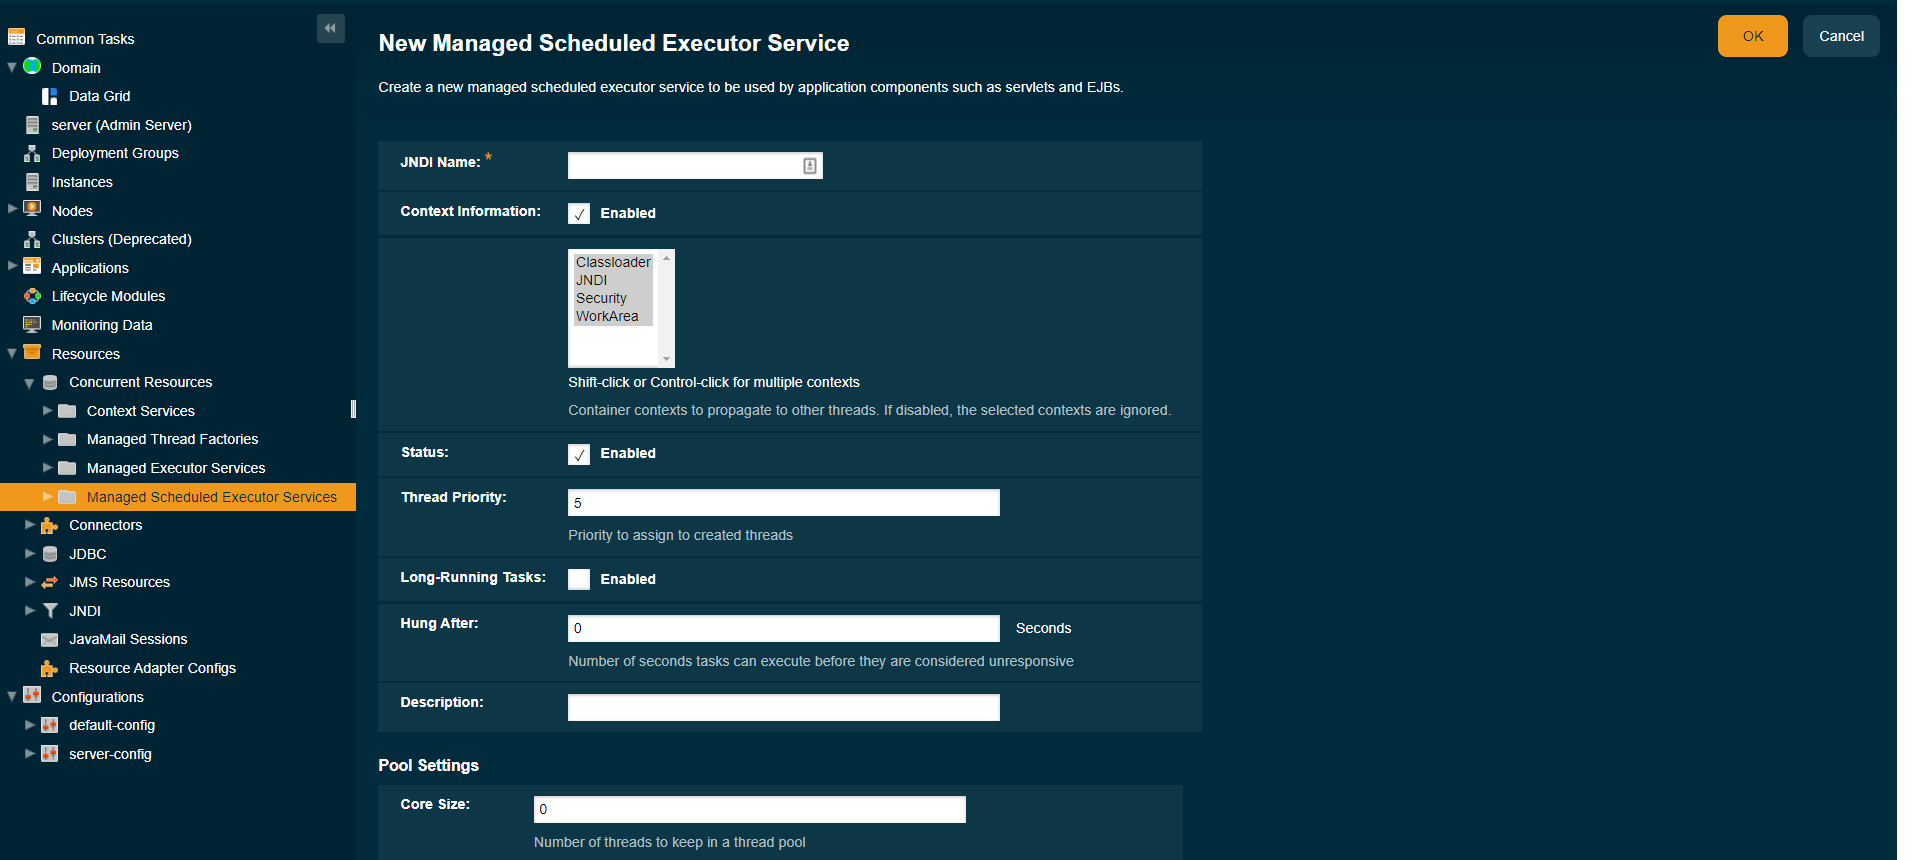
To create a new Managed Scheduled Executor Service in the Admin Console, go to Resources → Concurrent Resources → Managed Scheduled Executor Services → New:

Alternatively, the create-managed-scheduled-executor-service asadmin command can be used to create a managed scheduled executor service resource.
Because all JNDI names are in the java:comp/env subcontext, when specifying the JNDI name of a managed scheduled executor service, use only the concurrent/`name format. For example, `concurrent/ScheduledExecutor1.
For more information about the default managed scheduled executor service resource included with Payara Server, see Default Concurrent Resources.
| Creating a managed scheduled executor service resource is a dynamic event and typically does not require server restart. Applications can use a resource as soon as it is created. However, if an application tried to use a resource before it was created, and that resource is created later, the application or the server must be restarted. Otherwise, the application will not be able to locate the resource. |
-
Ensure that the server is running. Remote subcommands require a running server.
-
Create a managed scheduled executor service by using the
create-managed-scheduled-executor-servicesubcommand. -
If necessary, notify users that the new resource has been created.
Example 14-10 To Create a Managed Scheduled Executor Service
This example creates a managed scheduled executor service resource named concurrent/ScheduledExecutor1.
asadmin> create-managed-scheduled-executor-service concurrent/ScheduledExecutor1
Managed scheduled executor service concurrent/ScheduledExecutor1 created successfully.
Command create-managed-scheduled-executor-service executed successfully.
You can also view the full syntax and options of the subcommand by typing asadmin help create-managed-scheduled-executor-service at the command line.
To List Managed Scheduled Executor Services
Use the list-managed-scheduled-executor-services subcommand in remote mode to list the existing managed scheduled executor service resources.
-
Ensure that the server is running. Remote subcommands require a running server.
-
List managed scheduled executor service resources by using the
list-managed-scheduled-executor-servicessubcommand.
Example 14-11 To List a Managed Scheduled Executor Service
This example lists managed scheduled executor service resources on the default server instance, server.
asadmin> list-managed-scheduled-executor-services
concurrent/__defaultManagedScheduledExecutorService
concurrent/ScheduledExecutor1
concurrent/ScheduledExecutor2
Command list-managed-scheduled-executor-services executed successfully.
You can also view the full syntax and options of the subcommand by typing asadmin help list-managed-scheduled-executor-services at the command line.
To Update a Managed Scheduled Executor Service
You can change all of the settings for an existing managed scheduled executor service resource except its JNDI name. Use the get and set subcommands to view and change the values of the managed scheduled executor service attributes.
| When a resource is updated, the existing resource is shut down and recreated. If applications used the resource prior to the update, the application or the server must be restarted. |
-
Ensure that the server is running. Remote subcommands require a running server.
-
List the managed scheduled executor service resources by using the
list-managed-scheduled-executor-servicessubcommand. -
View the attributes of a managed scheduled executor service by using the
getsubcommand.
For example:asdmin>get resources.managed-scheduled-executor-service.{resource-JNDI-name}.* -
Set an attribute of the managed scheduled executor service by using the
setsubcommand.
For example:asdmin> set resources.managed-scheduled-executor-service.{resource-JNDI-name}.deployment-order=120
To Delete a Managed Scheduled Executor Service
Use the delete-managed-scheduled-executor-service subcommand in remote mode to delete an existing managed scheduled executor service. Deleting a managed scheduled executor service is a dynamic event and does not require server restart.
Before deleting a managed scheduled executor service resource, all associations to the resource must be removed.
-
Ensure that the server is running. Remote subcommands require a running server.
-
List the managed scheduled executor service resources by using the
list-managed-scheduled-executor-servicesubcommand. -
If necessary, notify users that the managed scheduled executor service is being deleted.
-
Delete the managed scheduled executor service by using the
delete-managed-scheduled-executor-servicesubcommand.
Example 14-12 To Delete a Managed Scheduled Executor Service
This example deletes the managed scheduled executor service resource named concurrent/ScheduledExecutor1.
asadmin> delete-managed-scheduled-executor-service concurrent/ScheduledExecutor1
Managed scheduled executor service concurrent/ScheduledExecutor1 deleted successfully.
Command delete-managed-scheduled-executor-service executed successfully.
You can also view the full syntax and options of the subcommand by typing asadmin help delete-managed-scheduled-executor-service at the command line.
