Payara Enterprise has additional notifiers built in and ready for use with your server environment that do not require further installation. These additional notifiers are pre-installed as extensions in the server module layout.
| If needed, notifiers can be removed from the server’s environment to reduce overhead. |
Notifier Extension Structure
Each notifier extension is composed of 2 parts:
The Core Module
The core module contains all the code necessary to receive notifications from the notification service and propagate them to their proposed channel. When installing this module, you’ll get the admin commands to configure the notifier, as well as the ability to select that notifier in the notification sources such as Request Tracing commands and admin console pages.
Installing a Notifier
To install a notifier extension: download the artifacts listed on the notifier documentation page and drop them into the as-install/modules directory of your Payara Server installation.
You can then restart the server to see your extension activated.
Removing Notifiers
All Payara Server notifiers are included in Payara Enterprise by default, however they are fully pluggable and can be removed from your Payara Server installation.
To remove a notifier from Payara Enterprise edition, first find the relevant modules to the notifier you want to remove in as-install/modules. To fully remove the notifier, you should delete both the core module and the admin console plugin module files, then restart the domain.
If you change your mind in the future, you can just drop both the module files back into the as-install/modules directory and restart the domain for the notifier to be re-installed.
Additional Notifiers
The following notifiers are available in Payara Server Enterprise:
Email Notifier
Payara Server is able to direct notifications to a single given email address. The notifier modules are available in these locations:
To use this notifier the following requirements have to be met:
-
A valid, configured
JavaMailsession.
Configuration
At a high level, the steps to configure the email notifier are:
-
Create a
JavaMailSession -
Create the notifier using the
asadmincommand or through the Admin Console
Using the admin console
You will need a JavaMail session to send the notifications; instructions on setting up a JavaMail session can be found in this section.
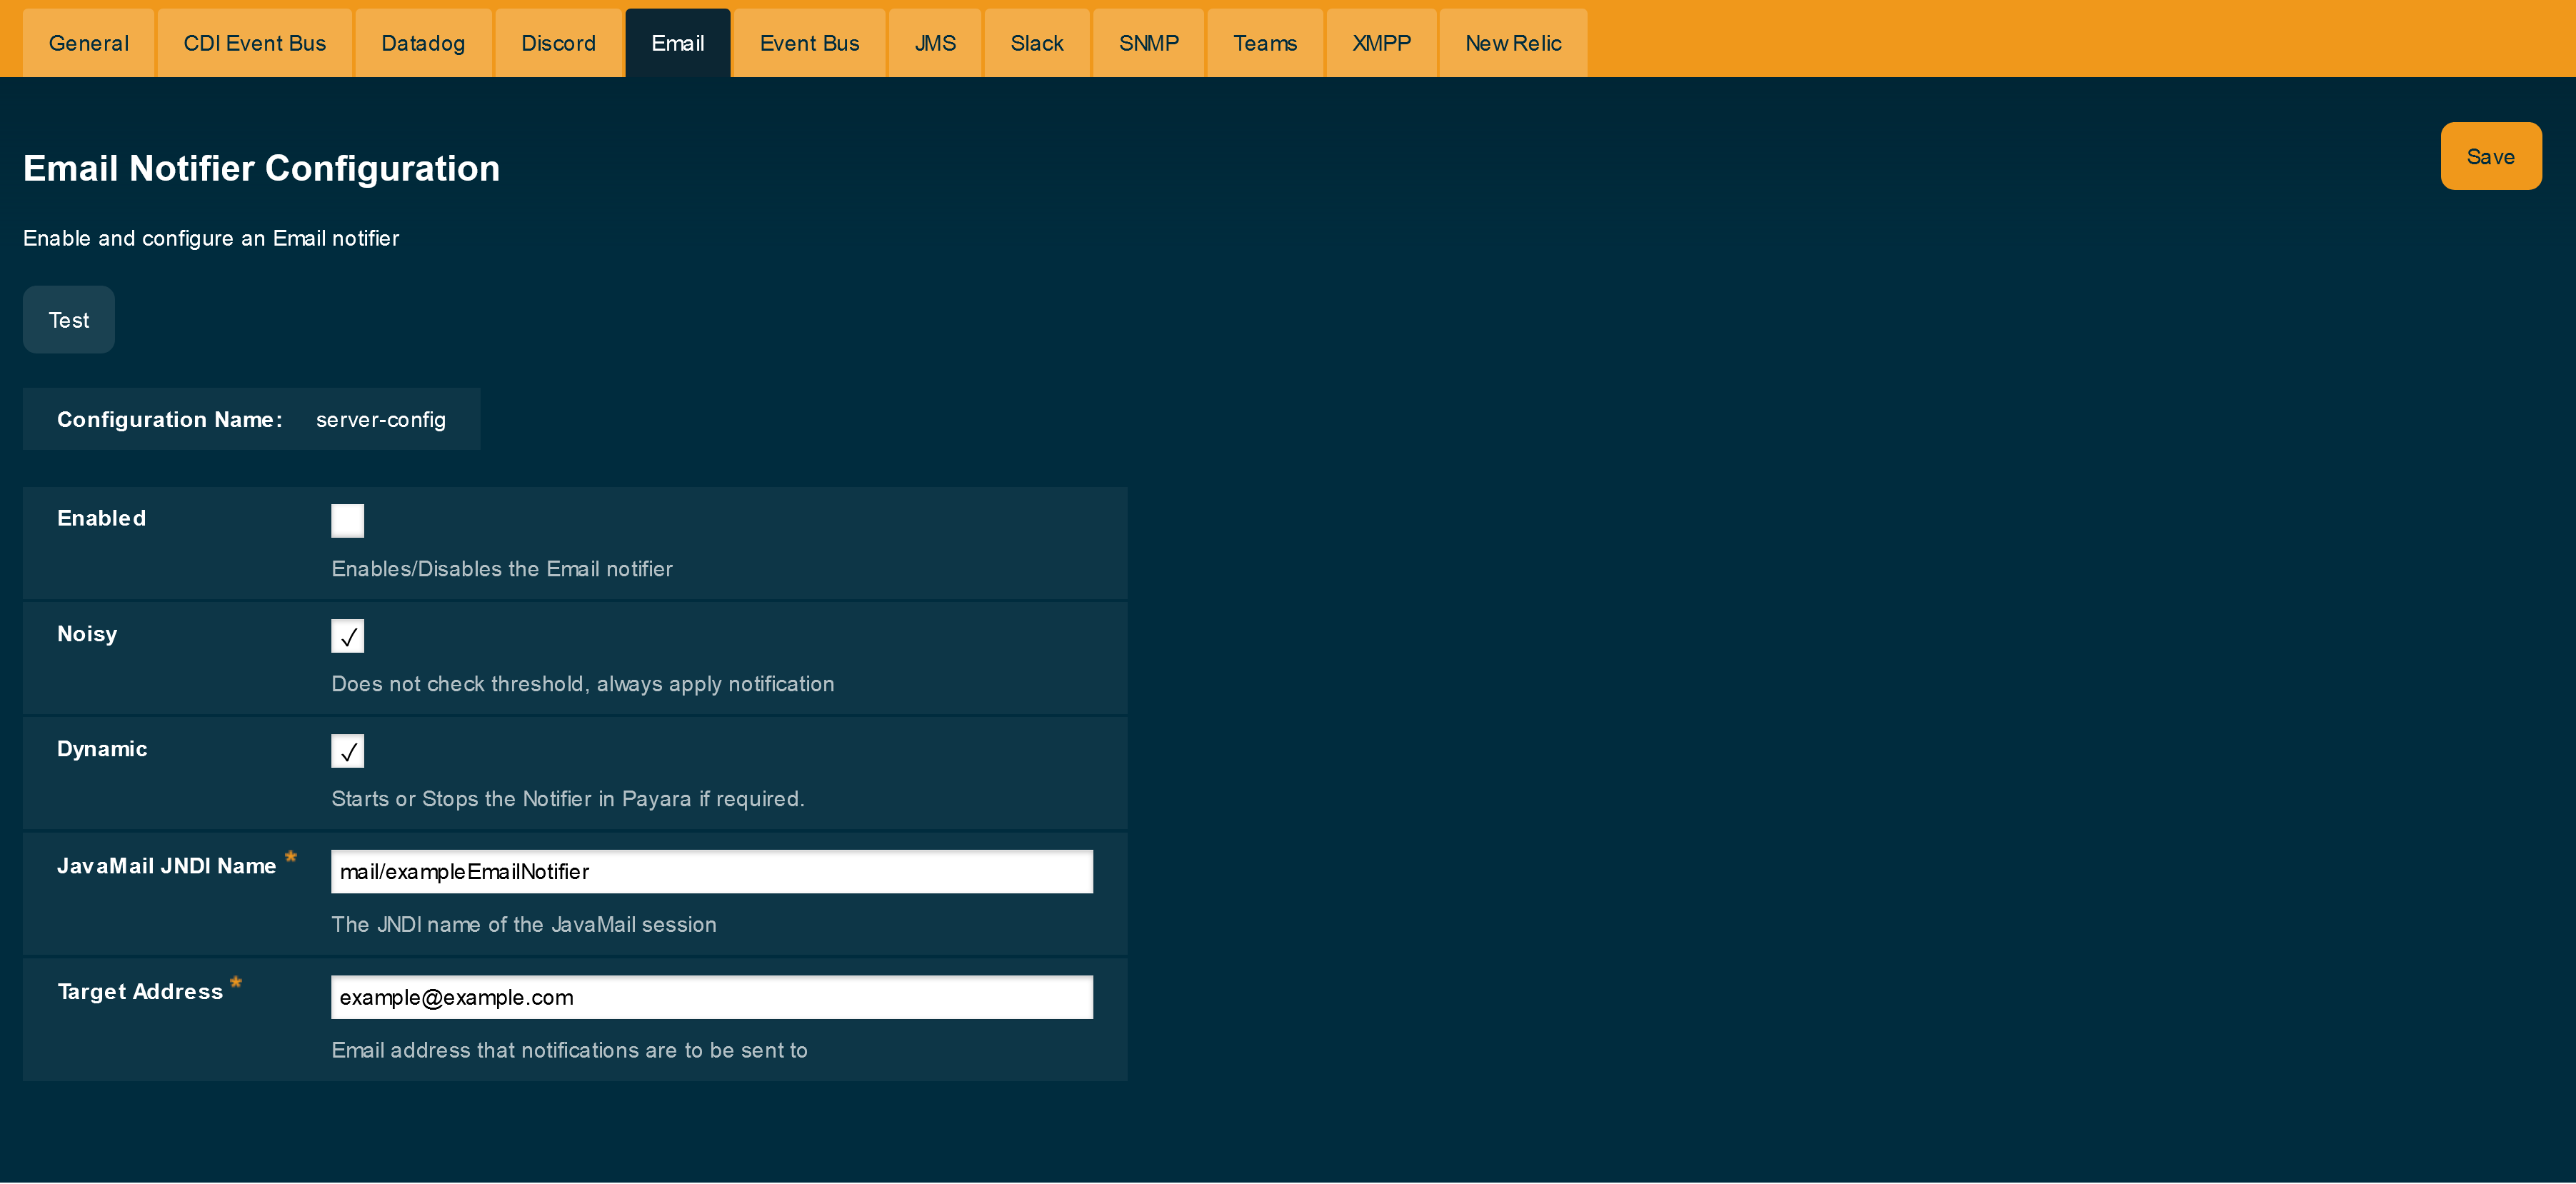
The email notifier is configured in the Email tab of the Notification Section of the server’s instance configuration.
On the Email tab there are four fields:
Enabled-
Determines whether the notifier should be activated.
Dynamic-
Sets whether the notifier will be enabled without a restart,
trueenables it immediately, whilefalserequires a restart. JavaMail JNDI Name-
Sets the name of the Java Naming and Directory Interface (JNDI) of the configured
JavaMailsession. The parameter name is--jndiNamein the asadmin command. Target Address-
Sets the email address which will receive the email notifications. Currently only one address can be specified. The parameter name is
--recipientin the asadmin command.
Using the Asadmin CLI
The same configuration can be set using an asadmin command, as shown below:
asadmin set-email-notifier-configuration --jndiName=mail/exampleEmailNotifier --recipient=notifications@example.com --enabled=true --dynamic=trueTo check the currently applied configuration, you can run the following asadmin
command:
asadmin get-email-notifier-configurationIt will return the current configuration of the email notifier in full detail; including whether it is enabled, the recipient address, and the JNDI name of the current JavaMail session in use.
Here is an example output:
Enabled  JNDI Name                  Recipient
true     mail/exampleEmailNotifier  example@example.com
SNMP Notifier
The Simple Network Management Protocol is a standard Internet Protocol that was designed to collect and organize information about all managed devices and services that belong to the same network. SNMP is supported by a huge variety of devices, including network devices like routers, modems and switches, servers and in the latter years extended to cover IoT devices and specialized equipment connected to the cloud.
The notifier modules are available in these locations:
| Use the version of SNMP4J 3.7.5 provided above as it has a modified manifest to be compatible with Payara Enterprise. |
SNMP Concepts
The basic elements in every SNMP communication are the following:
- Managed Component
-
This is the device or service that is managed and monitored by SNMP, in this specific case, Payara Server.
- SNMP Agent
-
A specialized software that gathers data on the overall status of the managed component and exposes specific instructions over interfaces for its management. In our case, the SNMP Notifier acts as an SNMP agent.
- SNMP Manager
-
A server machine that runs a network management system, which is configured to monitor and manage all devices and services in a network by "talking" to the agents and gathering all relevant information.
The SNMP protocol works using PDUs (Protocol Data Units) to allow managers and agents to work with a defined set of instructions.
| The notifier currently operates using the TRAP PDU to handle notification events. |
SNMP Traps
Payara Server notifies network management systems using SNMP traps. An SNMP trap is a special PDU that is used to generate an asynchronous notification from an agent to a manager. An important point to stress with traps is that they are asynchronous events that can occur at any time, which means that a manager expects to receive updates in a PASSIVE manner, thus saving resources.
In order to correctly configure Payara Server to send traps to a manager, the following information must be reviewed in tandem with the configuration of the manager:
- Hostname
-
This is the hostname of the server where the manager software resides.
- Port
-
This is the UDP port where the manager software is receiving SNMP traps. By default, the protocol usually uses port 162.
- Version
-
The version used by the SNMP trap.
- Community
-
This is the community string used to "secure" the communication to the manager
- OID
-
The object identifier used by the trap in order to allow the manager to correctly interpret the status of the server.
Version
Currently, the SNMP protocol is supported on three versions: v1, v2c and v3. Version 1 is extremely unsecure since authentication is managed only with the community string. Version 2c is an enhanced version of v1 in that improves the message formats and the protocol operations, using stronger authentication guards using the simplistic community string mechanism.
Finally, Version 3 improves security and remote management discarding the use of community strings.
Currently, the notifier configuration only supports v1 and v2c, hence the need to correctly configure a community string as well. By default, all traps are configured to use v2c, since it’s guaranteed to be supported by almost all network manager systems.
Community
The community string is used to establish trust between managers and agents. The community names are essentially passwords; most vendors ship their equipment with default community strings: public for a read-only community (allows reading data values, but doesn’t allow modification) and private for the read-write community (allowed to read and modify data values). It’s important to change these defaults on production environments.
The notifier configures all traps with the public community string by default.
OID - Object Identifier
Agents expose management data as variables composed in a structured hierarchy. SNMP does not define which variables are exposed by a managed component. Instead, SNMP uses an extensible design which allows applications and services to define their own hierarchies and other metadata (such as type and description of the variable), which are described in a Management Information Base (MIB).
MIBs describe the structure of the management data of a device subsystem using a hierarchical namespace composed of Object Identifiers (OID). Each OID uniquely identifies a variable sent in the SNMP trap by the agent.
In order for a network management system to understand a trap sent to it by an agent, the management system must know what the OID defines. Therefore, it must have the MIB for that trap loaded in its configuration.
The default value used by the notification service is .1.3.6.1.2.1.1.8. This OID represents a simple octet string that is used to hold the content of the notification event.
| In most cases there is no need to change the default OID, since it’s verified by most of the standard MIBs included on SNMP management systems and tools. |
Configuration
To set up the SNMP notifier on Payara Server you need to input the values mentioned earlier in the domain configuration. As usual, you can do this using the administration web console or from the command line.
| Keep in mind that the only required value to configure the notifier is the hostname of your network management system. All other values will assume the defaults discussed earlier if not configured explicitly. |
Using the Admin Console
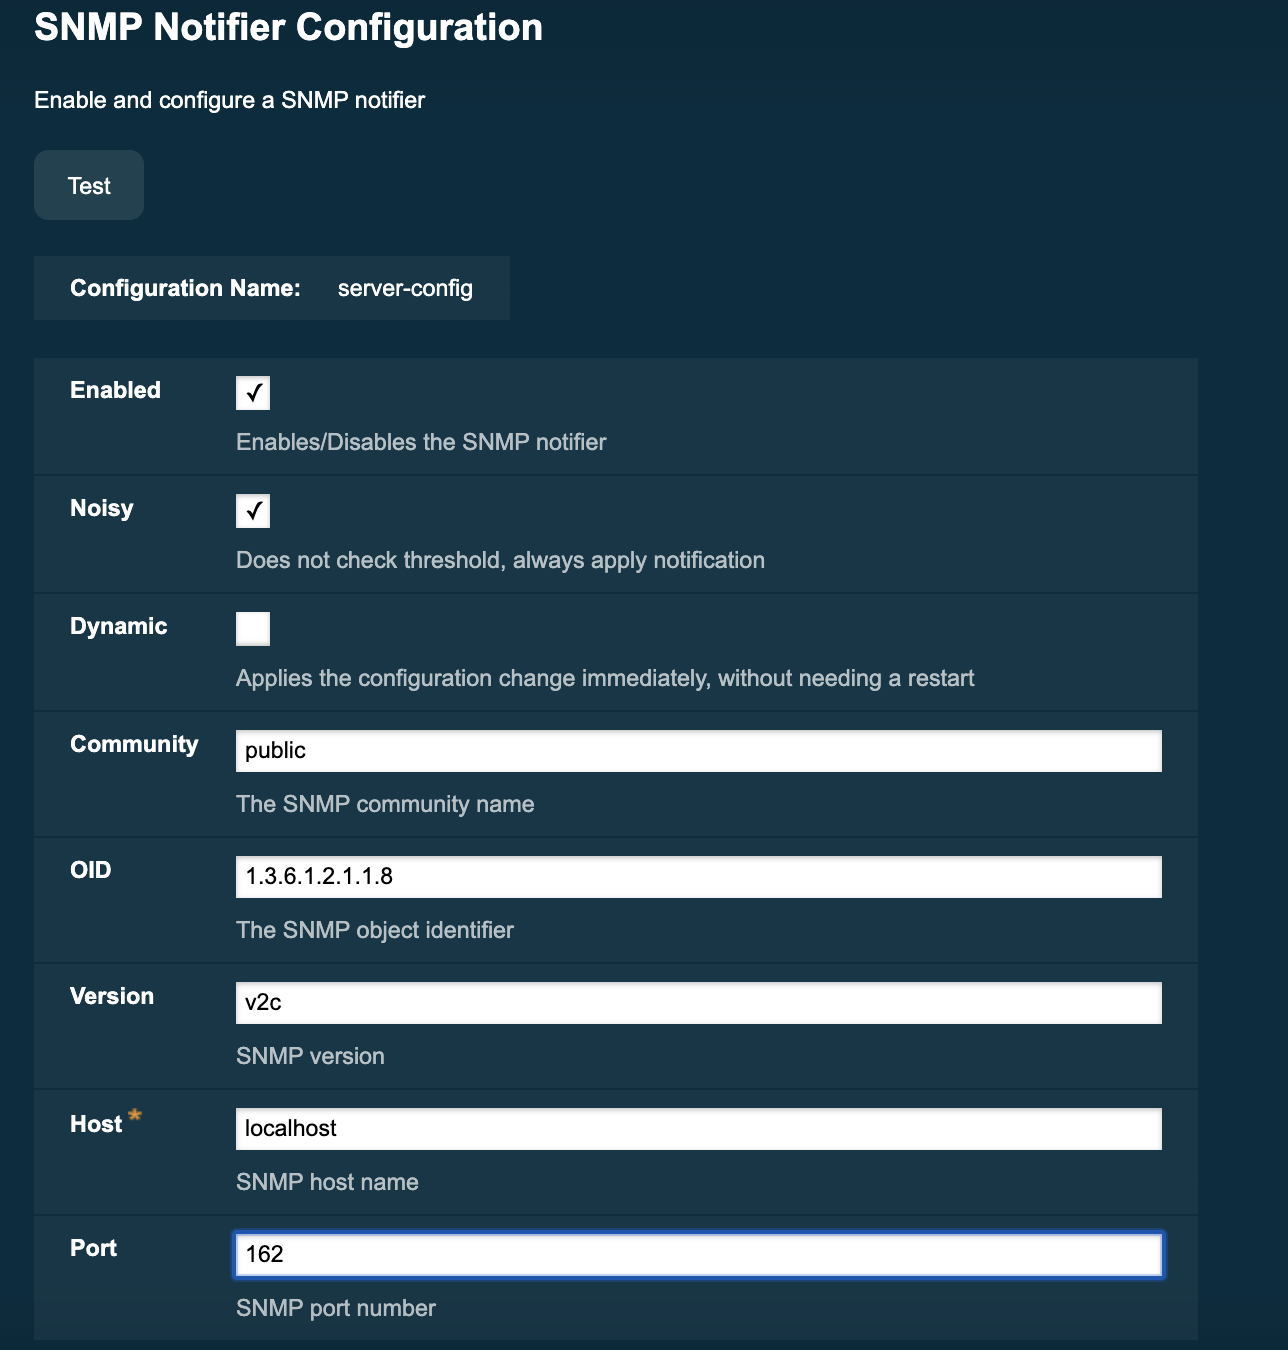
To configure the Notification Service in the Administration Console, go to Configuration → [instance-configuration (like server-config)] → Notification Service and click on the SNMP tab:
Using the Asadmin CLI
To configure the Notification Service from the command line, use the set-snmp-notifier-configuration asadmin command like this:
asadmin set-snmp-notifier-configuration --enabled=true --dynamic=true --hostname=localhost --snmpport=162 --community=public --oid=".1.3.6.1.2.1.1.8" --version=v2cYou can use the --enabled and --dynamic options to enable or disable the SNMP notifier on demand.
Also, you can retrieve the current configuration for the SNMP notifier using the get-snmp-notifier-configuration asadmin command like this:
asadmin > get-snmp-notifier-configurationThis will return the details of the current SNMP configuration; see below for an example:
Enabled  Filter   Community  OID                Version  Host       SNMP Port
true     WARNING  example    .1.3.6.1.2.1.1.8   v2c      127.0.0.1  162
Troubleshooting
When you have correctly configured the SNMP notifier, it can be used to push notifications to your configured server. You can visualize the notification messages on your network management system of your choice.
If you do not see any notification event messages, check the following:
-
Is the SNMP notifier enabled?
-
Is the Notification Service itself enabled?
-
Is there a service configured to use the notifier? (e.g. the HealthCheck service)
-
Is the service configured to send notifications frequently enough to observe?
-
Have you enabled the service after configuring it?
-
Does the SNMP network management supports SNMP traps?
-
Does the SNMP network management system support the configured protocol version?
-
Is the community string correctly supported by the SNMP network management system?
-
Are the SNMP management system’s MIB correctly configured to verify traps sent with the configured OID?
-
Is there a firewall between Payara Server and the network management system that is correctly configured to allow sending SNMP traps in the respective port?
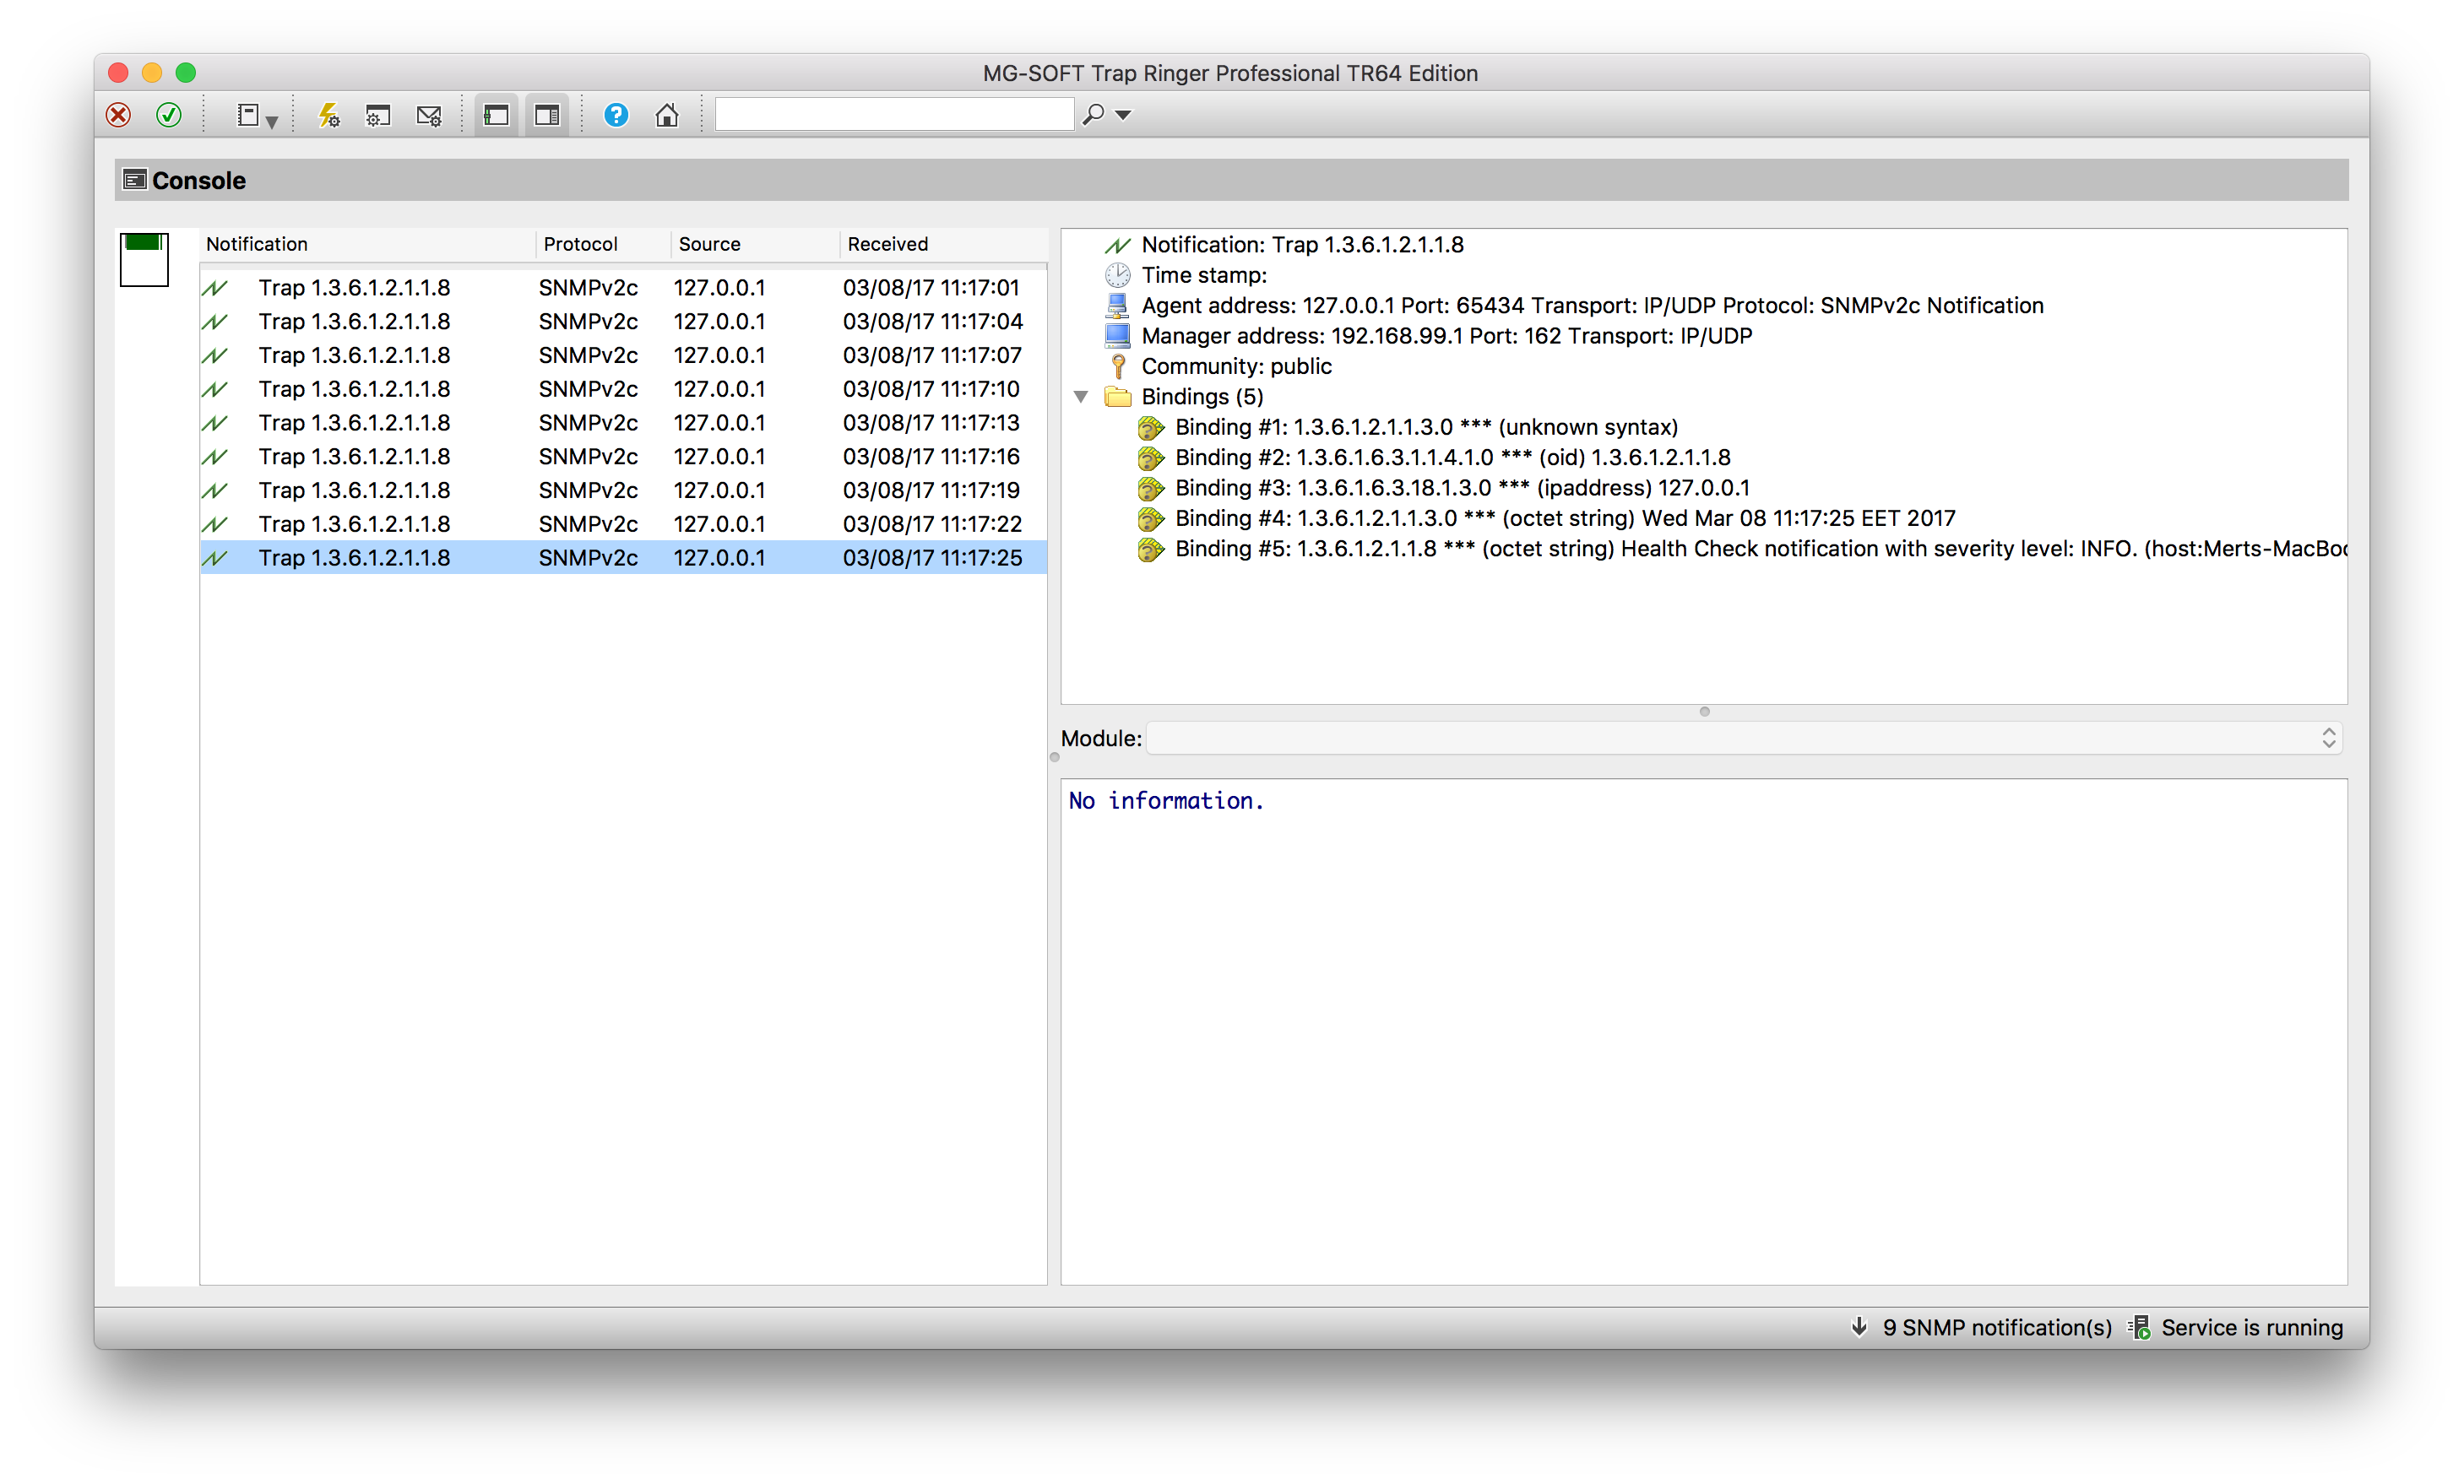
Here’s a sample of how the SNMP traps are visualized using MG-Soft Trap Ringer software:
New Relic Notifier
New Relic is an application performance monitoring (APM) tool that can be used to gather statistics and notify on key critical events generated by different type of applications.
New Relic specializes on integrating Java application servers like GlassFish, JBoss WildFly, etc. and other application frameworks seamlessly.
Payara Server includes a special notifier to send notifications from the Notification service to the New Relic Insights service using its remote API.
Custom notification events generated from Payara Server’s own monitoring systems like the Request Tracing and Healthcheck services can be automatically identified by this API and gathered correctly to identify performance issues on the application server.
The notifier modules are available in these locations:
New Relic Configuration
In order for the notifier to work correctly, you must complete the following requirements:
-
Create a New Relic user account. You can sign up for a new account here
New Relic offers 14-days trial accounts that can be used to test the service for free. -
Configure application performance monitoring (APM) for a Payara Server instance by installing a New Relic Java agent
-
Configure a New Relic Insights API key that will be used to set up the notifier.
Configure Application Performance Monitoring for Payara Server
The first task is to set up the New Relic Java agent in Payara Server. To do that, follow these steps:
-
Login to New Relic with your account credentials, and if you haven’t set up a monitoring agent yet, the following screen will be shown:
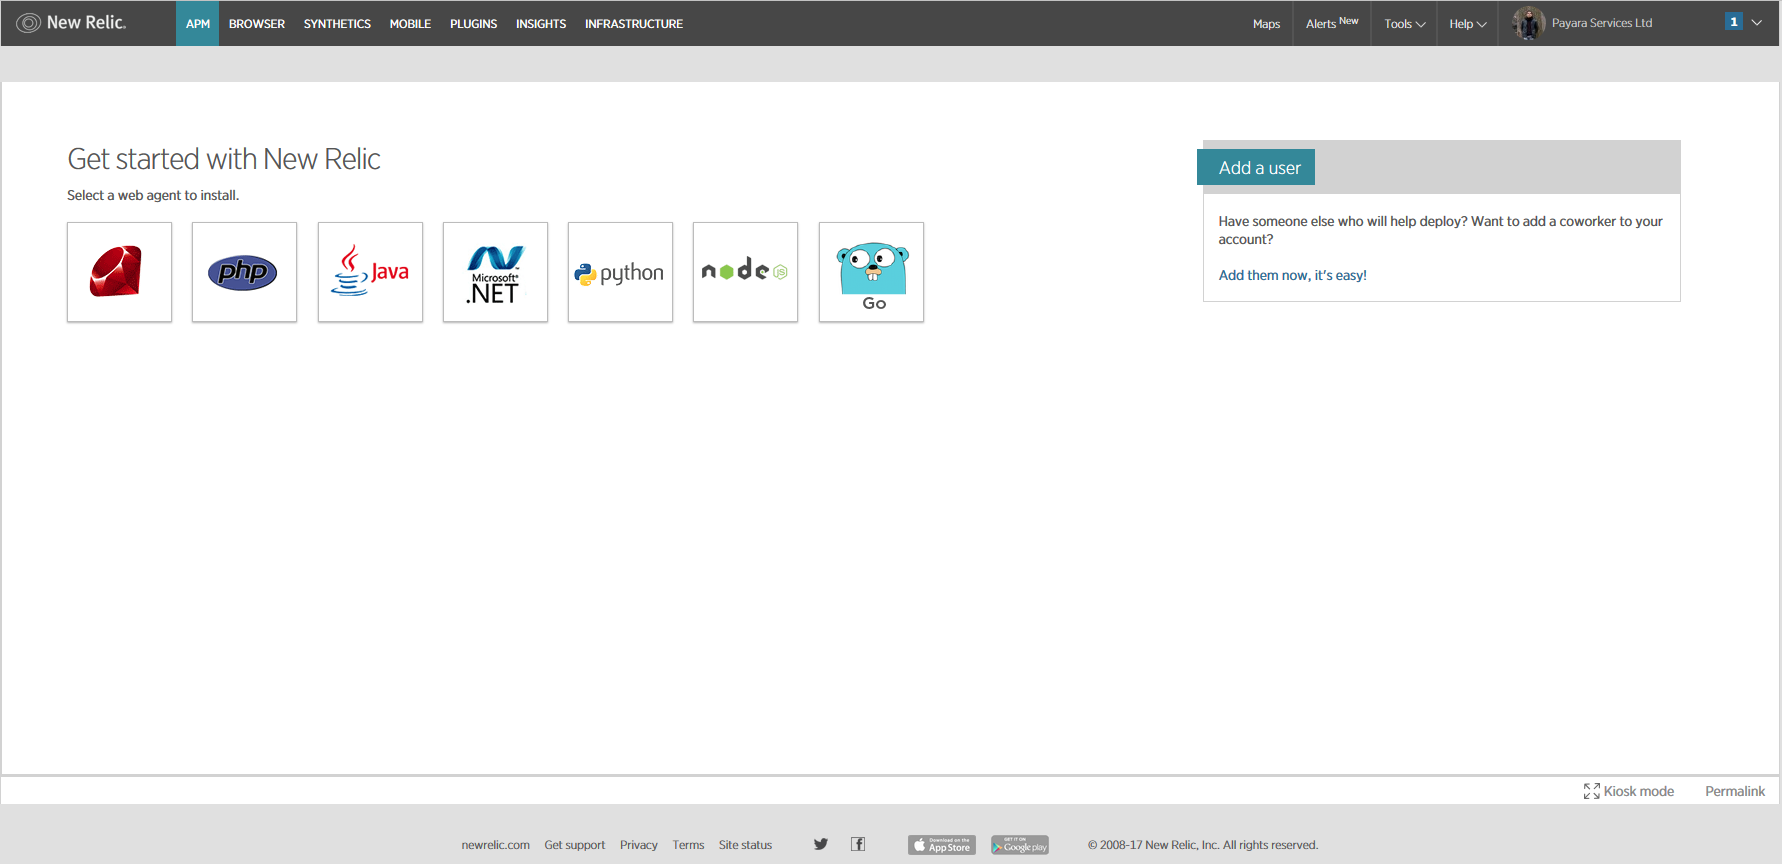
-
Select the Java option and the agent installation procedure will be shown:
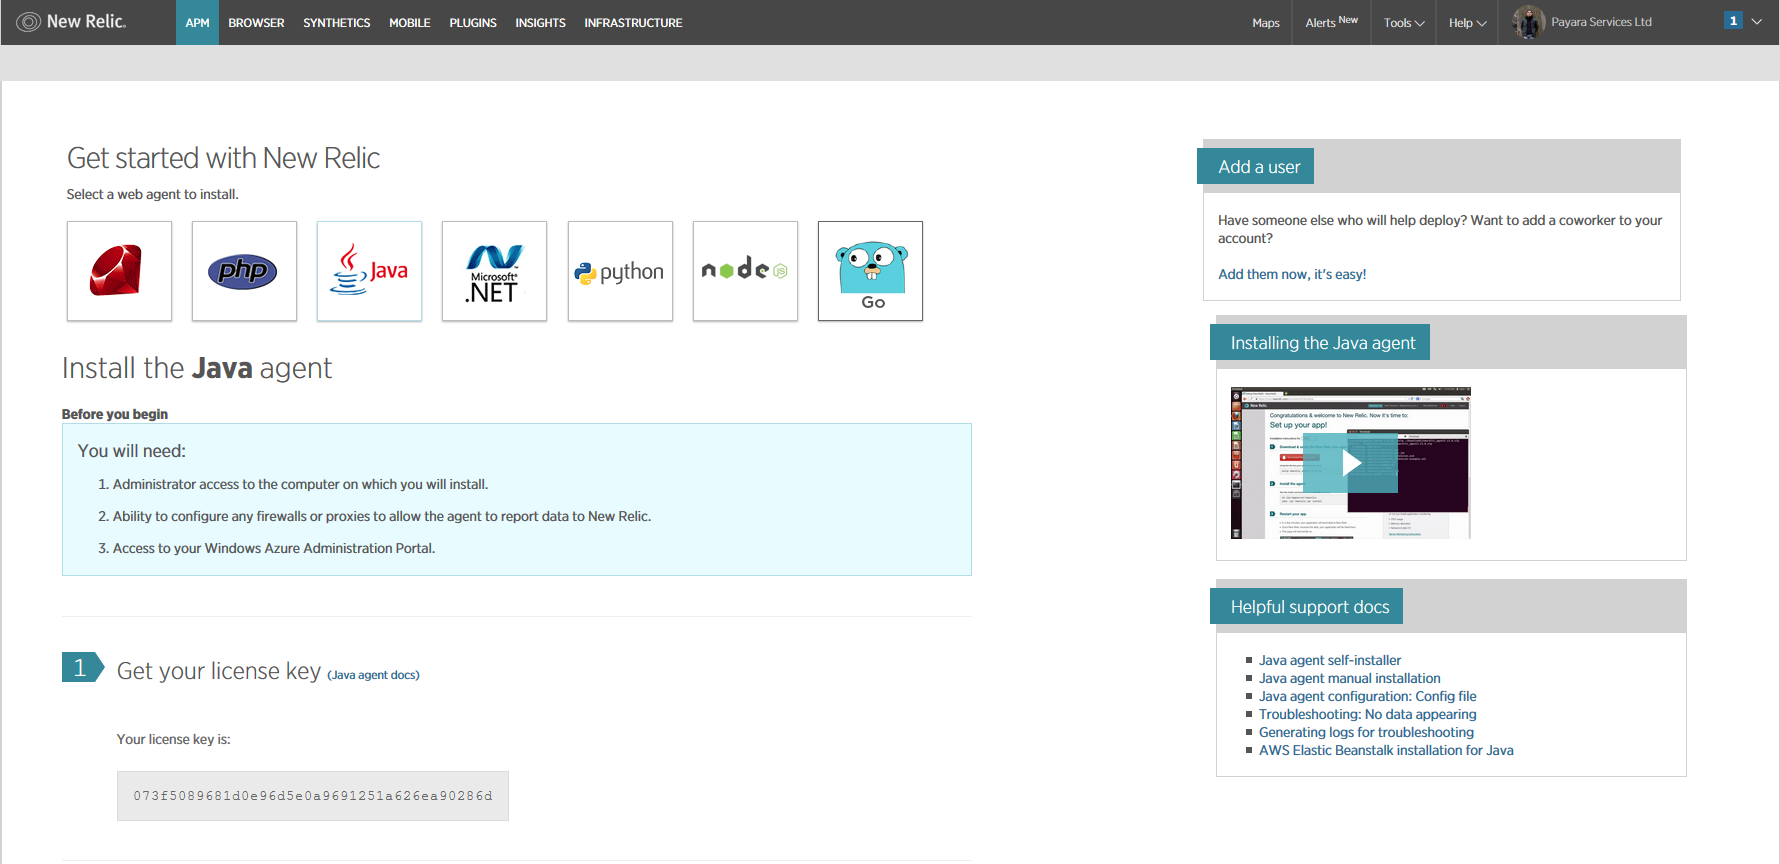
From the screen shown, copy the value of the License Key (you need to press the Reveal License Key button first) since you will need it later.
-
Now, on the same screen press the Download the Java Agent. This will download the Java agent files to your station. Unzip the files and copy the resulting folder to the root folder of the Payara Server domain you want to monitor.
In the following example we are copying it to the default domain
domain1:unzip newrelic-java-3.XX.X.zip mv newrelic as-install/domains/domain1 -
Before proceeding to install the agent into the Payara Server domain, we need to configure the License Key we got earlier. To do this, modify the agent’s configuration file that’s located at
domain-dir/newrelic/newrelic.ymlby using thelicense_keyproperty:# ... # This section is for settings common to all environments. # Do not add anything above this next line. common: &default_settings # ============================== LICENSE KEY =============================== # You must specify the license key associated with your New Relic # account. ... license_key: '073f5089681d0e96d5e0a9691251a626ea90286d' # Agent Enabled # Use this setting to disable the agent instead of removing it from the startup command. # Default is true. agent_enabled: true # Set the name of your application as you'd like it to show up in New Relic. # ... app_name: Payara Server 7.1.0 # ...We also recommend setting the name of the application under the app_nameproperty to correctly identify this server’s domain on the APM dashboard
| The License Key value must be inserted using single quotes (') |
-
Now, proceed to install the agent by running the following command at the root of the domain folder:
java -jar newrelic/newrelic.jar installIf the installation was successful, the output of the agent’s installer will show it like this:
***** ( ( o))  New Relic Java Agent Installer
***** Installing version 3.39.1 ...

* Backed up start script to /opt/7.1.0/glassfish/domains/domain1/config/domain.xml.20170613_180108
* Added agent switch to start script /opt/7.1.0/glassfish/domains/domain1/config/domain.xml

* No need to create New Relic configuration file because:
 A config file already exists: /opt/7.1.0/glassfish/domains/domain1/newrelic/newrelic.yml

***** Install successful

***** Next steps:
You\'re almost done! To see performance data for your app:

1) Restart your app server
2) Exercise your app
3) Log into http://rpm.newrelic.com

Within two minutes, your app should show up, ready to monitor and troubleshoot.
If app data doesn\'t appear, check newrelic/logs/newrelic_agent.log for errors.
The installer will modify the domain.xml configuration file of your server’s domain and add the configuration of the Java agent as a JVM start argument:
<java-config classpath-suffix="" debug-options="-agentlib:jdwp=transport=dt_socket,server=y,suspend=n,address=9009" system-classpath="">
  <jvm-options>-javaagent:${com.sun.aas.instanceRoot}/newrelic/newrelic.jar</jvm-options>
  <jvm-options>-server</jvm-options>
  ...
</java-config>
The agent setup page has a different set of instructions for Windows and Linux environments, but they are so similar that the instructions mentioned here should be sufficient. If you are considering installing the New Relic Java agent on a Payara Server standalone instance or a cluster of multiple instances, you need to manually add the JVM (the installer won’t work) option with the javaagentconfiguration to the instance/cluster referenced configuration.
Also, make sure that the directory where the newrelic.jar resides also contains thenewrelic.ymlconfiguration file -
Now that the agent has been installed, start the Payara Server domain. You will observe the following messages at the start of the domain’s log
INFO: New Relic Agent: Loading configuration file "/opt/7.1.0/glassfish/domains/domain1/newrelic/newrelic.yml" INFO: New Relic Agent: Writing to log file: /opt/7.1.0/glassfish/domains/domain1/newrelic/logs/newrelic_agent.log -
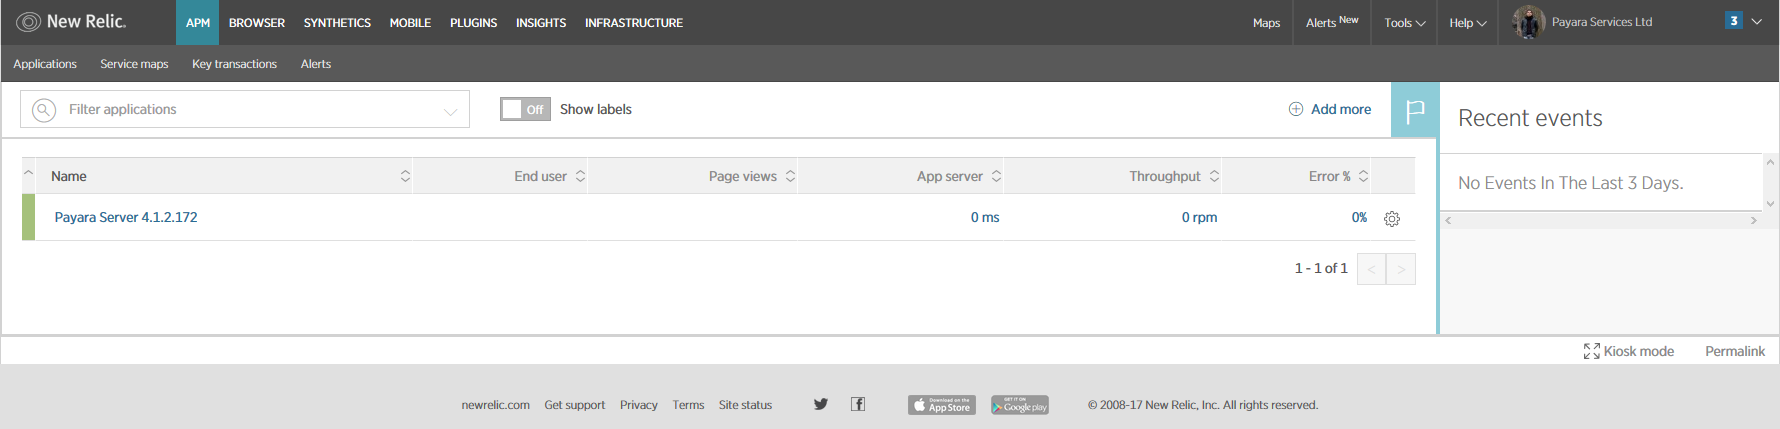
After some minutes with the server working, you can log in back to the New Relic portal and on the APM dashboard you can see a new entry for recently configured server:
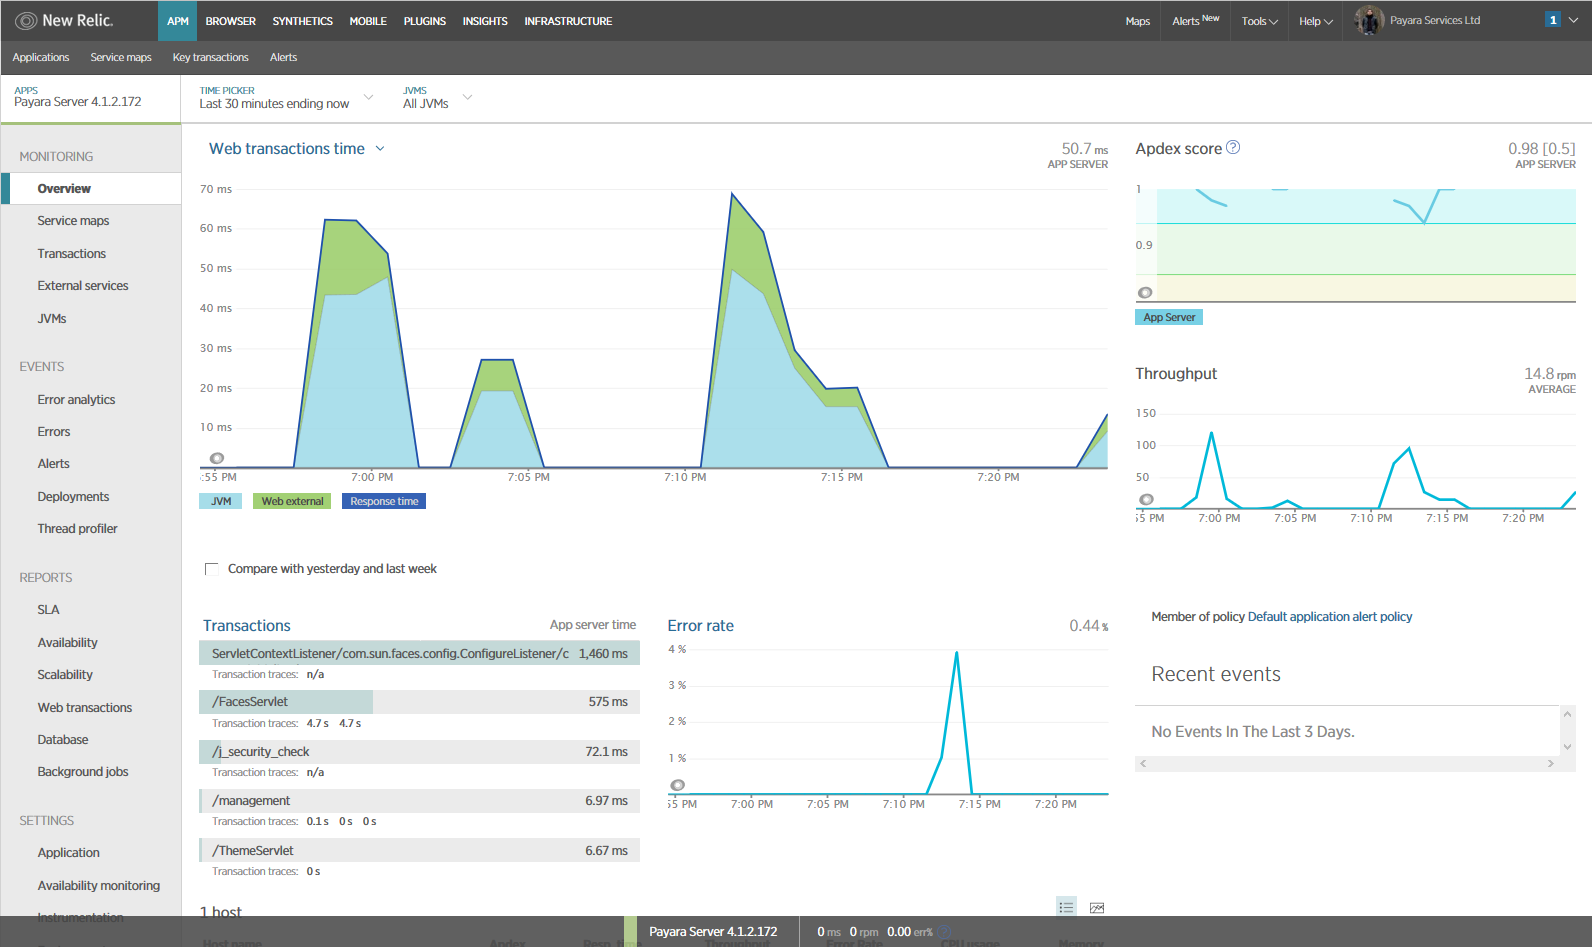
You can also access the latest monitoring statistics:
Retrieving the API Key from New Relic Insights
Now that the agent has been correctly installed, login back to your New Relic account portal and head to the Insights dashboard:
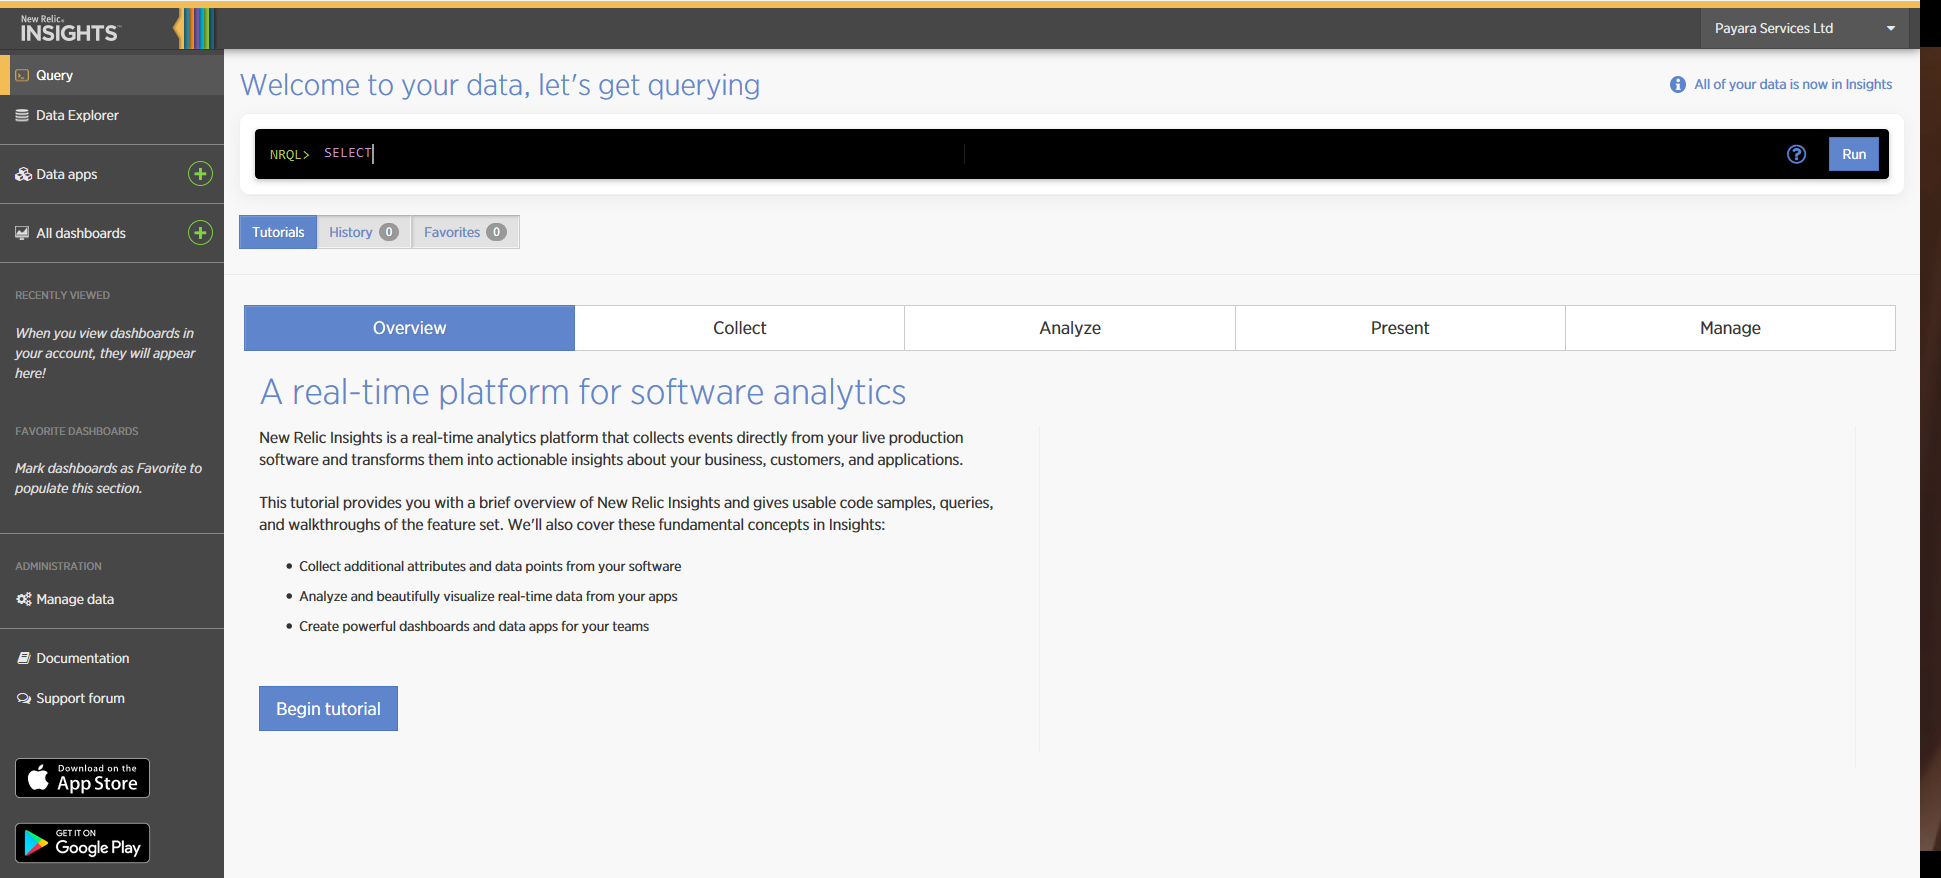
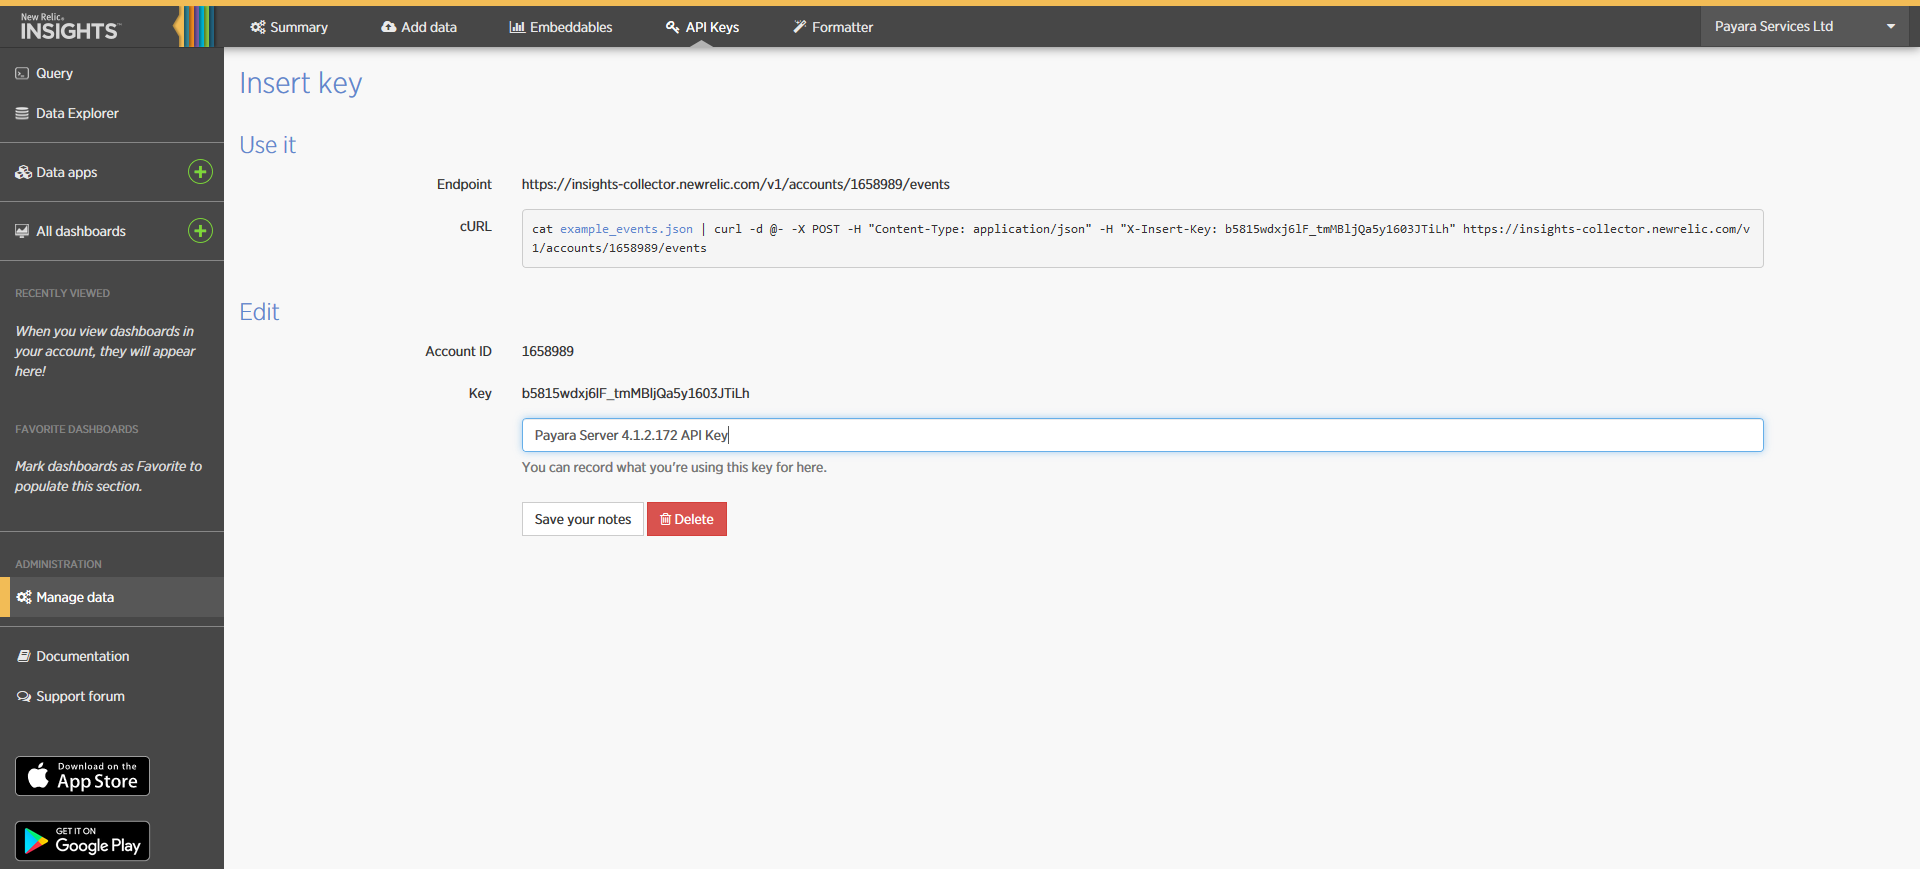
Access the Manage Data option on the side menu, you will be presented the following screen:

Click on the + icon at the side of the Insert Keys header. Take note of the
Account ID and API Key value on this screen. Also add a brief description to
reference this key on the dashboard:
Notifier Configuration
With the New Relic Java agent and Insights API Key correctly configured, you can proceed to configure the New Relic notifier on the Payara Server domain. As usual, you can do this using the administration web console or from the command line.
Using the Administration Web Console
To configure the Notification Service in the Administration Console, go to Configuration → [instance-configuration (like server-config)] → Notification Service and click on the New Relic tab:
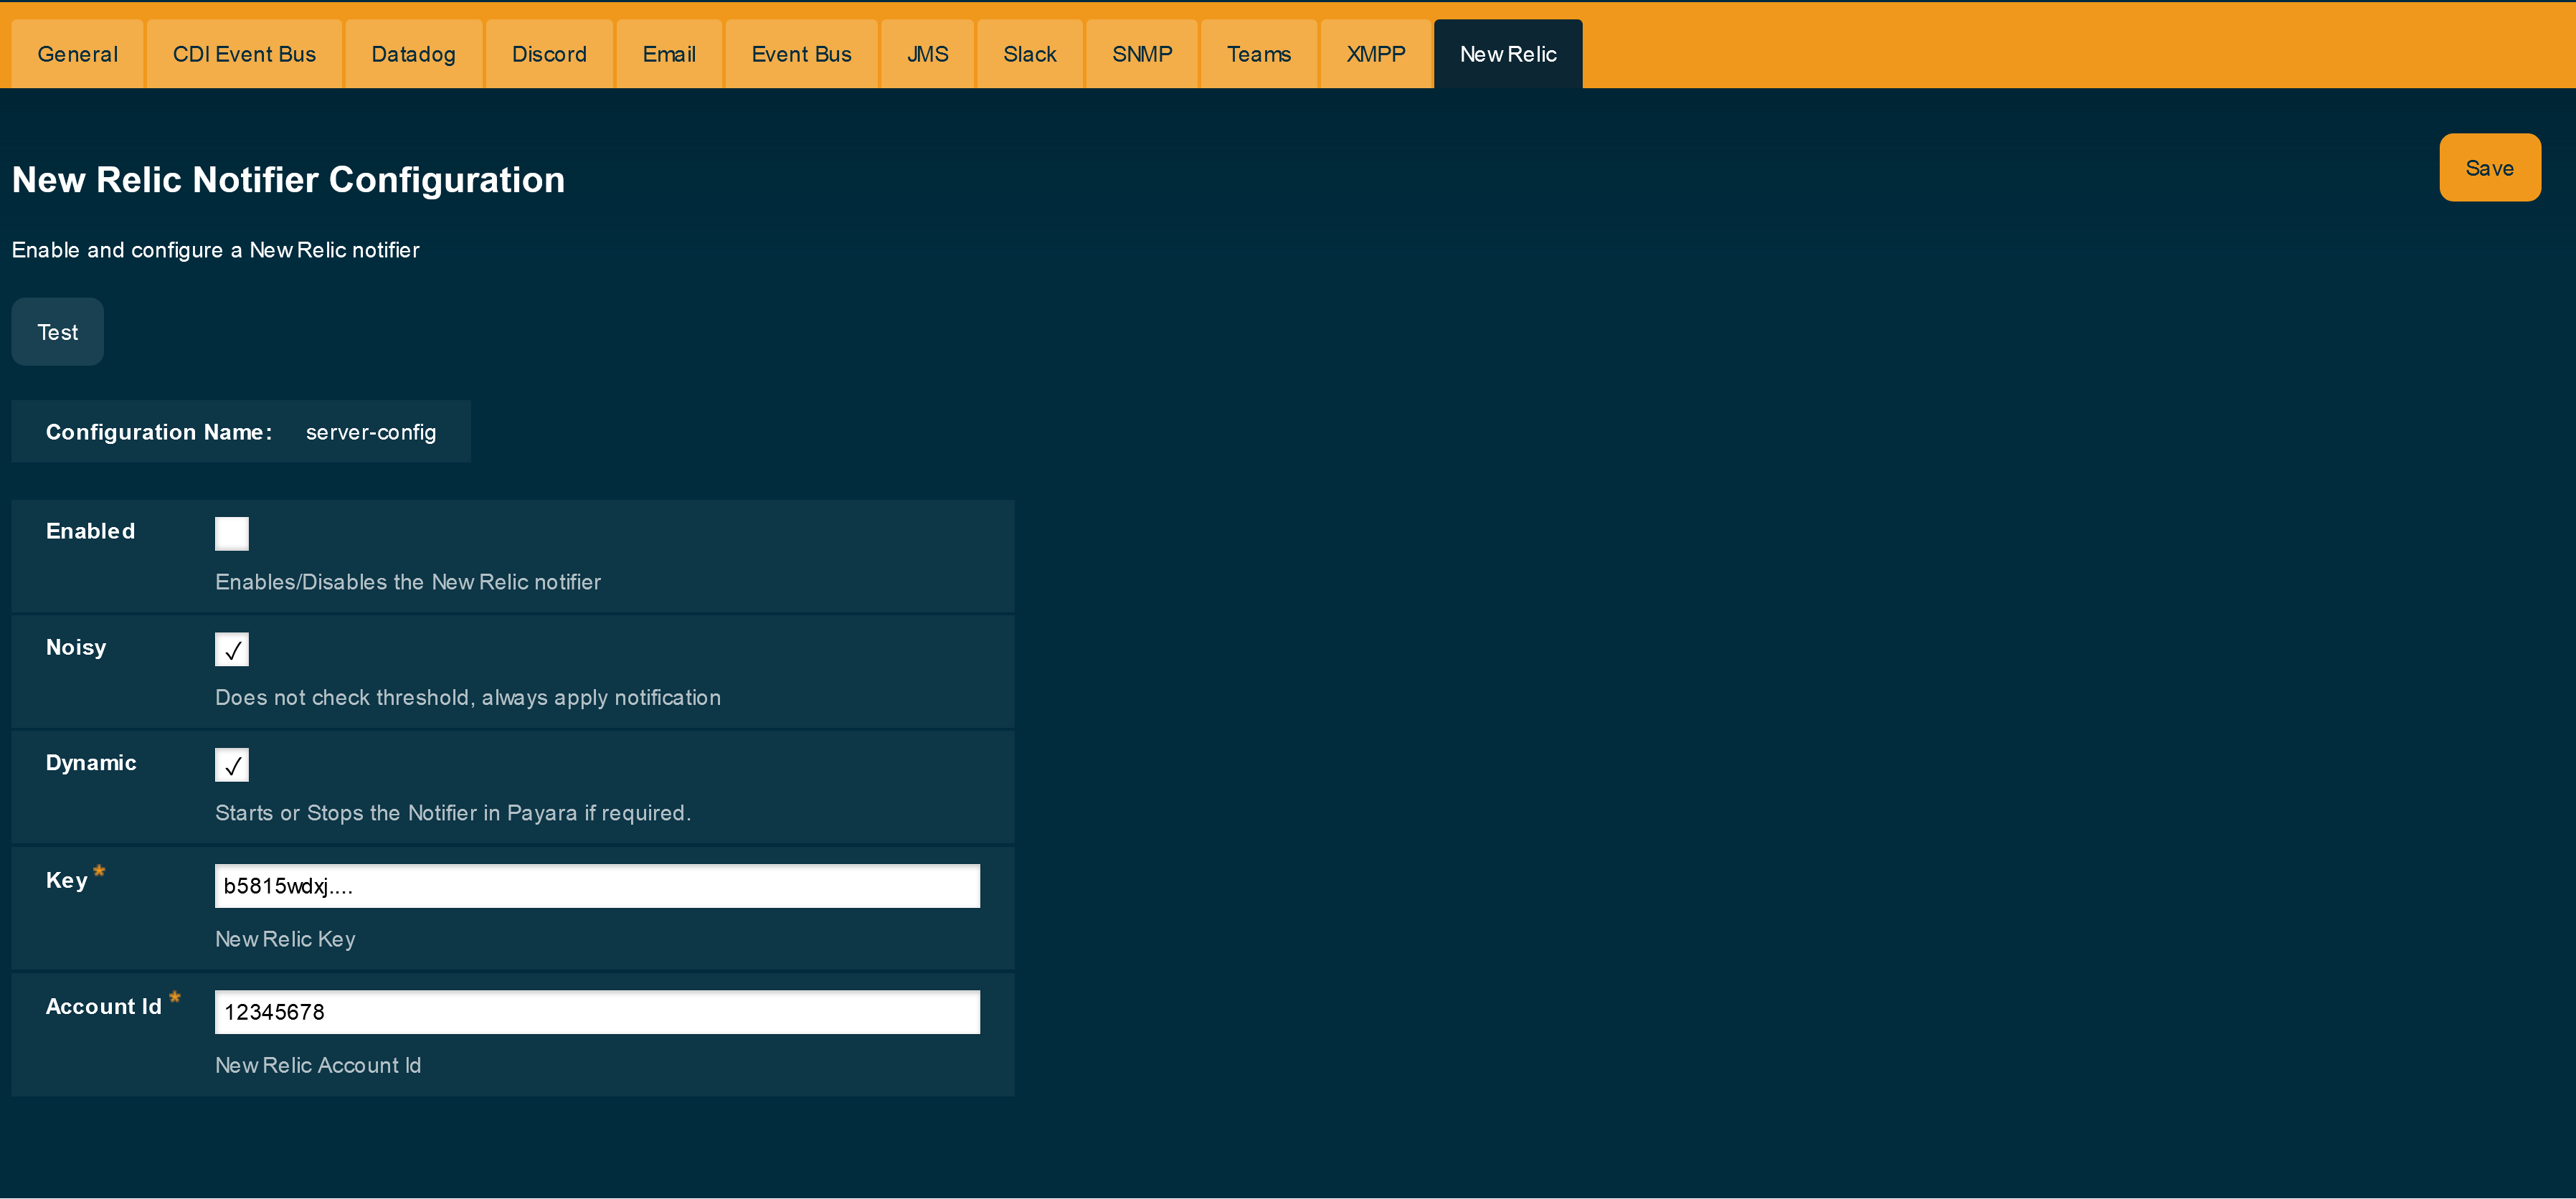
Check the Enabled box (and the Dynamic box too if you don’t want to restart the domain) and input the New Relic Account ID and the newly inserted Insights API Key. Hit the Save button to preserve the changes.
From the Command Line
To configure the Notification Service from the command line, use the set-newrelic-notifier-configuration asadmin command, specifying the tokens like this:
asadmin set-newrelic-notifier-configuration --dynamic=true --enabled=true --accountId=1658989 --key=b5815wdxj6lF_tmMBljQa5y1603JTiLhYou can use the --enabled and --dynamic options to enable or disable the New Relic notifier on demand.
Also, you can retrieve the current configuration for the New Relic notifier using the get-newrelic-notifier-configuration asadmin command like this:
asadmin get-newrelic-notifier-configuration

Enabled  Filter  Key                               Account Id
true     WARNING   b5815wdxj6lF_tmMBljQa5y1603JTiLh  1658989
Troubleshooting
When you have correctly configured the New Relic notifier, it can be used observe notification events on the New Relic Insights service dashboard. If you do not see any notification event messages on the data explorer, check the following:
-
Is the New Relic notifier enabled?
-
Is the Notification Service itself enabled?
-
Is there a service configured to use the notifier? (e.g. the HealthCheck service)
-
Is the service configured to send notifications frequently enough to observe?
-
Have you enabled the service after configuring it?
-
Is the Java Agent for your Payara Server’s domain correctly configured?
-
Have you created a valid API Key for the Insights service?
-
Does your account ID and the Insights API key match the ones configured on the Payara Server notifier?
Here’s a sample of how these notifications are visualized on the Data Explorer dashboard for the New Relic Insights service:
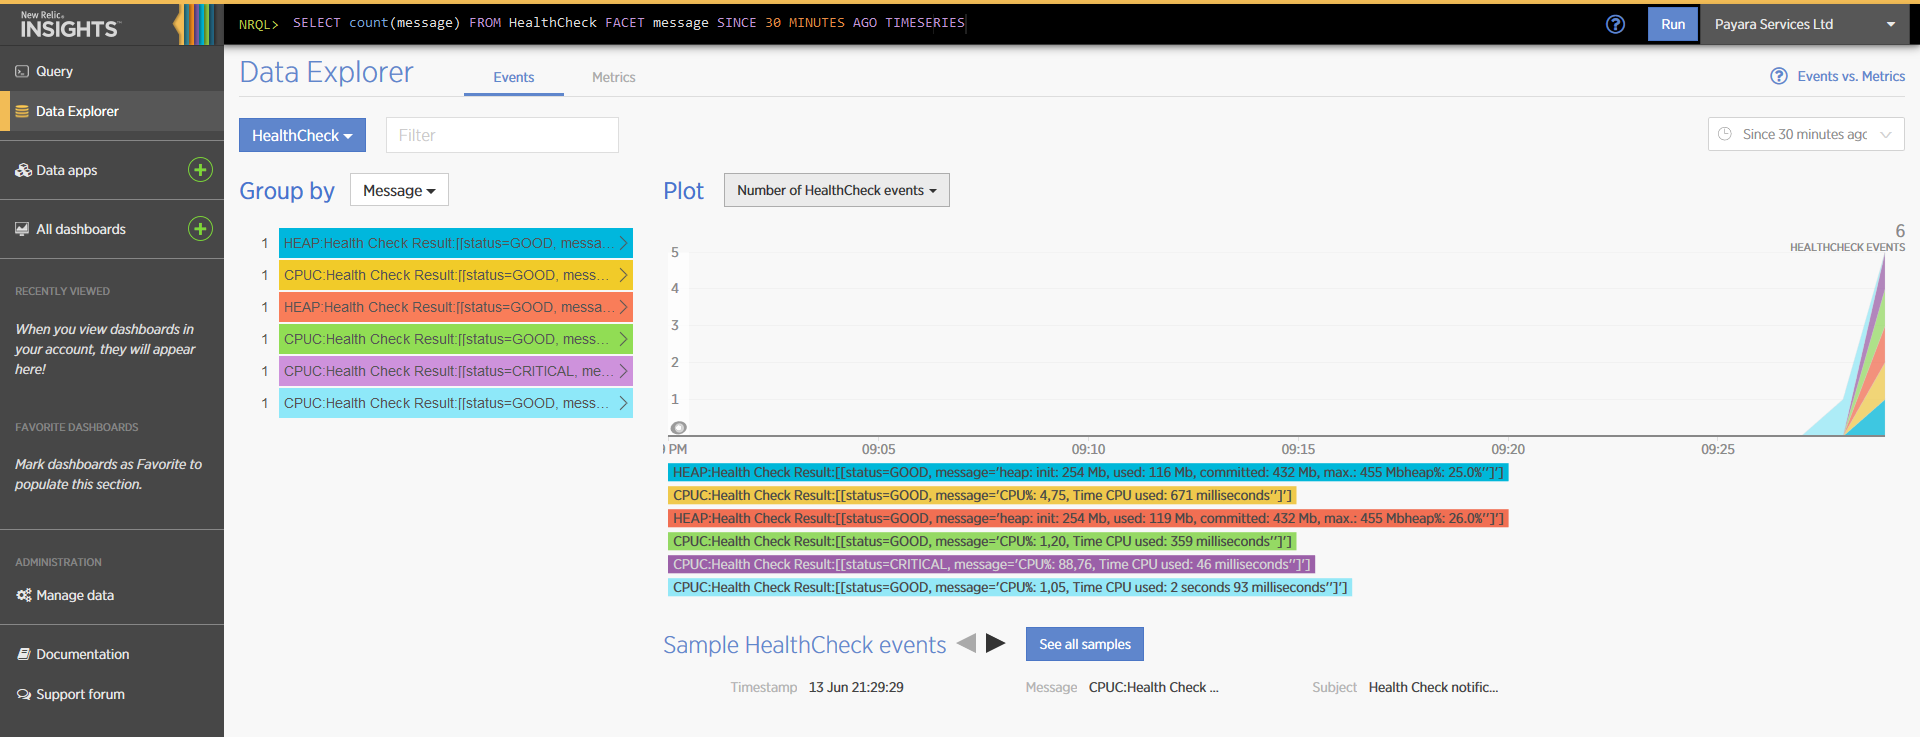
You can observe that the events are correctly identified depending on the severity of the notification, and they are correctly grouped by their custom category (in the image only the Healthcheck events are shown).
Datadog Notifier
Datadog is a cloud metric aggregator that simplifies the gathering and visualization of multiple platform stacks and services that can be on premises or on the cloud. Datadog also eases browsing through of all this information by implementing combination graphs (multiple graphs that can be configured on a single view) of related metrics.
Datadog supports gathering metrics from the following sources:
-
Cloud Providers (Amazon Web Services, Microsoft Azure, Google Cloud Platform)
-
Message Queues (Apache Kafka, ActiveMQ, RabbitMQ)
-
Code Repositories (GitHub, Bitbucket)
-
Clustering and DevOps Tools (Apache Mesos, Kubernetes, Docker)
-
Web Servers (Apache HTTP, Nginx, LightHTTP)
-
SQL and NoSQL Databases (MySQL, PostgreSQL, MongoDB, CouchBase)
-
Monitoring Solutions (New Relic, Nagios, Splunk, Amazon Cloud Trail)
Payara Server includes a special notifier to send notifications from the Notification service to a Datadog account by means of an API key.
Currently, the Payara Datadog notifier only supports the US1 - East region.
|
The notifier modules are available in these locations:
Datadog Account Integration
When you create a Datadog account, the service will provide you a default API key that you can use to integrate Payara Server with your account.
| You can sign up for a free trial account (14 days) if you want to test this integration without having to worry about a permanent subscription. |
Here are the instructions to retrieve the API keys:
-
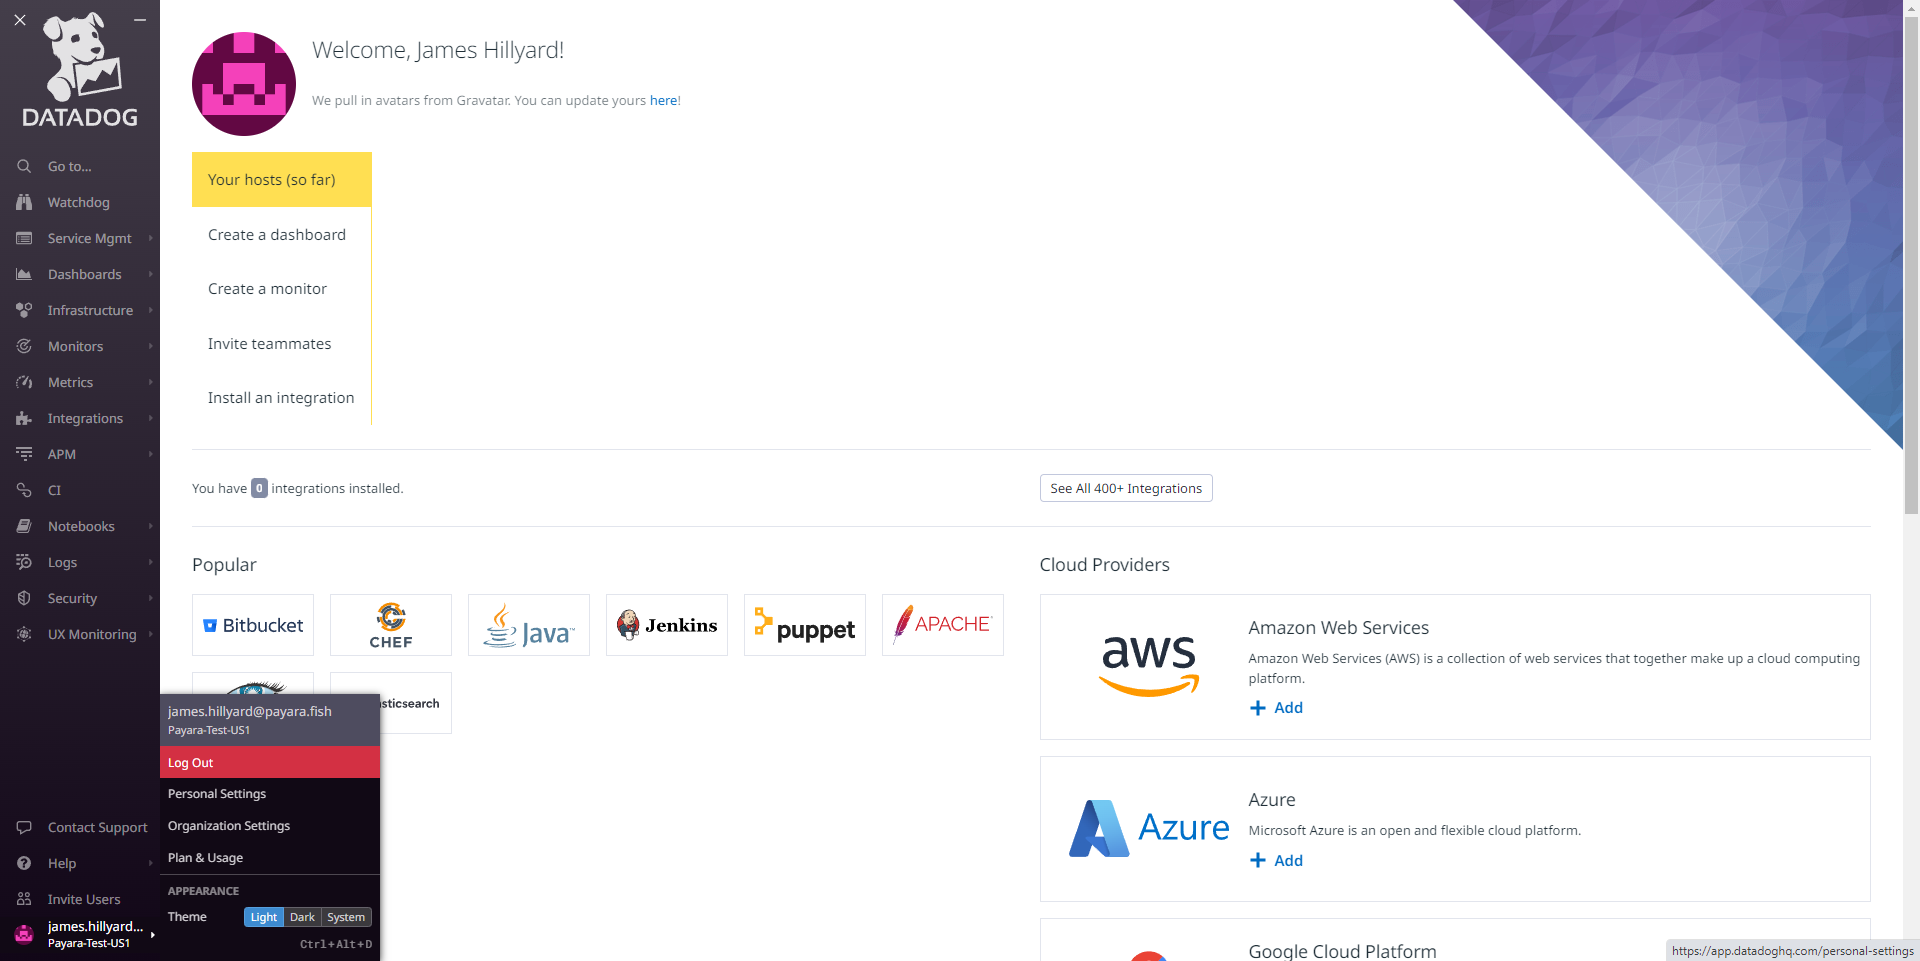
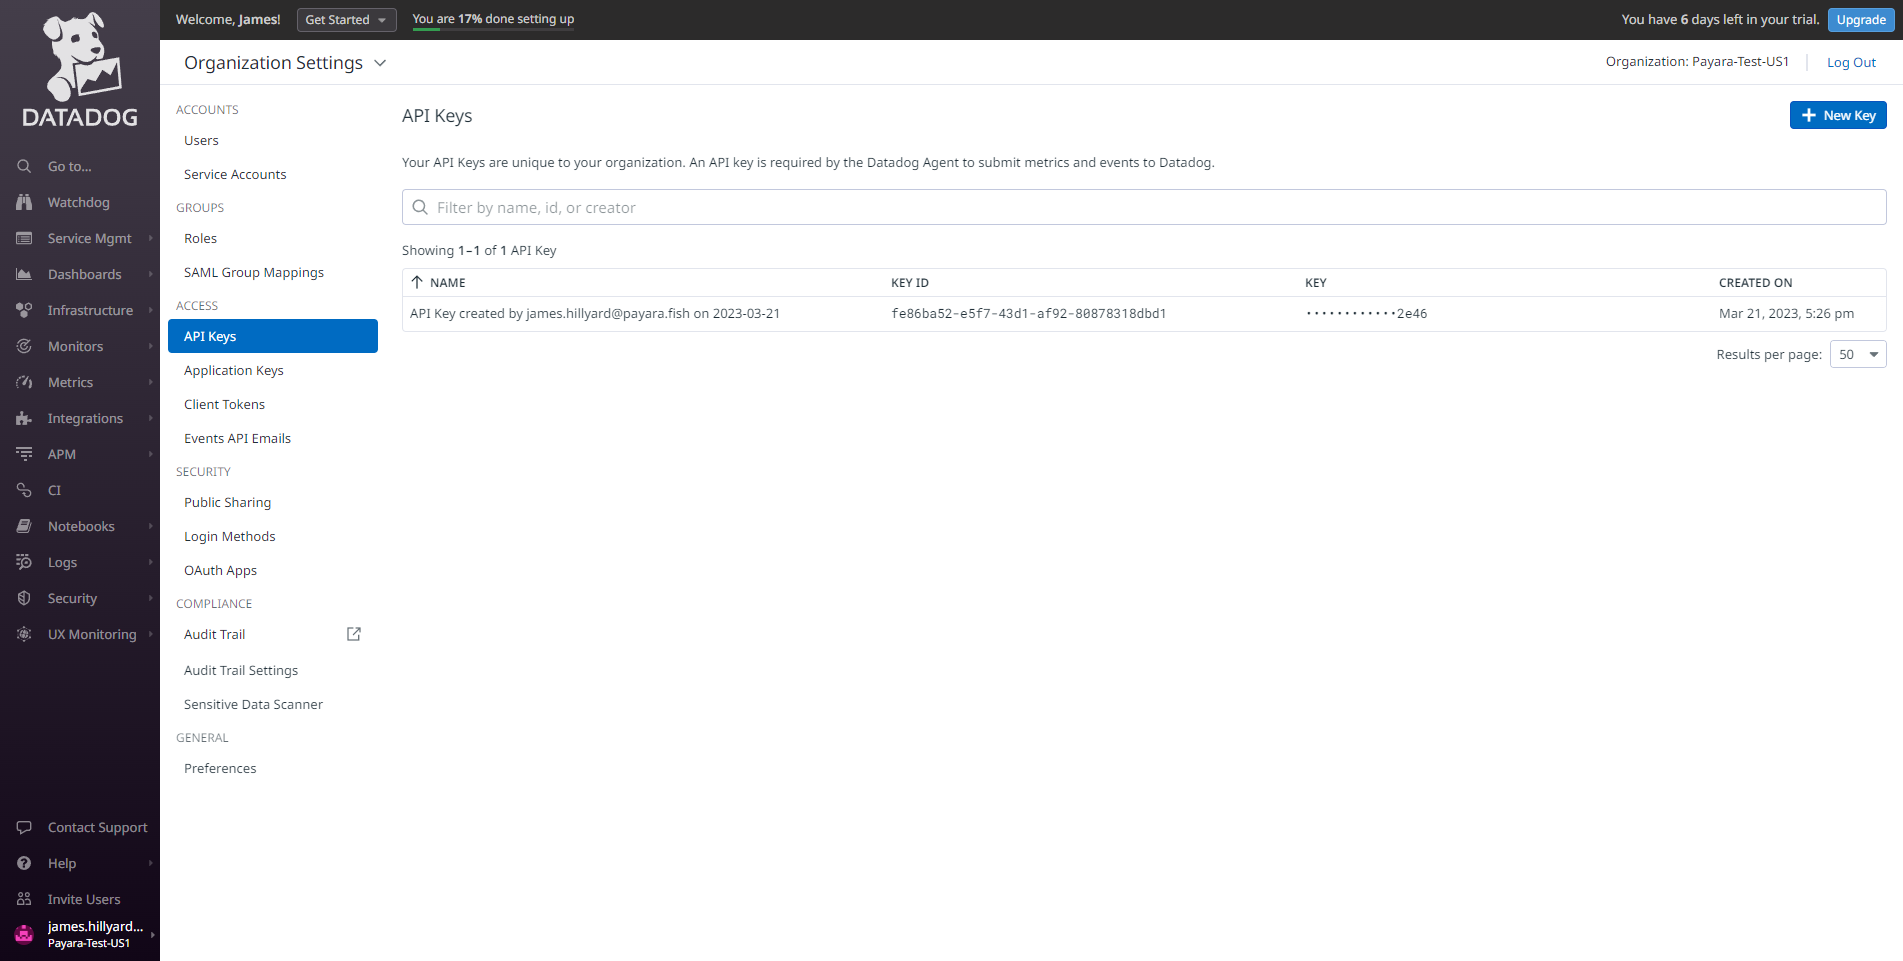
First, access the Datadog administration panel located at https://app.datadoghq.com/. Then, in the side menu select your name in the bottom left Organisation Settings → API Keys option:
-
On the API Keys tab you will observe the default API Key available for integration:
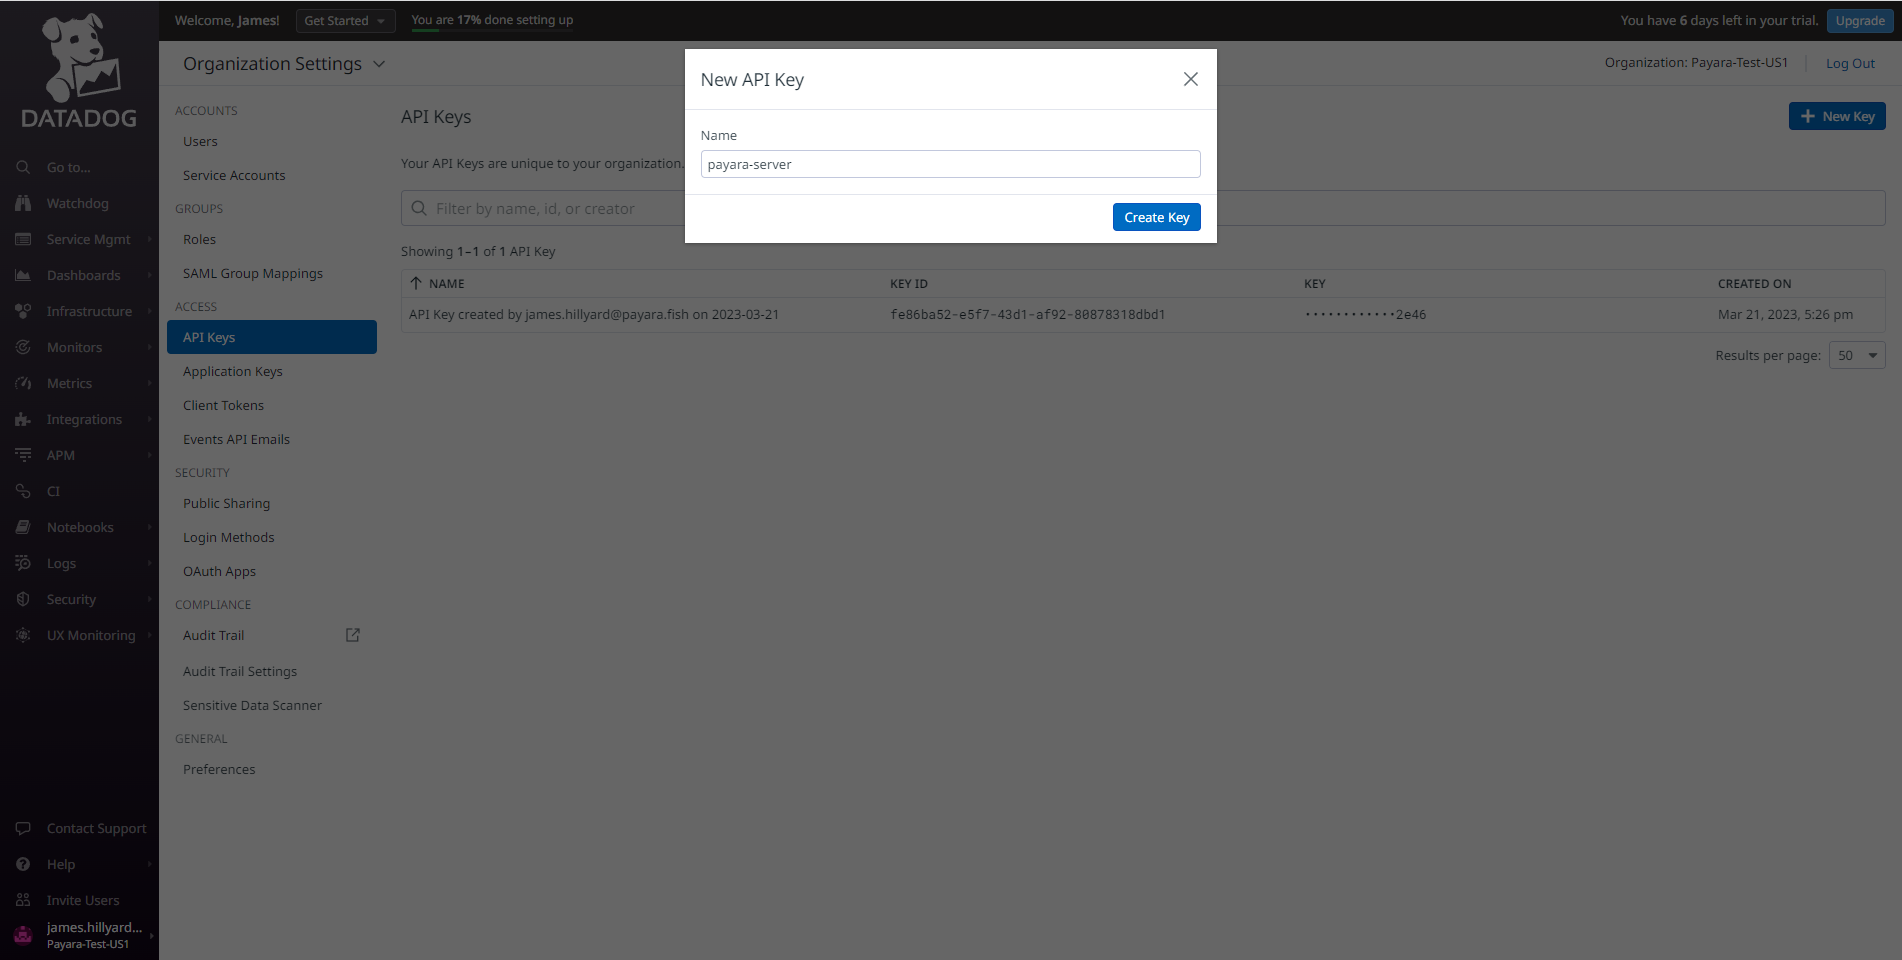
You can also create a new API key if you want to use it exclusively for your Payara Server installation.
-
Assign a name to the default API key or a newly created key, so you can identify which services or platform stacks are integrating with Datadog other than your Payara Server installation:
Notifier Configuration
Having retrieved the API key from Datadog’s administration panel, it’s necessary to configure this key to the notification service on Payara Server. It’s possible to do this either by using the administration web console or from the command line using administration commands.
Using the Administration Web Console
To configure the Notification Service in the Administration Console, go to Configuration → [instance-configuration (like server-config)] → Notification Service and click on the Datadog tab:
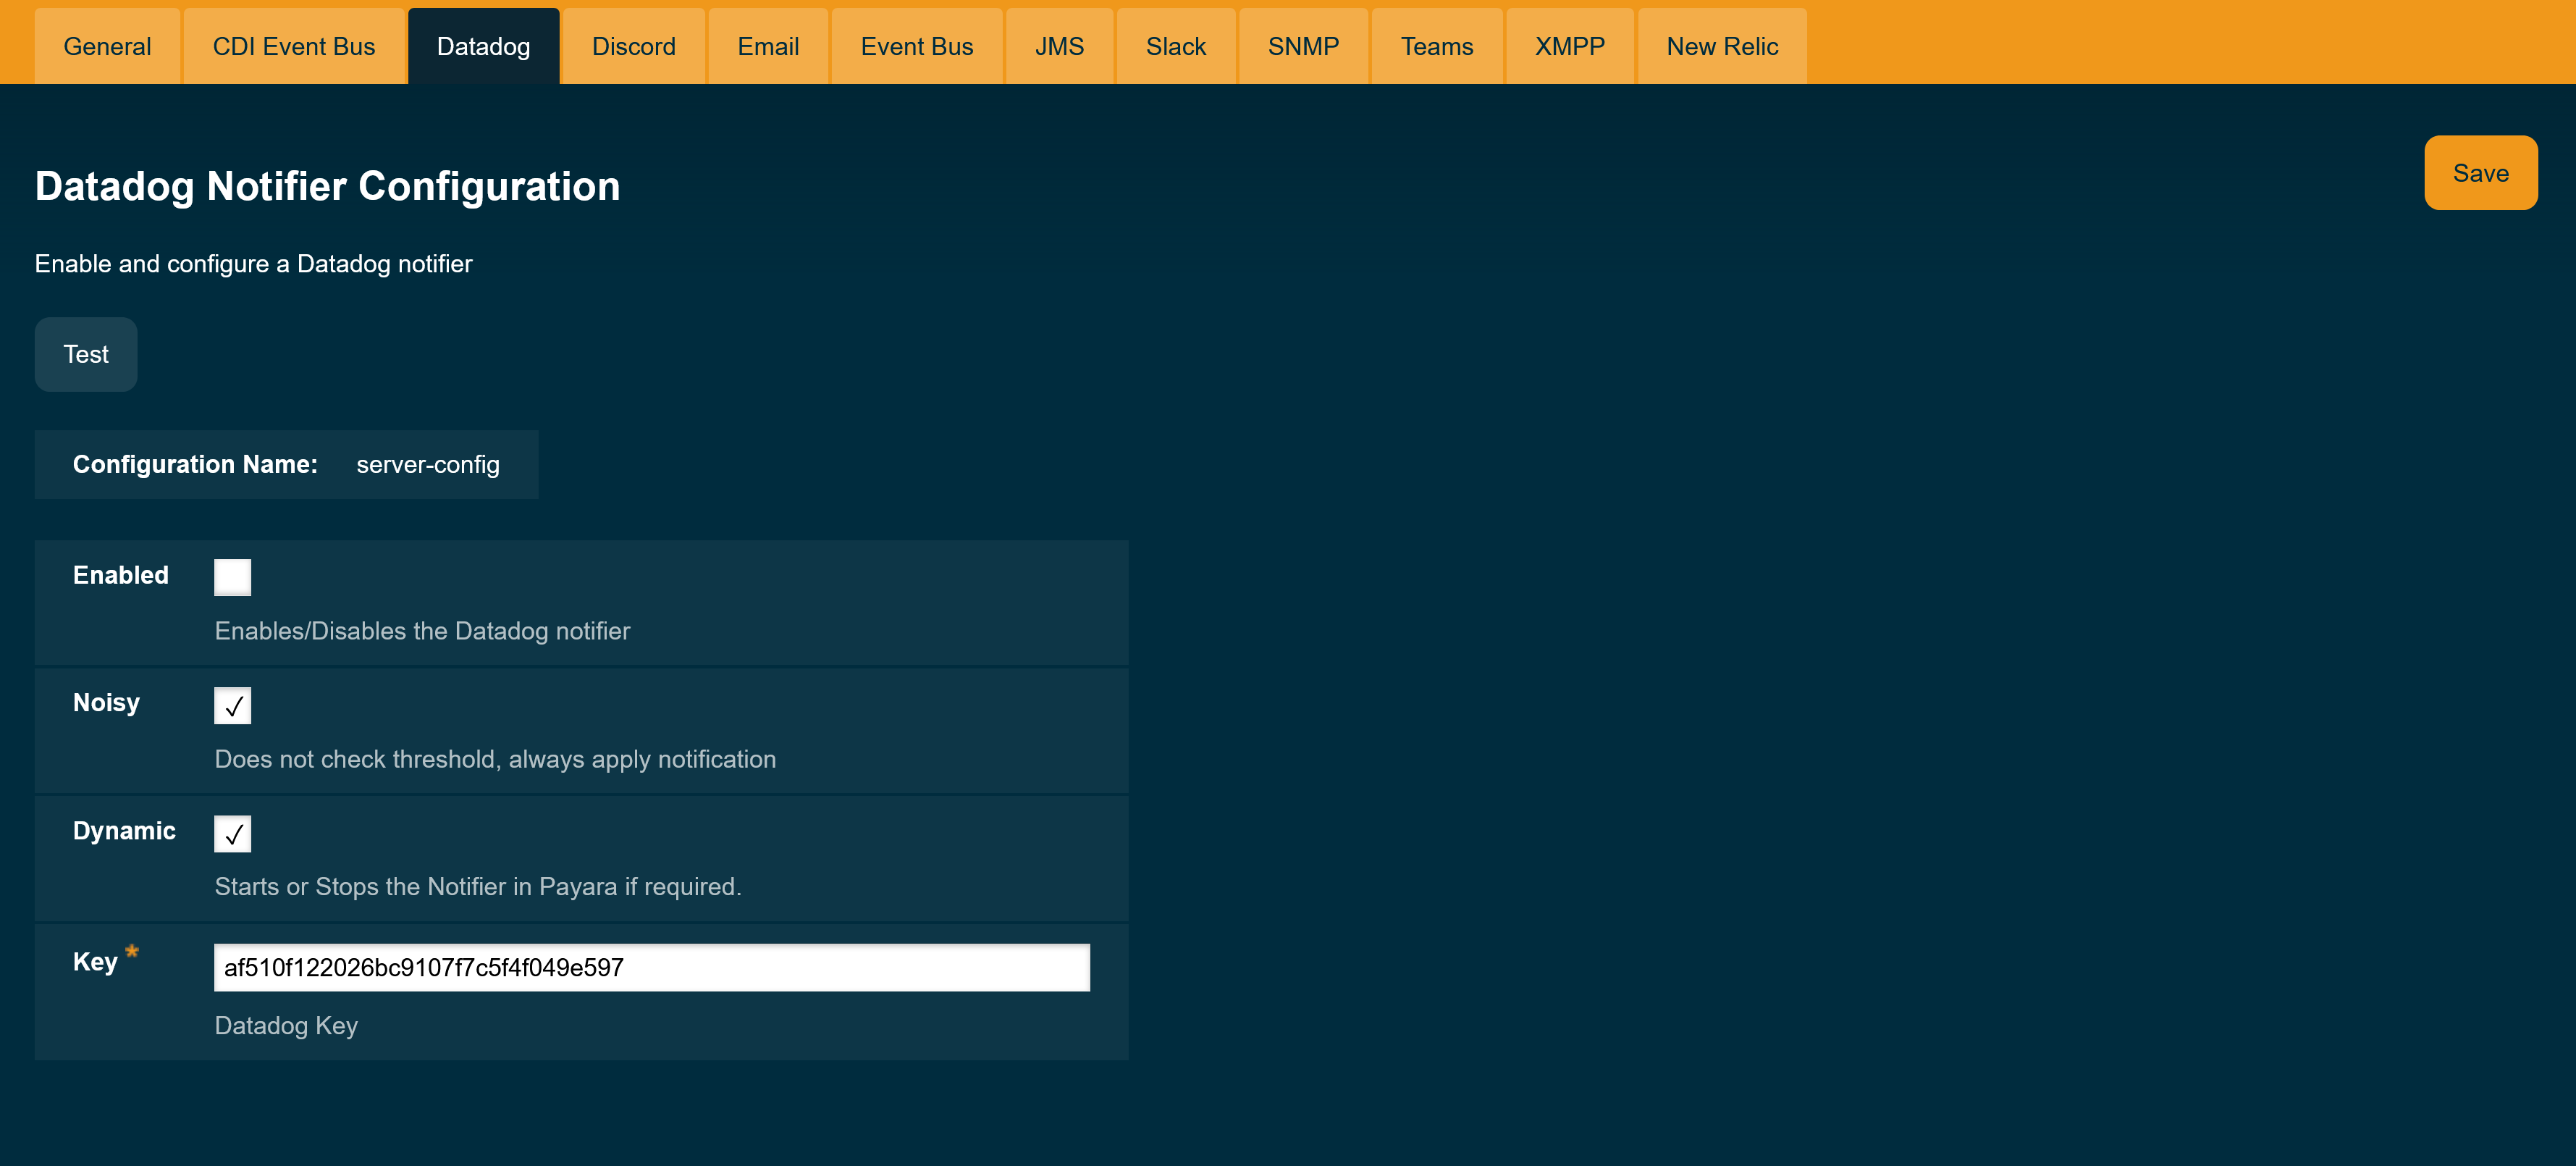
Check the Enabled box (and the Dynamic box too if you don’t want to restart the domain) and input the three tokens highlighted in the previous section.
Hit the Save button to preserve the changes.
From the Command Line
To configure the Notification Service from the command line, use the set-datadog-notifier-configuration asadmin command, specifying the tokens like this:
asadmin set-datadog-notifier-configuration --dynamic=true --key=af510f122026bc9107f7c5f4f049e597 --enabled=trueYou can use the --enabled and --dynamic options to enable or disable the Datadog notifier on demand.
Also, you can retrieve the current configuration for the Datadog notifier using the get-datadog-notifier-configuration asadmin command like this:
asadmin get-datadog-notifier-configuration

Enabled  Filter   Key
true     WARNING  af510f122026bc9107f7c5f4f049e597
Troubleshooting
When you have correctly configured the Datadog notifier, Datadog can gather relevant monitoring events from your Payara Server installation. If you do not see any notification event messages on your Datadog account, check the following:
-
Is the Datadog notifier enabled?
-
Is the Notification Service itself enabled?
-
Is there a service configured to use the notifier? (e.g. the HealthCheck service)
-
Is the service configured to send notifications frequently enough to observe?
-
Have you enabled the service after configuring it?
-
Does the configured API key on Payara Server match one of the API keys configured on your Datadog account?
-
Is Datadog running in the US1 region?
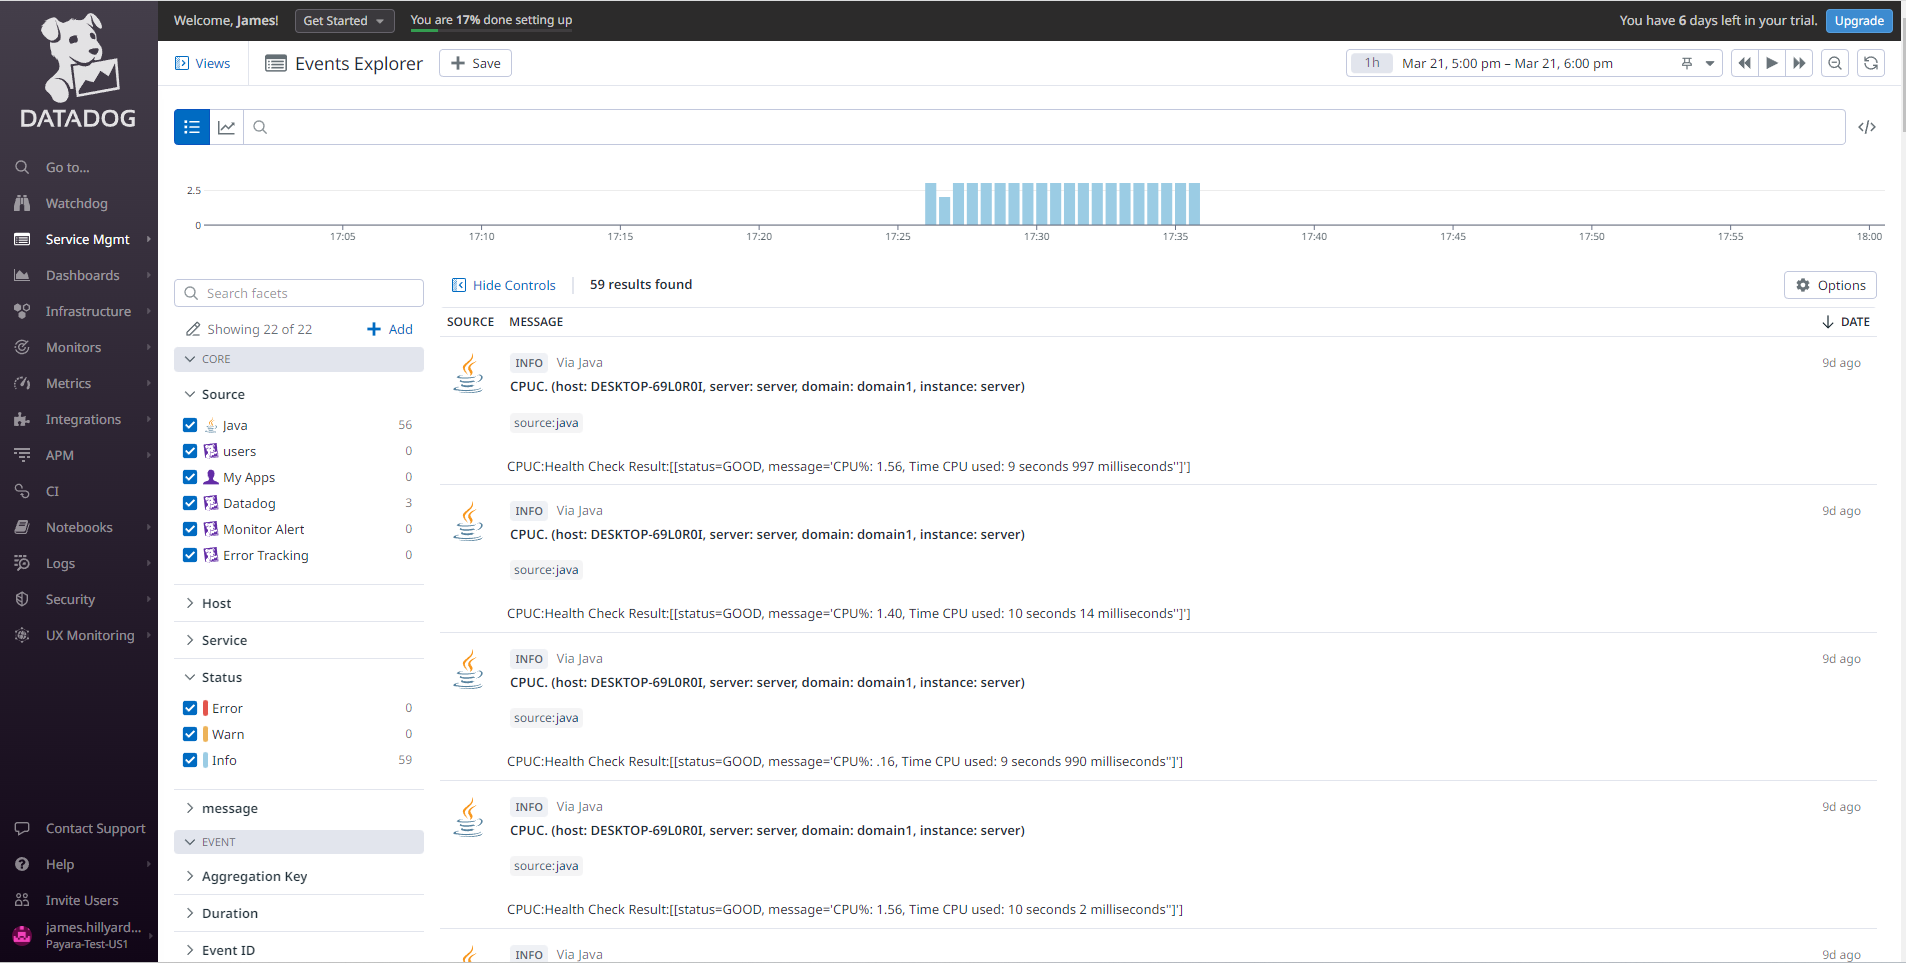
Here’s a sample of how the notifications are visualized on the Datadog event notification panel (on the side menu select the ServiceMgmt → Events option):
MS Teams Notifier
A notifier extension for publishing to a Microsoft Teams channel.
The notifier modules are available in these locations:
Notifier Configuration Configuration
Using the Administration Web Console
To configure the Notification Service in the Administration Console, go to Configuration → [instance-configuration (like server-config)] → Notification Service and click on the Teams tab:
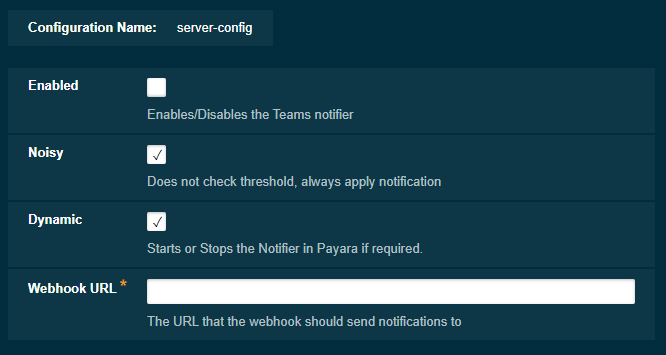
From the Command Line
To configure the Notification Service from the command line, use the set-teams-notifier-configuration asadmin command like this:
asadmin set-teams-notifier-configuration --enabled=true --dynamic=true https://outlook.office.com/webhook/xyzYou can use the --enabled and --dynamic options to enable or disable the Teams notifier on demand.
You can retrieve the current configuration for the Teams notifier using the get-teams-notifier-configuration asadmin command like this:
asadmin get-teams-notifier-configurationThis will return the details of the current Teams configuration; see below for an example:
Enabled  Filter   Webhook URL
true     WARNING  https://outlook.office.com/webhook/xyz
Slack Notifier
Slack is a functional enterprise chat and team collaboration tool inspired by IRC. It allows an organisation to create specific domains and discuss work topics or subjects in separate channels that can either be public or private.
This notifier sends notification events to an organisation’s domain channel using Slack API integrations.
The notifier modules are available in these locations:
Slack Integration Configuration
In order to allow the notification service to log events on a Slack channel of your choice, you must fulfill the following requirements first:
-
Have created a Slack account within your organisation’s domain (for example payara.slack.com)
-
Have a Slack account with granted permissions to create channels and configure API integrations.
-
Have created a Slack channel which will be used by the notification service to report notification events.
Once you have completed these requirements, you can configure an Incoming Webhook integration for the channel.
An Incoming Webhook is the simplest integration mechanism that Slack provides, in that they make use of normal HTTP requests with a JSON payload that includes the message text and additional options to format incoming messages to the channel.
Configure Incoming WebHook
-
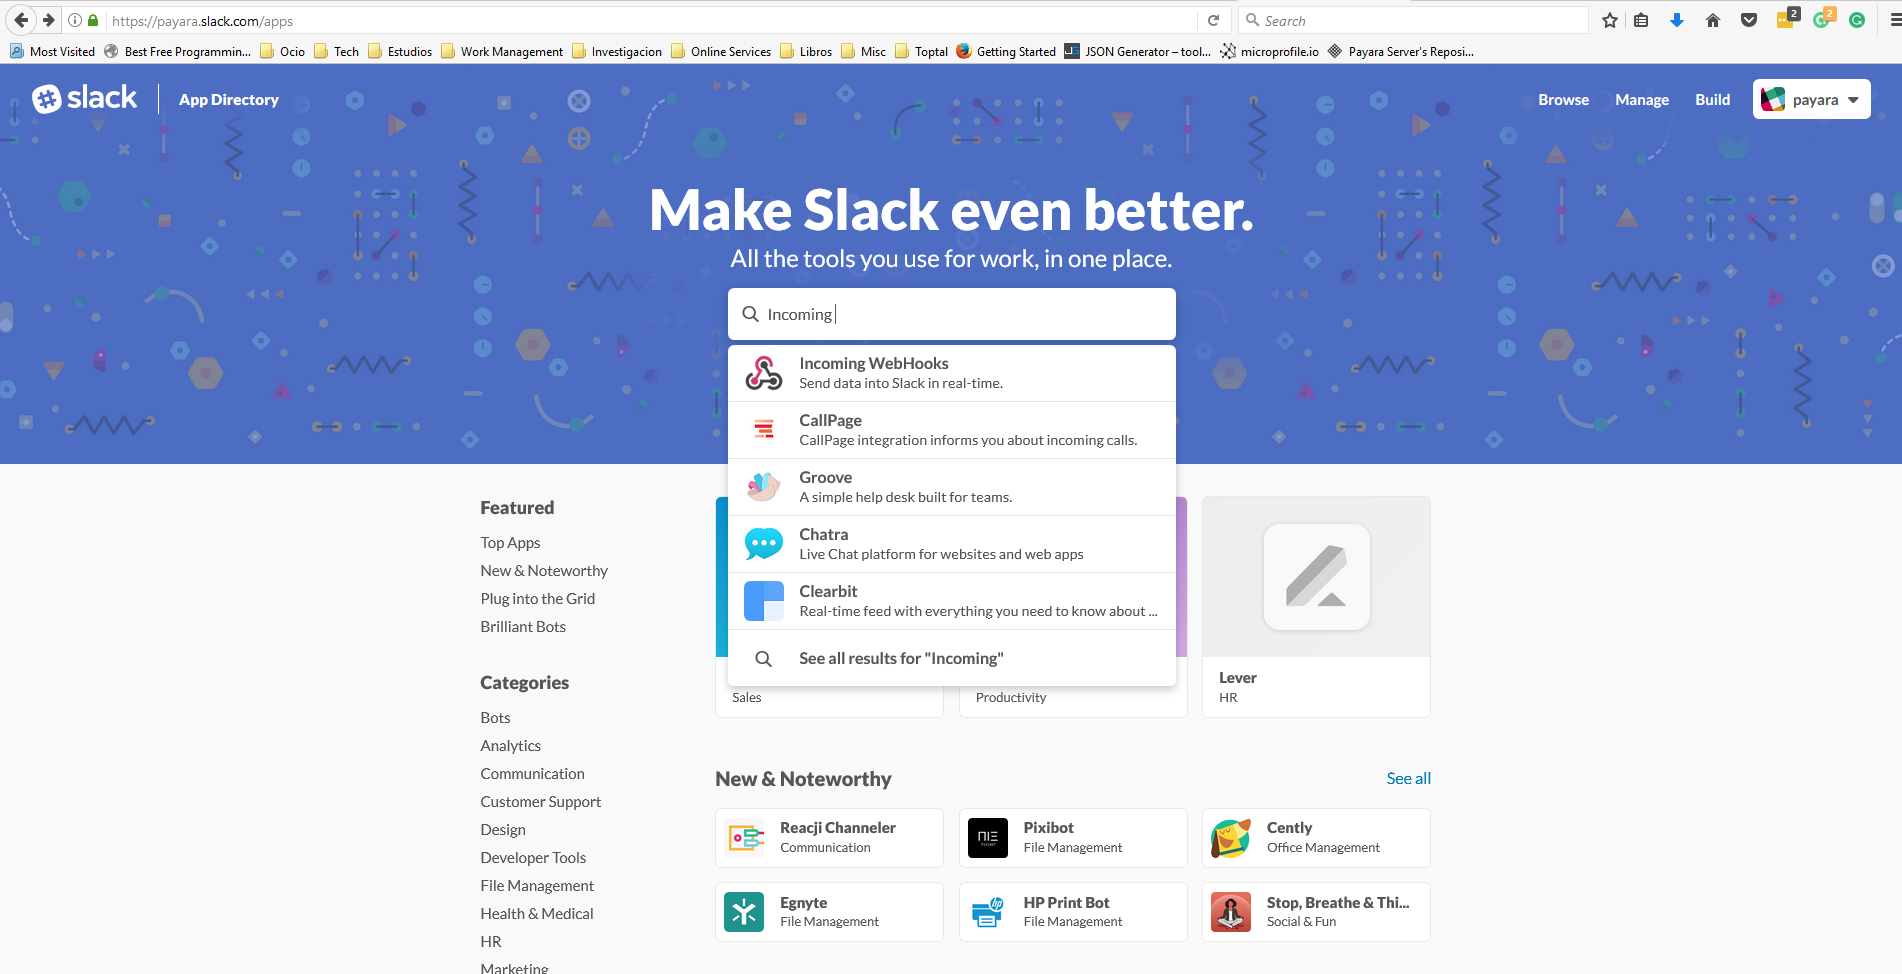
First, access the developer portal’s application directory located at https://payara.slack.com/apps.
Then, in the search box type Incoming Webhooks. A suggestion will appear in the results display:
-
Now, proceed to select the channel that the WebHook will use to direct the notification events to:
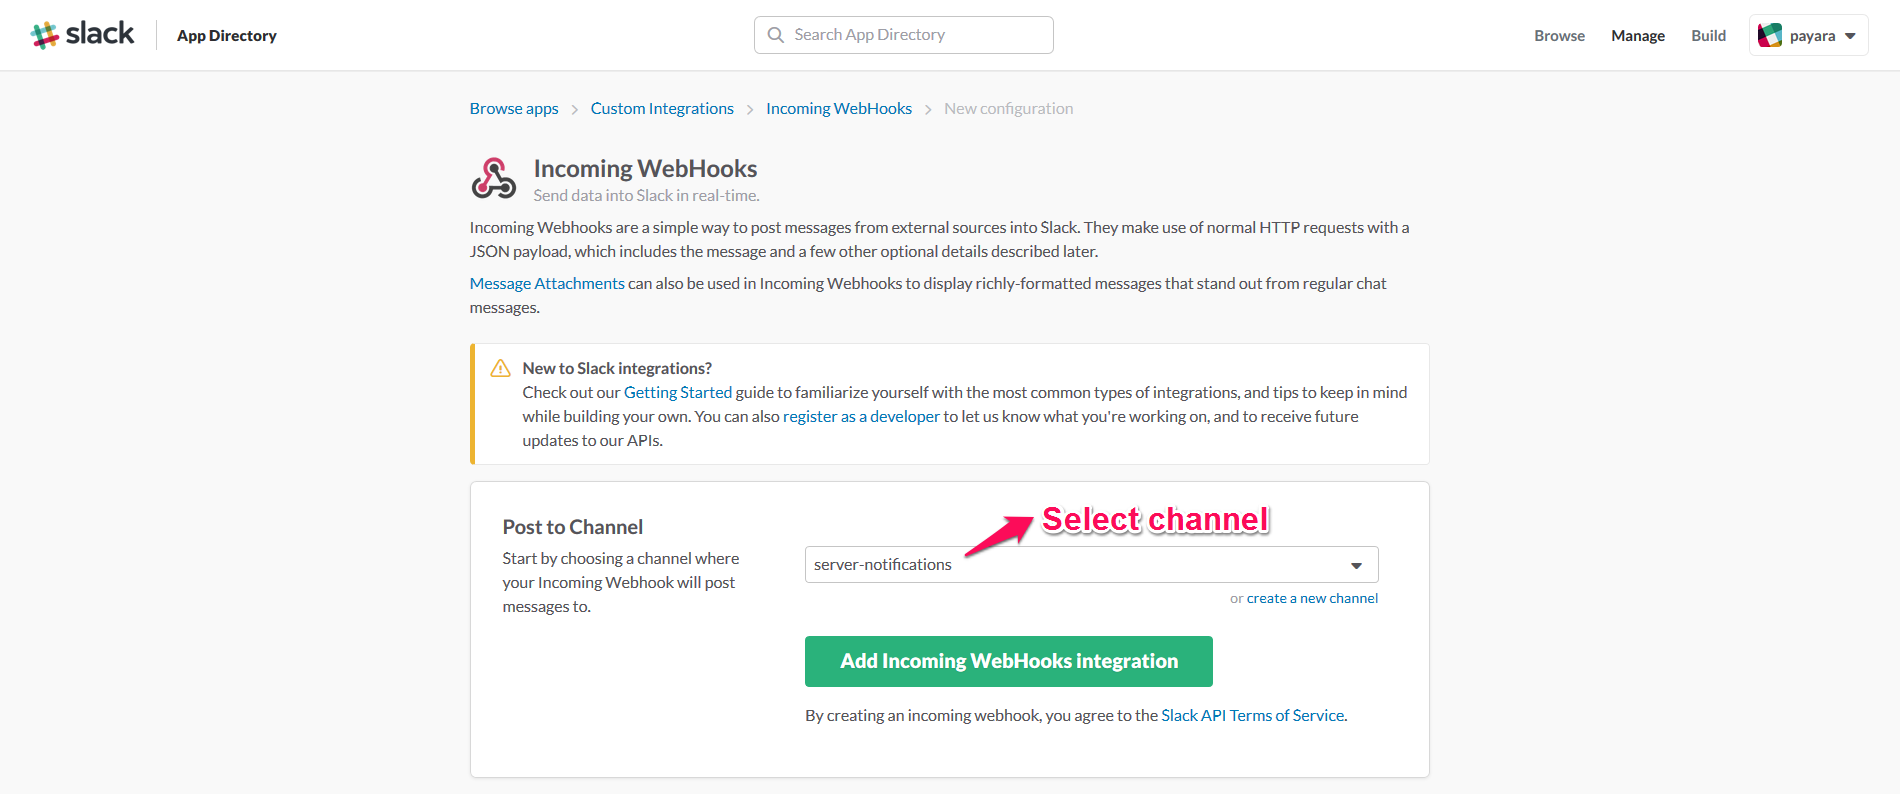
It’s recommended to choose a private channel, since it will keep these notifications events protected in case of unwanted disclosure, and it won’t spam other users of your organisation with unwanted notifications -
With this, the WebHook configuration is finished. Now, take special attention to the WebHook URL, which is usually follows this structure:
https://hooks.slack.com/services/{TOKEN1}/{TOKEN2}/{TOKEN3}Like in the following sample:

We will use these 3 tokens when configuring the server’s integration later.
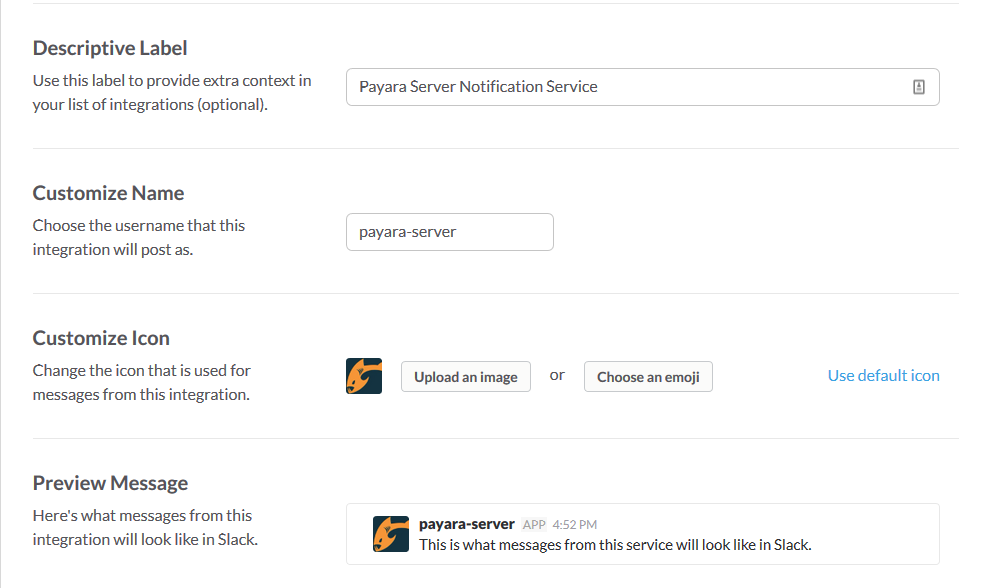
We recommend that you configure the following settings in the channel integration to give better visualization for your notifications:
- Descriptive Label
-
Use a name that’s easy to understand to identify this WebHook integration
- Customize Name
-
Insert a name for the "agent" that will report the notification messages
- Customize Icon
-
Insert a custom icon to identify the agent that will be visualized in the messages. We recommend using one of the Payara logos like in this sample:
Notifier Configuration
With the Incoming WebHook properly configured, now it’s time to set up the Notification Service in the domain configuration. As usual, you can do this using the administration web console or from the command line.
Using the Administration Web Console
To configure the Notification Service in the Administration Console, go to Configuration → [instance-configuration (like server-config)] → Notification Service and click on the Slack tab:
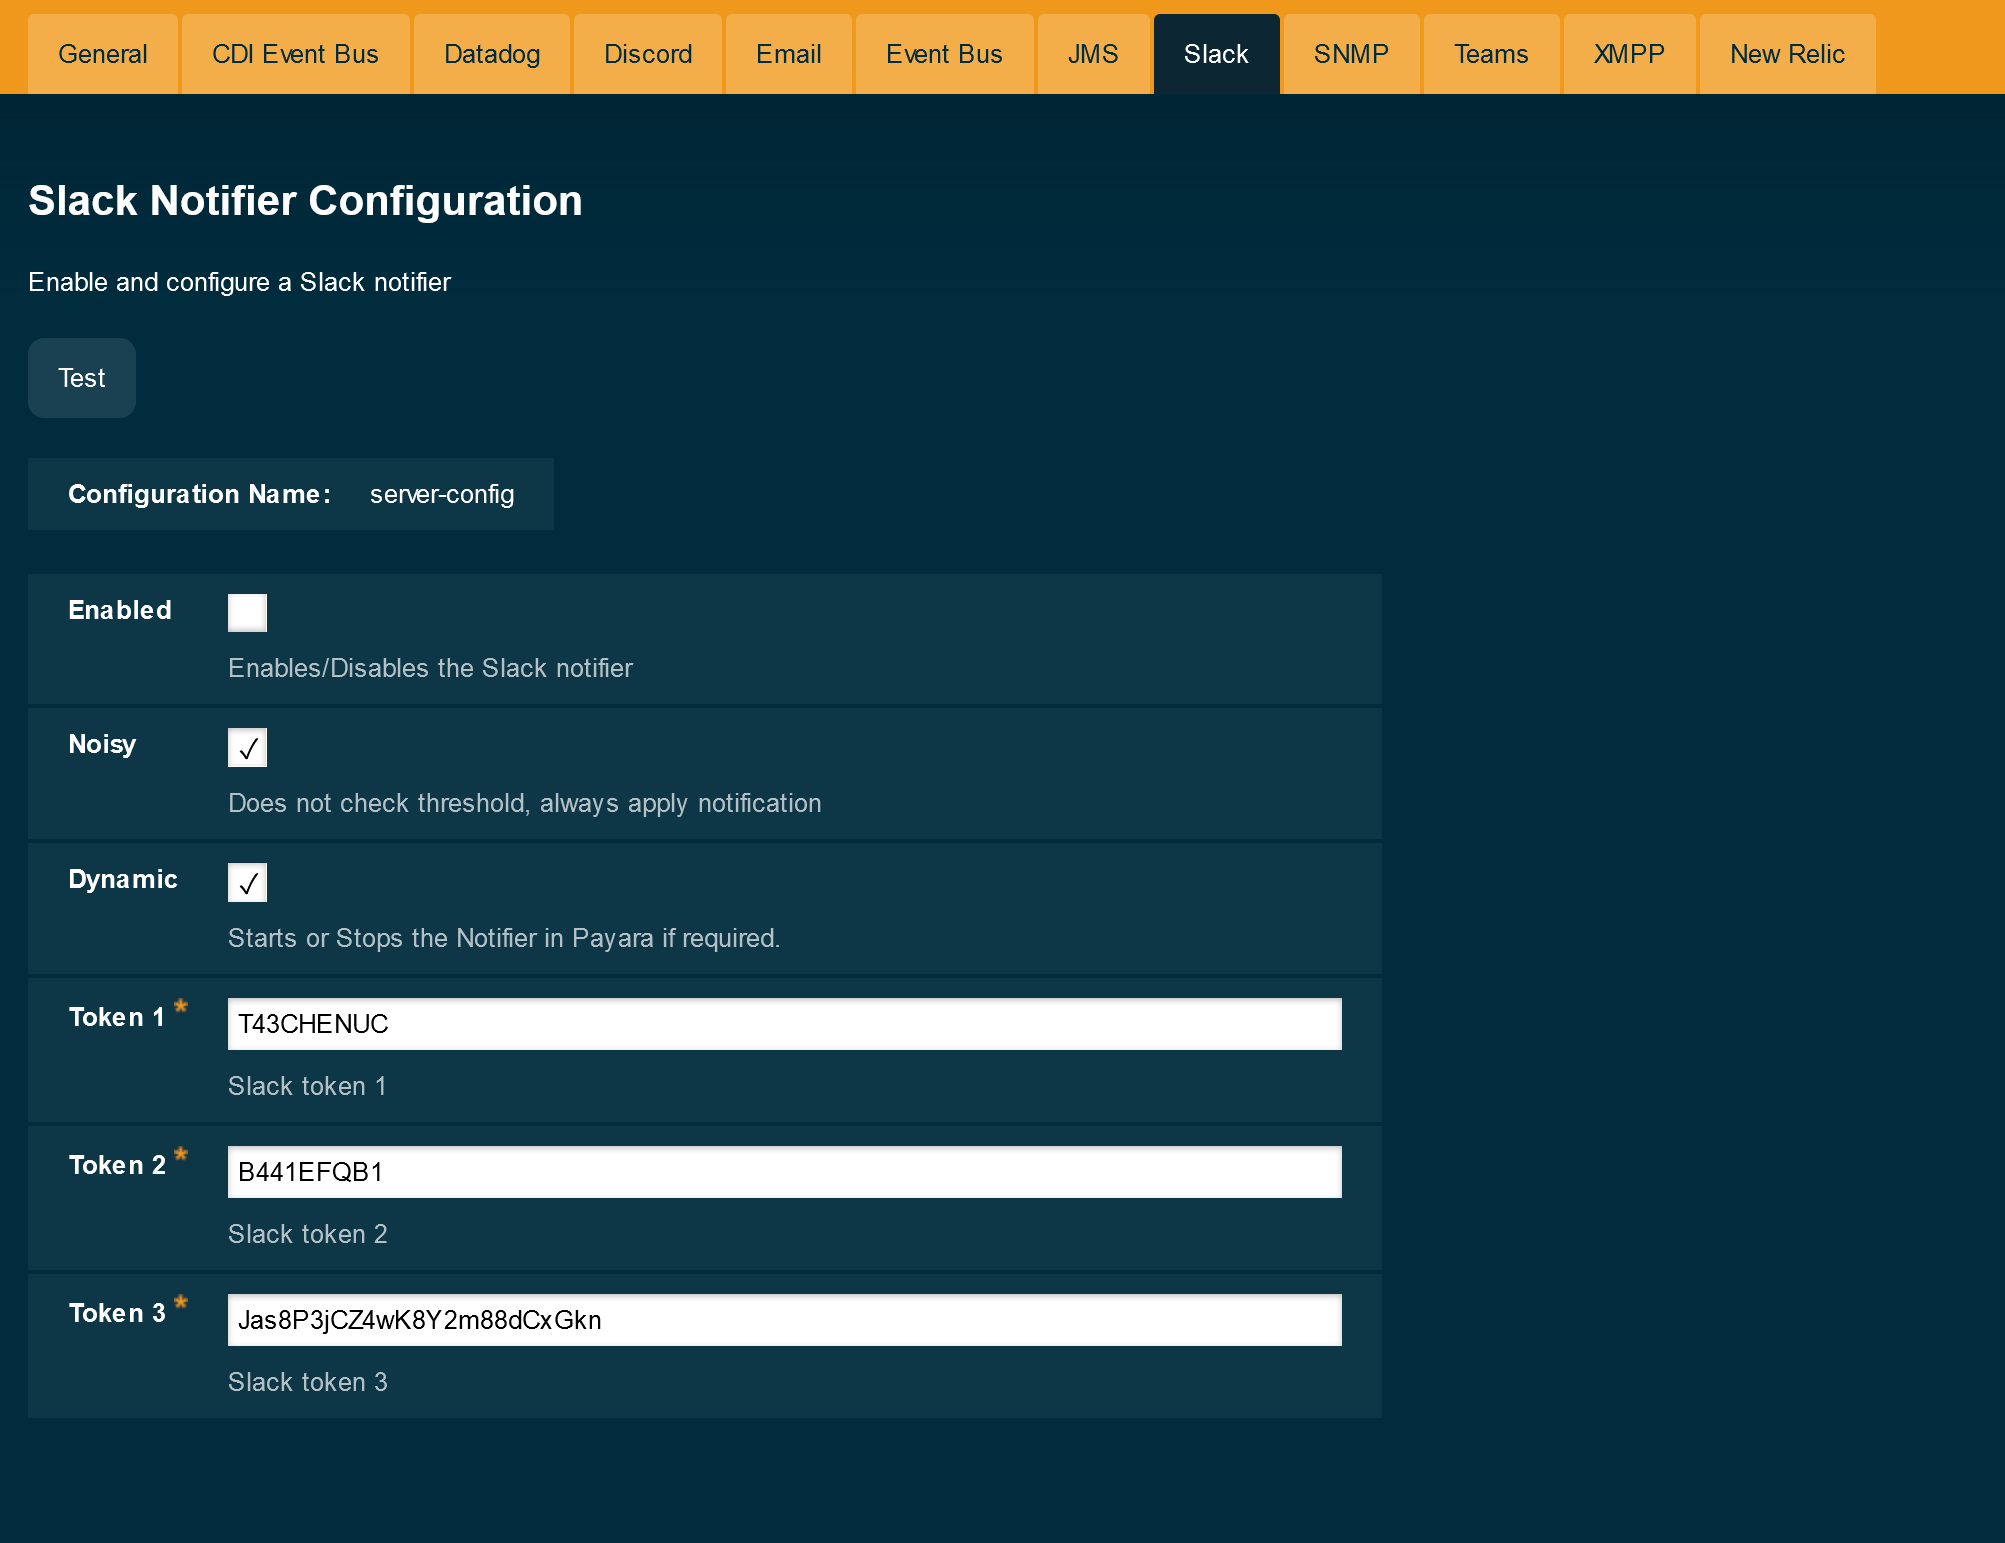
Check the Enabled box (and the Dynamic box too if you don’t want to restart the domain) and input the three tokens highlighted in the previous section. Hit the Save button to preserve the changes.
From the Command Line
To configure the Notification Service from the command line, use the set-slack-notifier-configuration asadmin command, specifying the tokens like this:
asadmin set-slack-notifier-configuration --enabled=true --dynamic=true --token1=T43CHENUC --token2=B441EFQB1 --token3=Jas8P3jCZ4wK8Y2m88dCxGknYou can use the --enabled and --dynamic options to enable or disable the Slack notifier on demand.
Also, you can retrieve the current configuration for the Slack notifier using the get-slack-notifier-configuration asadmin command like this:
asadmin get-slack-notifier-configuration

Enabled  Filter   Token 1    Token 2    Token 3
true     WARNING  T43CHENUC  B441EFQB1  Jas8P3jCZ4wK8Y2m88dCxGkn
Troubleshooting
When you have correctly configured the Slack notifier, it can be used to push notifications to your configured channel. If you do not see any notification event messages, check the following:
-
Is the Slack notifier enabled?
-
Is the Notification Service itself enabled?
-
Is there a service configured to use the notifier? (e.g. the HealthCheck service)
-
Is the service configured to send notifications frequently enough to observe?
-
Have you enabled the service after configuring it?
-
Is the Incoming WebHook correctly configured in the Slack API portal?
-
Check that you have not surpassed the current rate limit for the Slack API
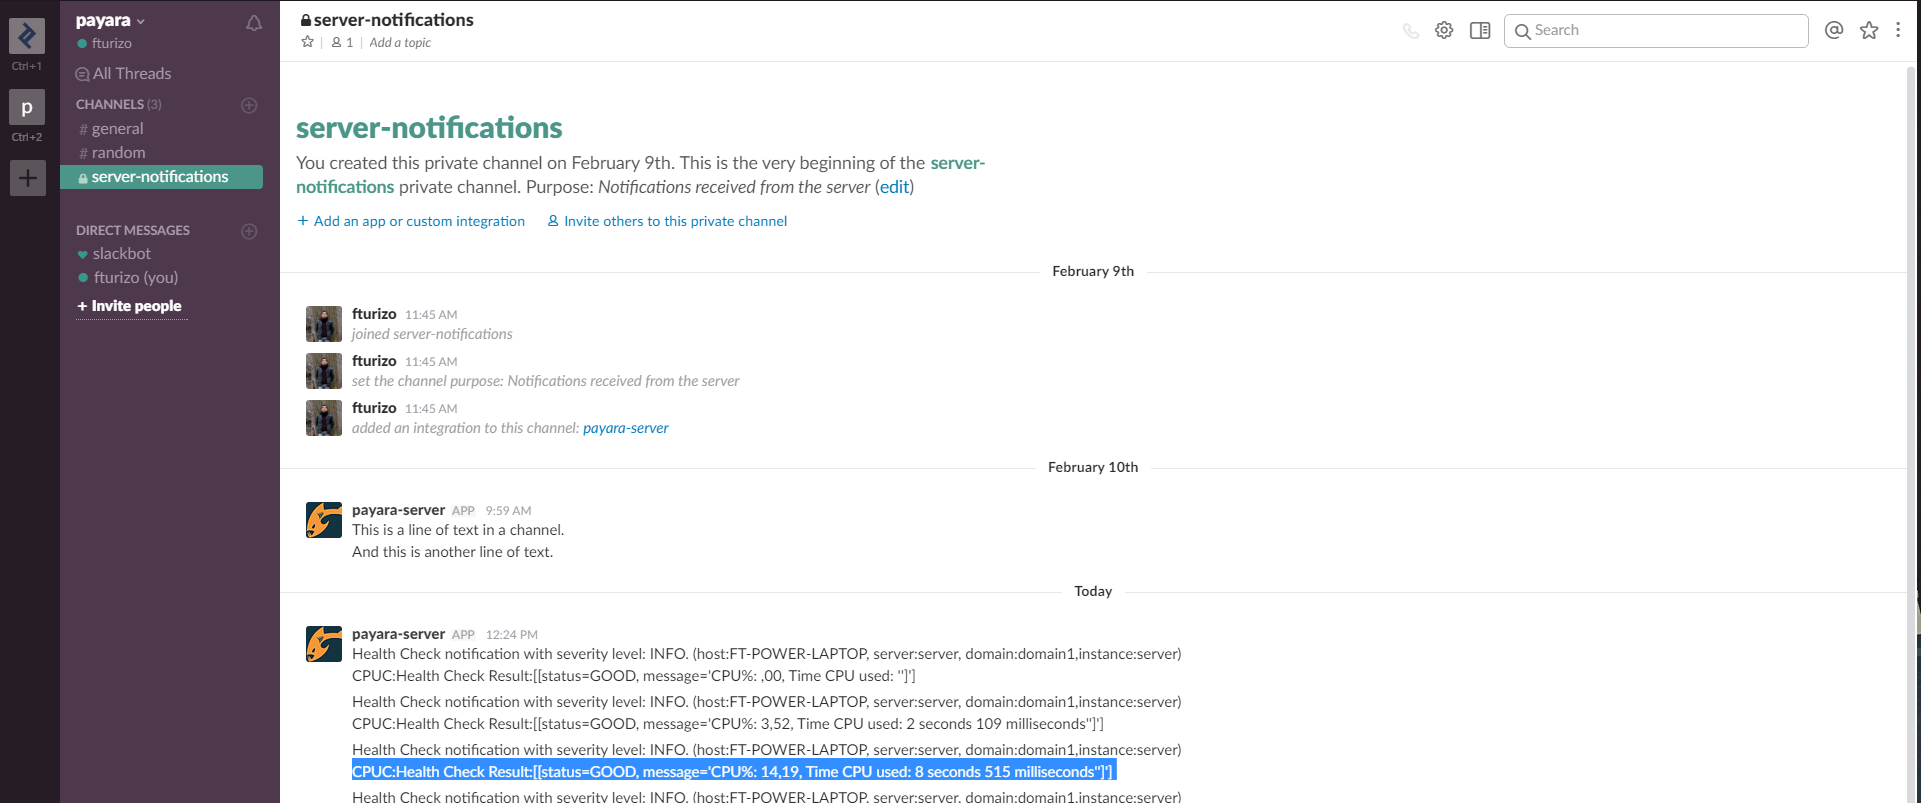
Here’s a sample of how the notifications are visualized on the Slack Desktop application:
Discord Notifier
A notifier for publishing notifications to a Discord channel.
The notifier modules are available in these locations:
Notifier Configuration
Using the Administration Web Console
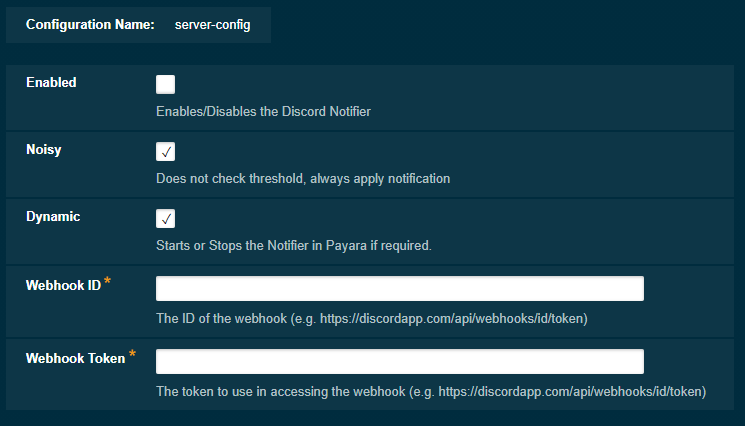
To configure the Notification Service in the Administration Console, go to Configuration → [instance-configuration (like server-config)] → Notification Service and click on the Discord tab:
From the Command Line
To configure the Notification Service from the command line, use the set-discord-notifier-configuration asadmin command like this:
asadmin set-discord-notifier-configuration --enabled=true --dynamic=true --webhookId=xxx --webhookToken=yyyWhere the xxx and yyy are respectively the ID and token for the webhook you have configured within Discord.
You can use the --enabled and --dynamic options to enable or disable the Discord notifier on demand.
You can retrieve the current configuration for the Discord notifier using the get-discord-notifier-configuration asadmin command like this:
asadmin get-discord-notifier-configurationThis will return the details of the current Discord configuration; see below for an example:
Enabled  Filter   Webhook ID  Webhook Token
true     WARNING  xxx         yyy