The Java Message Service (JMS) API is a messaging standard that allows Jakarta EE applications and components, including message-driven beans (MDBs), to create, send, receive, and read messages. It enables distributed communication that is loosely coupled, reliable, and asynchronous.
Payara Server supports JMS messaging by communicating with a JMS provider through a Jakarta EE Connector resource adapter. By default, Payara Server provides JMS messaging through its built-in jmsra resource adapter communicating with Open Message Queue, which is included with Payara Server. This combination, known as the JMS Service, is tightly integrated with Payara Server, providing a rich set of asadmin subcommands and Administration Console pages to simplify JMS messaging administration tasks.
Instructions for accomplishing the task in this chapter by using the Administration Console are contained in the Administration Console online help.
About the JMS Service
To support JMS messaging, the JMS Service provides the following administrative objects:
- JMS Service Configuration
-
The JMS service configuration is part of the overall configuration for a Payara standalone instance or cluster. It specifies how the JMS Service is to create and maintain connections with JMS Hosts.
- JMS Hosts
-
JMS hosts are the message servers that host destinations, store messages, and interact with applications to send and receive messages across connections. In Message Queue, JMS hosts are called brokers.
The JMS service supports these types of JMS hosts:-
Embedded type, in which the JMS host runs in the same JVM as the Payara instance; its configuration and lifecycle are managed by the JMS service
-
Local type, in which the JMS host runs separately on the same host as the Payara instance; its configuration and lifecycle are managed by the JMS service
-
Remote type, in which the JMS host represents a Message Queue broker or broker cluster that is external to the JMS service; its operation is managed using Message Queue administrative tools
For more information about JMS host types, see About JMS Host Types.
-
- JMS Connection Factory Resources
-
JMS connection factory resources house the information that applications use to connect to a JMS provider. For each JMS connection factory, the JMS service automatically maintains a Payara connector resource and a Payara connector connection pool in order to support connection pooling and fail-over.
- JMS Destination Resources
-
JMS destination resources house the information that applications use to specify the target destination of messages they produce and the source destination of messages they consume. For each JMS destination resource, the JMS service automatically maintains a Payara administered object.
- JMS Physical Destinations
-
JMS physical destinations provide a means to create and manage JMS destinations administratively instead of having them created dynamically when needed by an application. While dynamic creation of destinations is often sufficient during application development, administratively created physical destinations are more suitable for production environments.
JMS Service High Availability
Just as Payara Server supports clusters of instances to provide high availability, Message Queue supports clusters of brokers to provide service availability or service and data availability, depending on the type of broker cluster, as described in [Broker Clusters] in Open Message Queue Technical Overview.
The JMS service takes advantage of this Message Queue capability and automatically creates and manages a Message Queue broker cluster when a Payara cluster’s configuration specifies Embedded or Local type JMS hosts. Additionally, both Payara clusters and standalone instances can use Message Queue broker clusters as Remote type JMS hosts.
For information about how the JMS service supports Payara clusters and Message Queue broker clusters, see Configuring Java Message Service High Availability in the Payara Server Edition High Availability section.
Updating the JMS Service Configuration
Because the JMS service configuration is part of the overall configuration for a standalone instance or cluster, it is created when the standalone instance or cluster is created. You can then update the JMS service configuration by using the Java Message Service page for the configuration in the Administration Console, or by using a set subcommand of the following form:
set configs.config.config-name.jms-service.attribute-name=attribute-valueThe attributes you can set are:
type-
The JMS host type the service is to use. Available choices are
EMBEDDED,LOCALandREMOTE. See About JMS Host Types for more information. init-timeout-in-seconds-
The number of seconds Payara Server waits for the JMS service to start before aborting the startup.
start-args-
A list of arguments the JMS service passes to Embedded and Local type JMS hosts on startup.
default-jms-host-
The name of the default JMS host.
reconnect-enabled-
When set to
true, the JMS service attempts to reconnect to a JMS host (or one of the JMS hosts in the AddressList) when a connection is lost. reconnect-attempts-
The number of attempts to connect (or reconnect) for each JMS host in the AddressList before the JMS service tries the next address in the list. A value of -1 indicates that the number of reconnect attempts is unlimited (the JMS service attempts to connect to the first address until it succeeds).
reconnect-interval-in-seconds-
The number of seconds between reconnect attempts. This interval applies for attempts on each JMS host in the AddressList and for successive addresses in the list. If it is too short, this time interval does not give a JMS host time to recover. If it is too long, the reconnect might represent an unacceptable delay.
addresslist-behavior-
The order of connection attempts. Available choices are:
random-
Select a JMS host from the AddressList randomly. If there are many clients attempting a connection using the same connection factory, specify
randomto prevent them from all being connected to the same JMS host. priority-
Always try to connect to the first JMS host in the AddressList and use another one only if the first one is not available.
addresslist-iterations-
The number of times the JMS service iterates through the AddressList in an effort to establish (or reestablish) a connection. A value of -1 indicates that the number of attempts is unlimited.
mq-schememq-service-
The Message Queue address scheme name and connection service name to use for the AddressList if a non-default scheme or service is to be used.
| After making changes to the JMS service configuration, Payara Server instances that use the configuration must be restarted in order for the changes to be propagated. |
Setting Message Queue Broker Properties in the JMS Service Configuration
You can specify any Message Queue broker property in the JMS service configuration by adding it by name to the Additional Properties table on the Java Message
Service page for the configuration in the Administration Console, or by using a set subcommand of the following form:
set configs.config.config-name.jms-service.property.broker-property-name=valueIf the broker property name includes dots, preface the dots with two backslashes (\\); for example, to set the imq.system.max_count property, specify imq\\.system\\.max_count in the set subcommand.
| You can also set broker properties in the JMS host. If you set the same broker property in both the JMS service configuration and the JMS host, the value specified in the JMS host is used. |
Administering JMS Hosts
A JMS host represents a Message Queue broker. JMS contains a JMS hosts list (the AddressList property) that contains all the JMS hosts that are used by Payara Server. The JMS hosts list is populated with the hosts and ports of the specified Message Queue brokers and is updated whenever a JMS host configuration changes. When you create JMS resources or deploy message driven beans, the resources or beans inherit the JMS hosts list.
For information about administering JMS hosts that are servicing Payara clusters, see Configuring Payara Clusters to Use Message Queue Broker Clusters in the Payara Server High Availability section.
About JMS Host Types
The JMS service uses Message Queue (MQ) brokers as JMS hosts, integrating them in three ways:
- Embedded Type
-
When the JMS service configuration’s
typeattribute isEMBEDDED, the MQ broker is co-located in the same JVM as the Payara server instance it services. The JMS service starts it in-process and manages its configuration and lifecycle. For this type, the JMS service uses lazy initialization to start the broker when the first JMS operation is requested instead of immediately when the Payara instance is started. If necessary, you can force startup of the broker by using thejms-pingcommand. Additionally, if the Payara instance is a standalone instance (not a clustered instance), JMS operations use a Message Queue feature called direct mode to bypass the networking stack, leading to performance optimization. - Local Type
-
When the JMS service configuration’s
typeattribute isLOCAL, the JMS service starts the MQ broker specified in the configuration as the default JMS host in a separate process on the same host as the Payara server instance. The JMS service manages its configuration and lifecycle. For this type, the JMS service starts the broker immediately when the Payara instance is started. The JMS service provides the Message Queue broker an additional port to start the RMI registry. This port number is equal to the broker’s JMS port plus 100. For example, if the JMS port number is 37676, then the additional port’s number will be 37776. Additionally, thestart-argsproperty of the JMS service configuration can be used to specify Message Queue broker startup options. - Remote Type
-
When the JMS service configuration’s
typeattribute isREMOTE, the JMS service uses the information defined by the default JMS host to communicate with an MQ broker or broker cluster that has been configured and started using Message Queue tools. Ongoing administration and tuning of the broker or broker cluster are also performed using Message Queue tools.
Configuring Embedded and Local JMS Hosts
Because the JMS service, not Message Queue, manages Embedded and Local JMS hosts automatically, you should avoid using Message Queue utilities to configure them. Instead, specify broker properties in the JMS service configuration or in the JMS host.
Should the need to use Message Queue utilities arise, you must use the -varhome option when running certain Message Queue utilities to specify the IMQ_VARHOME location of the Embedded or Local JMS host. This location depends on which Payara instance the JMS host is servicing:
-
For
server, the Domain Administration Server (DAS), theIMQ_VARHOMElocation is:domain-root-dir/domain-dir/imq -
For any other Payara instance, the
IMQ_VARHOMElocation is:as-install/nodes/node-name/instance-name/imq
For example, the broker log file for an Embedded or Local JMS host servicing the DAS is available at domain-root-dir/domain-dir/imq/instances/imqbroker/log/log.txt, and the broker log file for an Embedded or Local JMS host servicing any other Payara instance is available at as-install/nodes/node-name/instance-name/imq/instances/mq-instance-name/log/log.txt.
When using Message Queue utilities on the Windows platform, you must explicitly use the Windows executable (.exe) versions of the utilities, even when running command shells such as Cygwin. For example, instead of running imqcmd, you must run imqcmd.exe.
|
To Create a JMS Host
The default JMS service configuration includes a JMS host, default_JMS_host. For most situations, this host is sufficient, so replacing it or creating additional JMS hosts is not often necessary and is a task for advanced users. Use the create-jms-host subcommand in remote asadmin mode to create an additional JMS host.
-
Ensure that the server is running. Remote
asadminsubcommands require a running server. -
Create the JMS host by using the
create-jms-hostsubcommand:asadmin> create-jms-host --mqhost hostName --mqport portNumber --mquser adminUser --mqpassword adminPassword --target glassfishTarget --property mqBrokerPropList --force trueFalse jms-host-name--mqhost-
The host name of the Message Queue broker.
--mqport-
The port number of the Message Queue broker.
--mquser-
The username of the administrative user of the Message Queue broker.
--mqpassword-
The password of the administrative user of the Message Queue broker.
--target-
The Payara Server object for which the JMS host is being created. For details, see
create-jms-host. --property-
A list of one or more Message Queue broker properties to configure the broker. The list is colon-separated (
:) and has the form:prop1Name=prop1Value:prop2Name=prop2Value:...If a broker property name includes dots, preface the dots with two backslashes (
\\); for example, to include theimq.system.max_countproperty, specifyimq\\.system\\.max_countin the--propertyoption.
| You can also set broker properties in the JMS service configuration. If you set the same broker property in both the JMS host and the JMS service configuration, the value specified in the JMS host is used. |
--force-
Specifies whether the subcommand overwrites the existing JMS host of the same name. The default value is
false. - jms-host-name
-
The unique name of the JMS host.
To List JMS Hosts
Use the list-jms-hosts subcommand in remote asadmin mode to list the existing JMS hosts.
-
Ensure that the server is running. Remote
asadminsubcommands require a running server. -
List the JMS hosts by using the
list-jms-hostssubcommand.
To Update a JMS Host
Use the set subcommand in remote asadmin mode to update an existing JMS host.
-
Ensure that the server is running. Remote
asadminsubcommands require a running server. -
Use the
getsubcommand to list the current attribute values of the desired JMS host:
asadmin> get configs.config.config-name.jms-service.jms-host.jms-host-name.*
For information about JMS host attributes, see create-jms-host(1).
. Use the set subcommand to modify a JMS host attribute:
asadmin> set configs.config.config-name.jms-service.jmshost.
jms-host-name.attribute-name=attribute-value- The attributes you can set are
-
host-
The host name of the Message Queue broker.
port-
The port number of the Message Queue broker.
admin-user-name-
The username of the administrative user of the Message Queue broker.
admin-password-
The password of the administrative user of the Message Queue broker.
- `property.`broker-property-name
-
A Message Queue broker property. The property and the value assigned to it are used to configure the Message Queue broker.
If the broker property name includes dots, preface the dots with two backslashes (`\\`); for example, to include the `imq.system.max_count` property, specify `imq\\.system\\.max_count` in the `set` subcommand.
You can also set broker properties in the JMS service configuration. If you set the same broker property in both the JMS host and the JMS service configuration, the value specified in the JMS host is used.
To Delete a JMS Host
Use the delete-jms-host subcommand in remote asadmin mode to delete a JMS host from the JMS service. If you delete the only JMS host, the JMS service will not be able to start until you create a new JMS host.
-
Ensure that the server is running. Remote
asadminsubcommands require a running server. -
List the JMS hosts by using the
list-jms-hostssubcommand. -
Delete a JMS host by using the
delete-jms-hostsubcommand.
Administering JMS Connection Factories and Destinations
The JMS API uses two kinds of administered objects. Connection factory objects allow an application to create other JMS objects programmatically. Destination objects serve as repositories for messages. How these objects are created is specific to each implementation of JMS. In Payara Server, JMS is implemented by performing the following tasks:
-
Creating a connection factory
-
Creating a destination, which requires creating a physical destination and a destination resource that refers to the physical destination
JMS applications use the Java Naming and Directory Interface (JNDI) API to access the connection factory and destination resources. A JMS application normally uses at least one connection factory and at least one destination. By studying the application or consulting with the application developer, you can determine what resources must be created. The order in which the resources are created does not matter.
The Jakarta EE standard specifies that certain default resources be made available to applications, and defines specific JNDI names for these default resources. Payara Server makes these names available through the use of logical JNDI names, which map Jakarta EE standard JNDI names to specific Payara Server resources. For JMS connection factory resources, the Jakarta EE standard name java:comp/DefaultJMSConnectionFactory is mapped to the jms/__defaultConnectionFactory resource.
Payara Server provides the following types of connection factory objects:
-
QueueConnectionFactoryobjects, used for point-to-point communication -
TopicConnectionFactoryobjects, used for publish-subscribe communication -
ConnectionFactoryobjects, which can be used for both point-to-point and publish-subscribe communications (recommended for new applications)
Payara Server provides the following types of destination objects:
-
Queueobjects, used for point-to-point communication -
Topicobjects, used for publish-subscribe communication
The subcommands in this section can be used to administer both the connection factory resources and the destination resources. For information on JMS service support of connection pooling and failover, see Connection Failover in the Payara Server High Availability section. For instructions on administering physical destinations, see Administering JMS Physical Destinations.
To Create a Connection Factory or Destination Resource
For each JMS connection factory that you create, Payara Server creates a connector connection pool and connector resource. For each JMS destination that you create, Payara Server creates a connector admin object resource. If you delete a JMS resource, Payara Server automatically deletes the connector resources.
Use the create-jms-resource command in remote asadmin mode to create a JMS connection factory resource or a destination resource.
To specify the addresslist property (in the format host:mqport,host2:mqport,host3:mqport) for the asadmin create-jms-resource command, escape the : by using \\. For example, host1\\:mqport,host2\\:mqport,host3\\:mpqport.
|
To update a JMS connection factory, use the set subcommand for the underlying connector connection pool,
See To Update a Connector Connection Pool.
To update a destination, use the set subcommand for the admin object resource. See To Update an Administered Object.
-
Ensure that the server is running. Remote
asadminsubcommands require a running server. -
Create a JMS resource by using the
create-jms-resourcecommand.
Information about the properties for the subcommand is included in this help page. -
If needed, restart the server.
Some properties require server restart. See Configuration Changes That Require Restart. If your server needs to be restarted, see To Restart a Domain.
Example 17-5 Creating a JMS Connection Factory
This example creates a connection factory resource of type jakarta.jms.ConnectionFactory whose JNDI name is jms/DurableConnectionFactory. The ClientId property sets a client ID on the connection factory so that it can be used for durable subscriptions. The JNDI name for a JMS resource customarily includes the jms/ naming subcontext.
asadmin> create-jms-resource --restype jakarta.jms.ConnectionFactory
--description "connection factory for durable subscriptions"
--property ClientId=MyID jms/DurableConnectionFactory
Command create-jms-resource executed successfully.To List JMS Resources
Use the list-jms-resources subcommand in remote asadmin mode to list the existing connection factory and destination resources.
-
Ensure that the server is running. Remote
asadminsubcommands require a running server. -
List the existing JMS resources by using the
list-jms-resourcessubcommand.
Example 17-7 Listing All JMS Resources
This example lists all the existing JMS connection factory and destination resources.
asadmin> list-jms-resources
jms/Queue
jms/ConnectionFactory
jms/DurableConnectionFactory
jms/Topic
Command list-jms-resources executed successfully
Example 17-8 Listing a JMS Resources of a Specific Type
This example lists the resources for the resource type javax.
asadmin> list-jms-resources --restype jakarta.jms.TopicConnectionFactory
jms/DurableTopicConnectionFactory
jms/TopicConnectionFactory
Command list-jms-resources executed successfully.
To Delete a Connection Factory or Destination Resource
Use the delete-jms-resource subcommand in remote asadmin mode to remove the specified connection factory or destination resource.
Before You Begin
Ensure that you remove all references to the specified JMS resource before running this subcommand.
-
Ensure that the server is running. Remote
asadminsubcommands require a running server. -
List the existing JMS resources by using the
list-jms-resourcessubcommand. -
Delete the JMS resource by using the
delete-jms-resourcesubcommand.
Administering JMS Physical Destinations
Messages are delivered for routing and delivery to consumers by using physical destinations in the JMS provider. A physical destination is identified and encapsulated by an administered object (such as a Topic or Queue destination resource) that an application component uses to specify the destination of messages it is producing and the source of messages it is consuming. For instructions on configuring a destination resource, see To Create a Connection Factory or Destination Resource.
If a message-driven bean is deployed and the physical destination it listens to does not exist, Payara Server automatically creates the physical destination and sets the value of the maxNumActiveConsumers property to -1. However, it is good practice to create the physical destination beforehand. The first time that an application accesses a destination resource, Message Queue automatically creates the physical destination specified by the Name property of the destination resource. This automatically created physical destination is temporary and expires after a period specified by a Message Queue configuration property, provided that there are no messages in it and no message producers or consumers connected to it.
To Create a JMS Physical Destination
For production purposes, always create physical destinations. During the development and testing phase, however, this step is not required. Use the create-jmsdest subcommand in remote asadmin mode to create a physical destination.
Because a physical destination is actually a Message Queue object rather than a server object, you use Message Queue broker commands to update properties.
-
Ensure that the server is running. Remote
asadminsubcommands require a running server. -
Create a JMS physical destination by using the
create-jmsdestsubcommand. Information about the properties for the subcommand is included in this help page. -
If needed, restart the server. Some properties require server restart. See Configuration Changes That Require Restart. If your server needs to be restarted, see To Restart a Domain.
To List JMS Physical Destinations
Use the list-jmsdest subcommand in remote asadmin mode to list the existing JMS physical destinations.
-
Ensure that the server is running. Remote
asadminsubcommands require a running server. -
List the existing JMS physical destinations by using the
list-jmsdestsubcommand.
To Purge Messages From a Physical Destination
Use the flush-jmsdest subcommand in remote asadmin mode to purge the messages from a physical destination in the specified target’s JMS service configuration.
-
Ensure that the server is running. Remote
asadminsubcommands require a running server. -
Purge messages from the JMS physical destination by using the
flush-jmsdestsubcommand. -
If needed, restart the server. Some properties require server restart. See Configuration Changes That Require Restart. If your server needs to be restarted, see To Restart a Domain.
To Delete a JMS Physical Destination
Use the delete-jmsdest subcommand in remote asadmin mode to remove the specified JMS physical destination.
-
Ensure that the server is running. Remote
asadminsubcommands require a running server. -
List the existing JMS physical destinations by using the
list-jmsdestsubcommand. -
Delete the physical resource by using the
delete-jmsdestsubcommand.
Special Situations When Using the JMS Service
As mentioned earlier, Message Queue, through the built-in jmsra resource adapter, is tightly integrated with PayaraServer to provide JMS messaging managed through a rich set of asadmin subcommands and Administration Console pages to simplify JMS messaging administration tasks. In most instances, this tight integration is transparent and automatic, requiring no special effort on the part of an administrator. In certain special situations, though, an administrator must perform a task such a setting a Message Queue broker property or a Payara object attribute to enable or disable a capability of the integration.
The topics in this section describe these situations.
- Restarting an Embedded or Local Broker That Has Failed
-
Because the JMS service, not Message Queue, manages the lifecycle of brokers acting as Embedded and Local JMS hosts, do not use the
imqbrokerdMessage Queue utility to start such a broker that has failed. Instead, restart the Payara instance that the broker is servicing. - Changing the Admin User Password for an Embedded or Local Broker
-
Follow these steps to change the
adminuser password for an Embedded or Local broker:-
Make sure the broker is running.
-
Use the
imqusermgrMessage Queue utility to change the password of theadminuser. -
Edit the configuration of the JMS host, changing the password of the
adminuser to the new password. -
Restart the Payara instance that the broker is servicing.
When changing the password for the brokers in a broker cluster, first perform steps 1 and 2 on each broker. Then, perform step 3. Finally, perform step 4 on each broker. Using SSL to Connect to an Oracle Internet Directory (OID) or Oracle
-
- Virtual Directory (OVD) User Respository
-
When using SSL to connect to an OID or OVD user repository, you must set the
imq.user_repository.ldap.ssl.socketfactoryMessage Queue broker property tocom.sun.enterprise.security.auth.realm.ldap.CustomSocketFactory.
Troubleshooting the JMS Service
If you encounter problems, consider the following:
-
Use the
jms-pingsubcommand to confirm that the Message Queue broker is running. -
View the Payara Server log file. For
server, the DomainAdministrations Server (DAS), the log is available at domain-dir`/logs/server.log`; for other Payara instances, the log is available at as-install`/nodes/node-name/instance-name/logs/server.log`.
If the log file indicates that a Message Queue broker acting as a Remote JMS host did not respond to a message, stop the broker and then restart it. -
View the broker log. For a broker associated with the Domain Administration Server (DAS), the log is available at domain-dir`/imq/instances/imqbroker/log/log.txt`; for brokers associated with other Payara instances, the log is available at as-install`/nodes/
node-name/instance-name/imq/instances/mq-instance-name/log/log.txt`. -
For Remote type JMS hosts, be sure to start Message Queue brokers first, then Payara Server instances.
-
If all Message Queue brokers are down, it can take up to 30 minutes for Payara Server to go down or up when you are using the default values in JMS. You can change the default values for this timeout. For example:
asadmin set domain1.jms-service.reconnect-interval-in-seconds=5
Using ActiveMQ with Payara Server
Payara Server comes with its own message queue broker: OpenMQ. However, ActiveMQ is also an option for a message queue broker. This section describes how to use ActiveMQ with Payara Server.
Installing ActiveMQ
The latest version of ActiveMQ can be downloaded from here: ActiveMQ Downloads
Once downloaded, unzip the file and navigate to /bin folder and run the following command in order to start ActiveMQ:
activemq start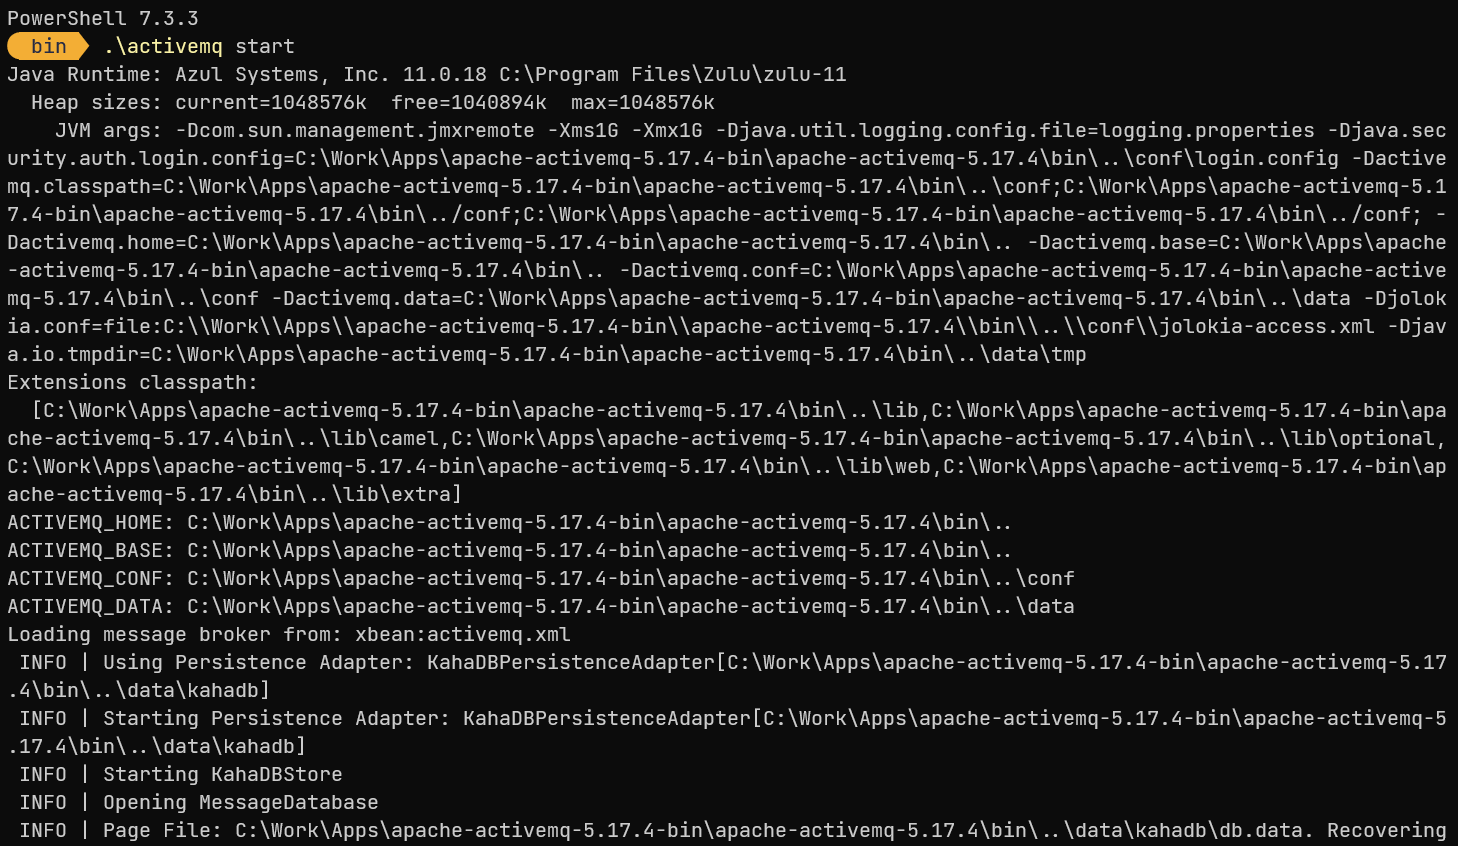
This is going to start the ActiveMQ broker at http://127.0.0.1:8161
After accessing the web console and logged in with the default credentials (admin/admin), you can create a new queue or topic by clicking on the Queues tab, inputting a name to Queue Name text box and clicking on "Create" button. For the purpose of this example we will create a queue named TESTQ.
Deploy the ActiveMQ RAR to Payara Serve
In order to use ActiveMQ with Payara Server, you need to deploy the ActiveMQ RAR to Payara Server. You can download the ActiveMQ RAR from here: ActiveMQ RAR
The rar needs then to be deployed to Payara Server. This can be done by using the Payara Admin Console or by using the following asadmin command:
asadmin deploy --type rar activemq-rar-5.17.4.rarConfiguring the ActiveMQ Connector
The first thing to do is to create a new JMS Resource Adapter Config. This can be done by using the Payara Admin Console or by using the following asadmin command:
asadmin create-resource-adapter-config --property ServerUrl=tcp://127.0.0.1:61616:UserName='admin':Password='admin' activemq-rar-5.17.4If you chose to use the Payara Admin Console, you will need to create a new JMS Resource Adapter Config by clicking on the "JMS Resource Adapter Configs" link under the "Resources" section of the left menu. The key properties for a default ActiveMQ configuration are:
| Property | Value |
|---|---|
ServerUrl |
tcp://127.0.0.1:61616 |
UserName |
admin |
Password |
admin |
Now we need to create a new JMS Connector Connection Pool as shown in the following screenshots:
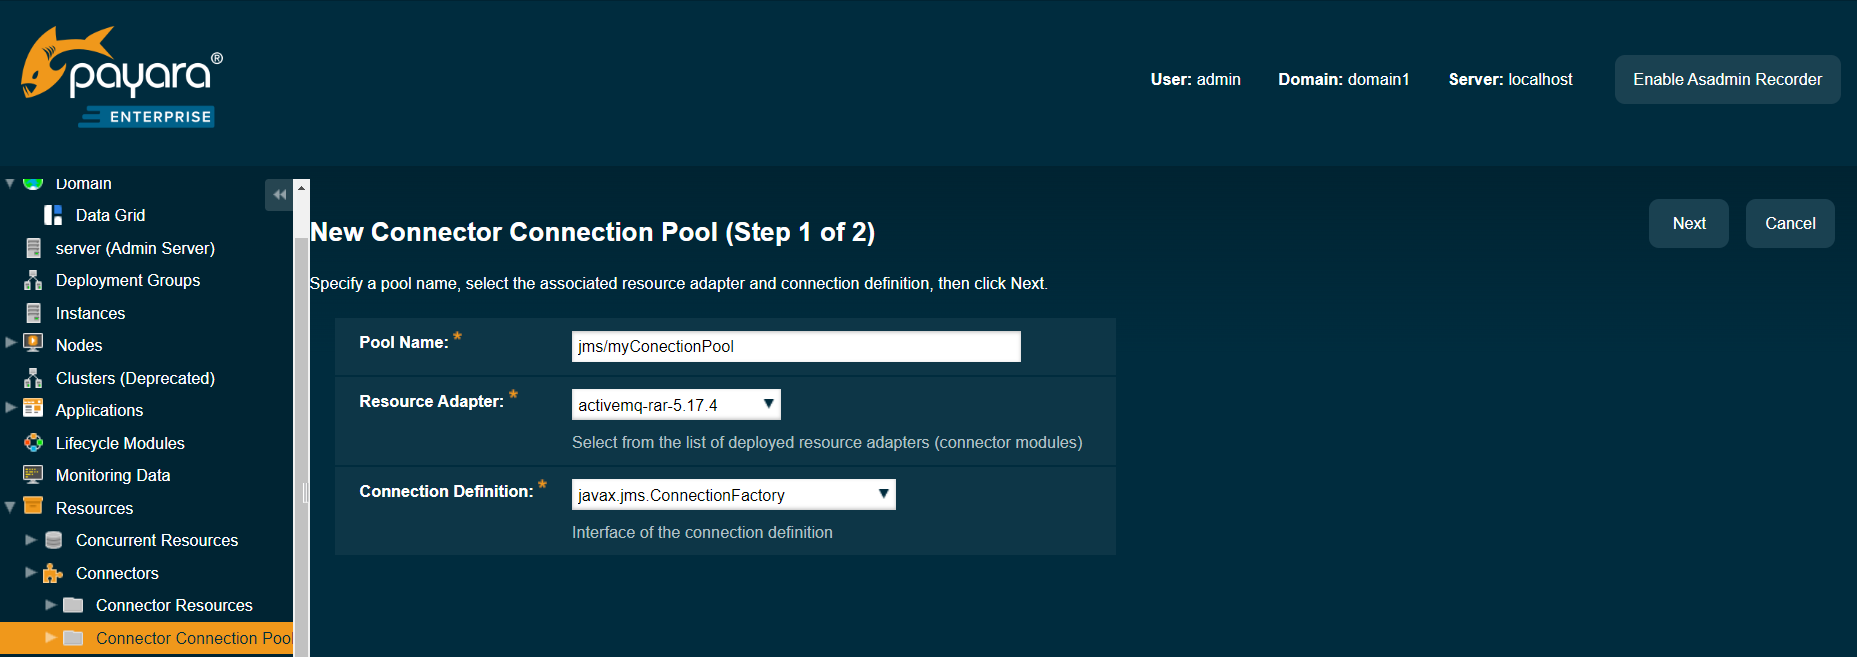
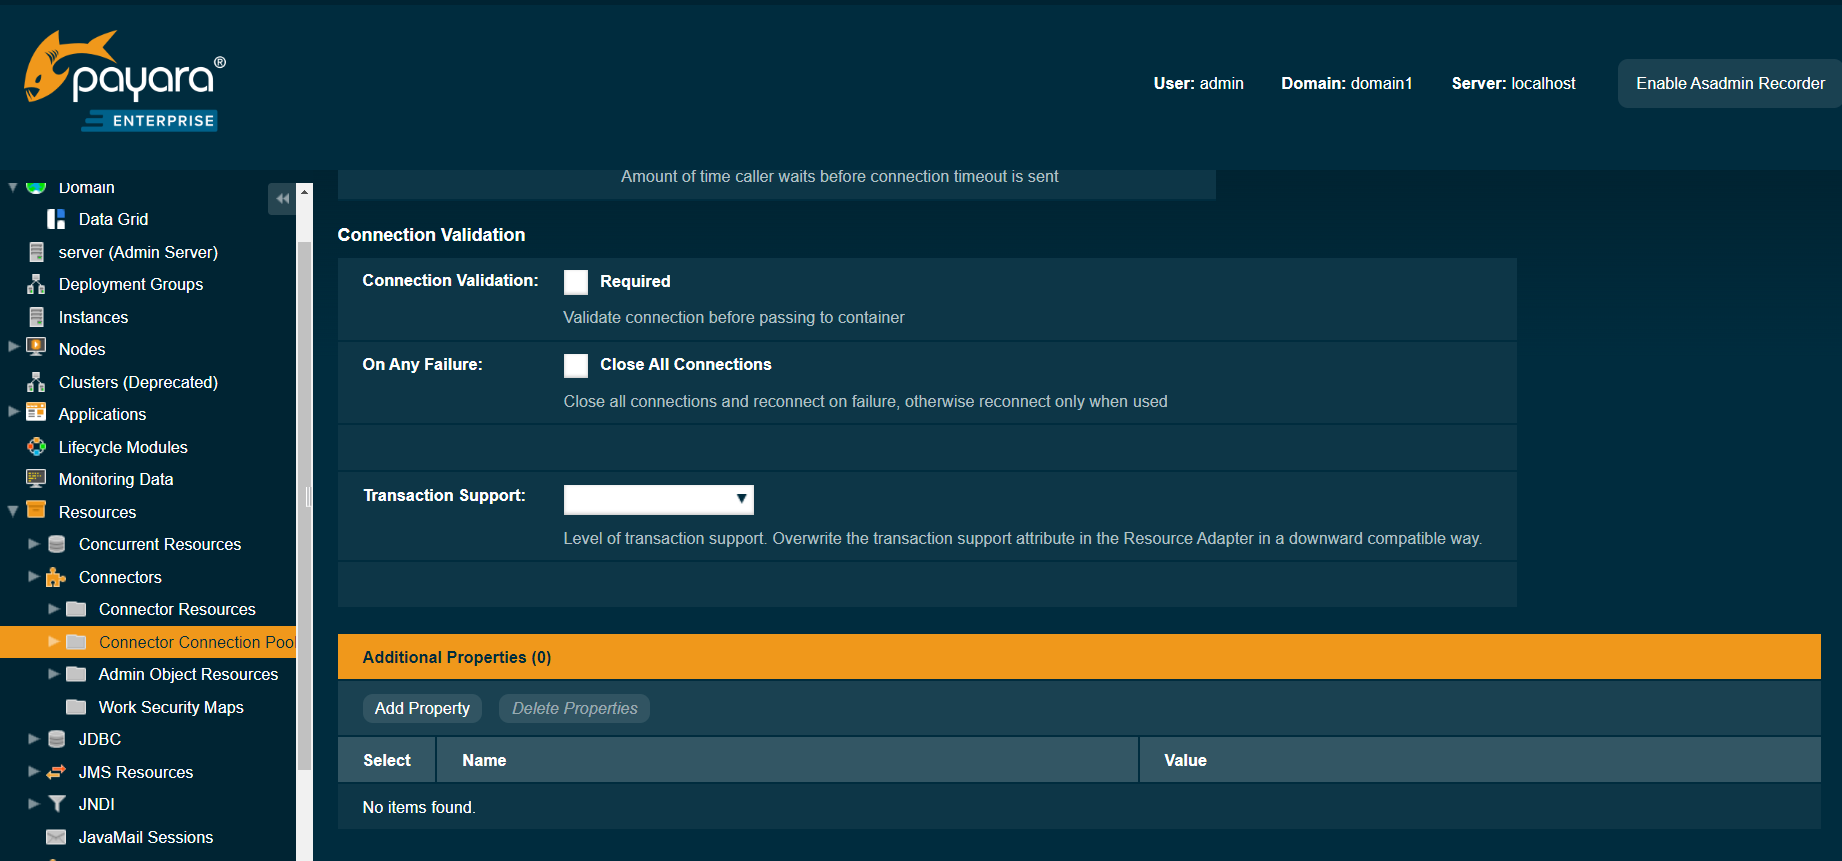
The Connector Connection Pool can also be created by using the following asadmin command:
asadmin create-connector-connection-pool --raname activemq-rar-5.17.4 --connectiondefinition javax.jms.ConnectionFactory --ping true --isconnectvalidatereq true jms/myConnectionPoolAnother configuration needed is the JNDI mapping for te JMS Connector Connection Pool. This can be done by using the Payara Admin Console following this screenshot:
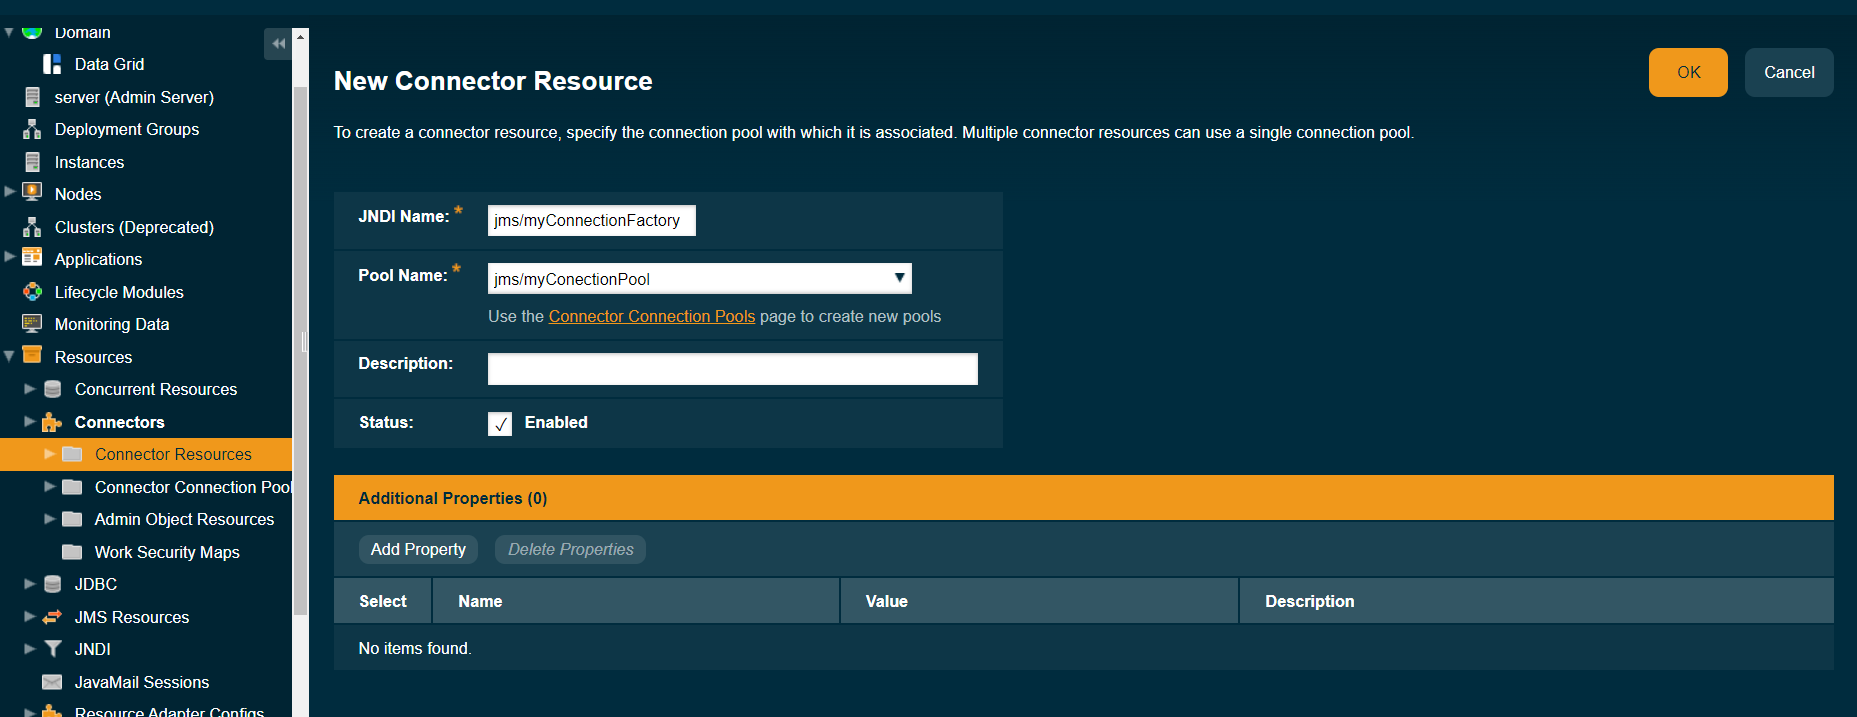
Alternatively you can use the following asadmin command:
asadmin create-connector-resource --poolname jms/myConnectionPool jms/myConnectionFactoryNow we have the connection factory configured we can also create a JMS mapping to our Queue. This can be done by using the Payara Admin Console following this screenshot:
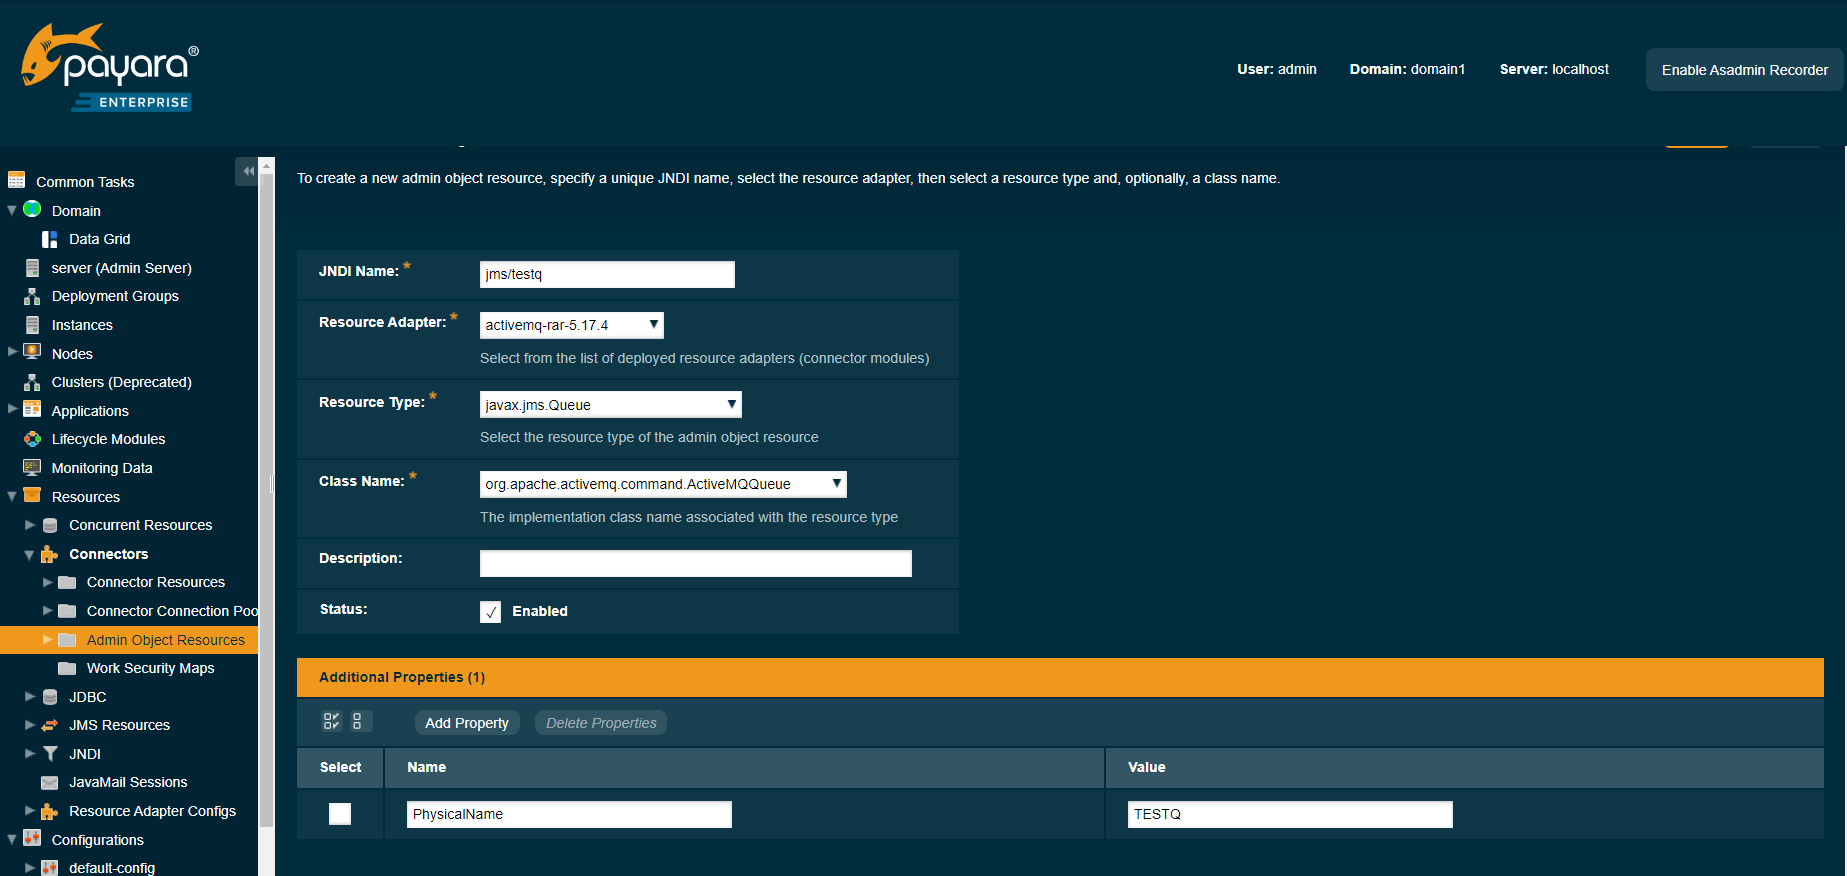
Again, if you prefer, you can use the following asadmin command to create the same mapping:
asadmin create-admin-object --raname activemq-rar-5.17.4 --restype javax.jms.Queue --property PhysicalName=TESTQ jms/TESTQTesting the ActiveMQ Configuration via MDB
Below shows the code for an MDB that listens on the queue configured in this blog within ActiveMQ. We can see that both the resource adapter, the physical name of the queue and the JNDI name are set as Activation Properties of the MDB.
package fish.payara.support.activemqtest;

import javax.ejb.ActivationConfigProperty;
import javax.ejb.MessageDriven;
import javax.jms.Message;
import javax.jms.MessageListener;

@MessageDriven(name = "testmdb", activationConfig = {
    @ActivationConfigProperty(propertyName = "destinationLookup", propertyValue = "jms/TESTQ"),
    @ActivationConfigProperty(propertyName = "destinationType", propertyValue = "javax.jms.Queue"),
    @ActivationConfigProperty(propertyName = "destination", propertyValue = "TESTQ"),
    @ActivationConfigProperty(propertyName = "resourceAdapter", propertyValue = "activemq-rar-5.17.4")
})
public class NewMessageBean implements MessageListener {

    public NewMessageBean() {
    }

    @Override
    public void onMessage(Message message) {
        System.out.println("Got message " + message);
    }
}
If we build and deploy this MDB we will see in the Active MQ console that we have a single consumer on our queue.

We can test the MDB by sending a message using the ActiveMQ console.
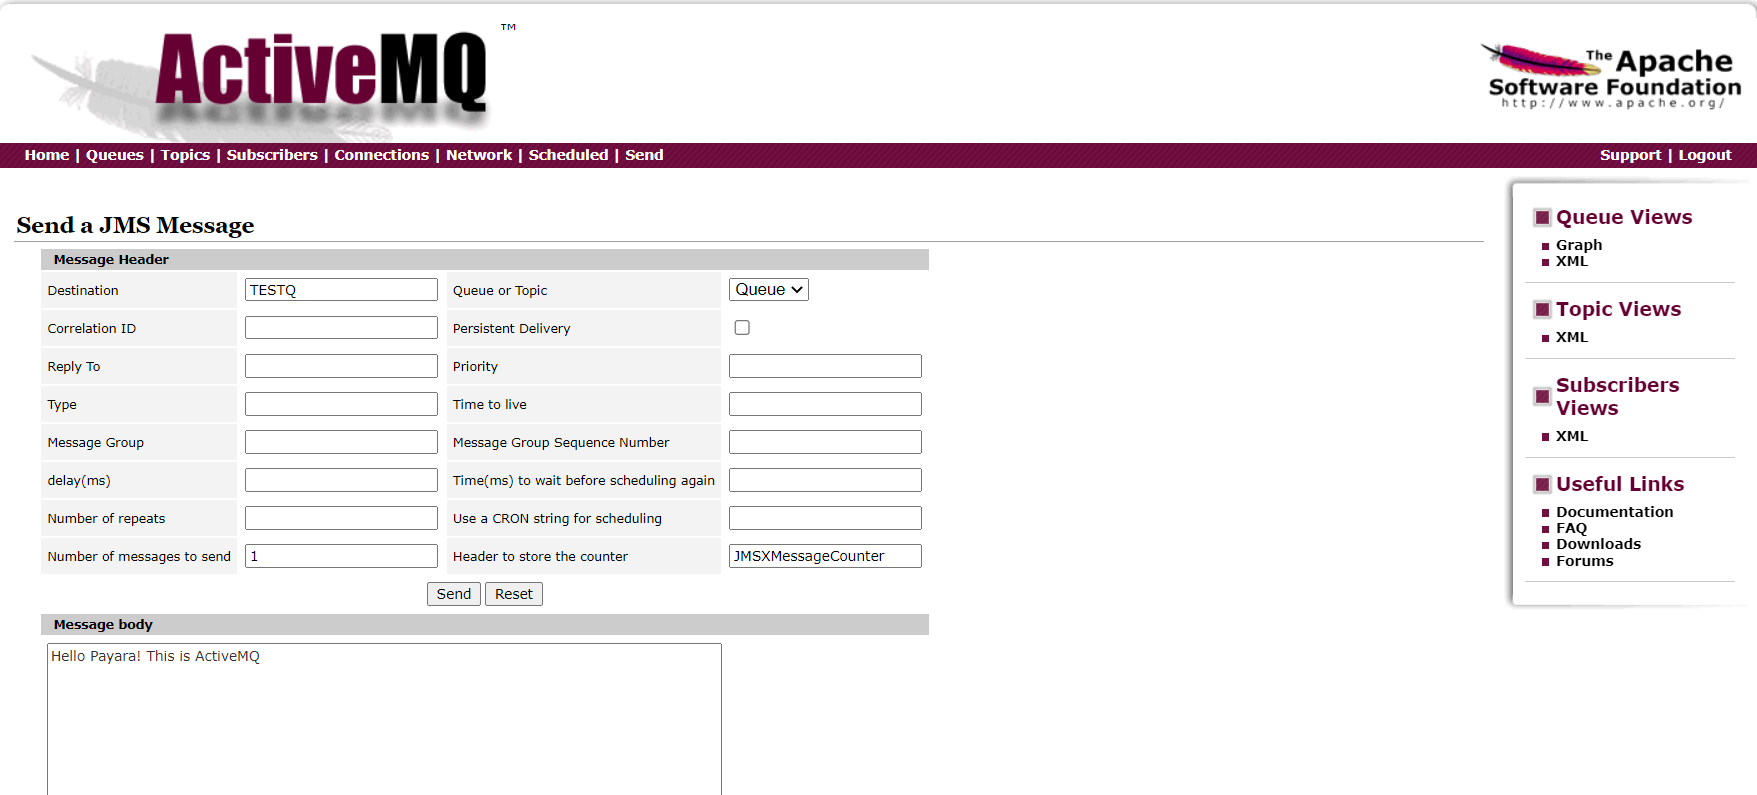
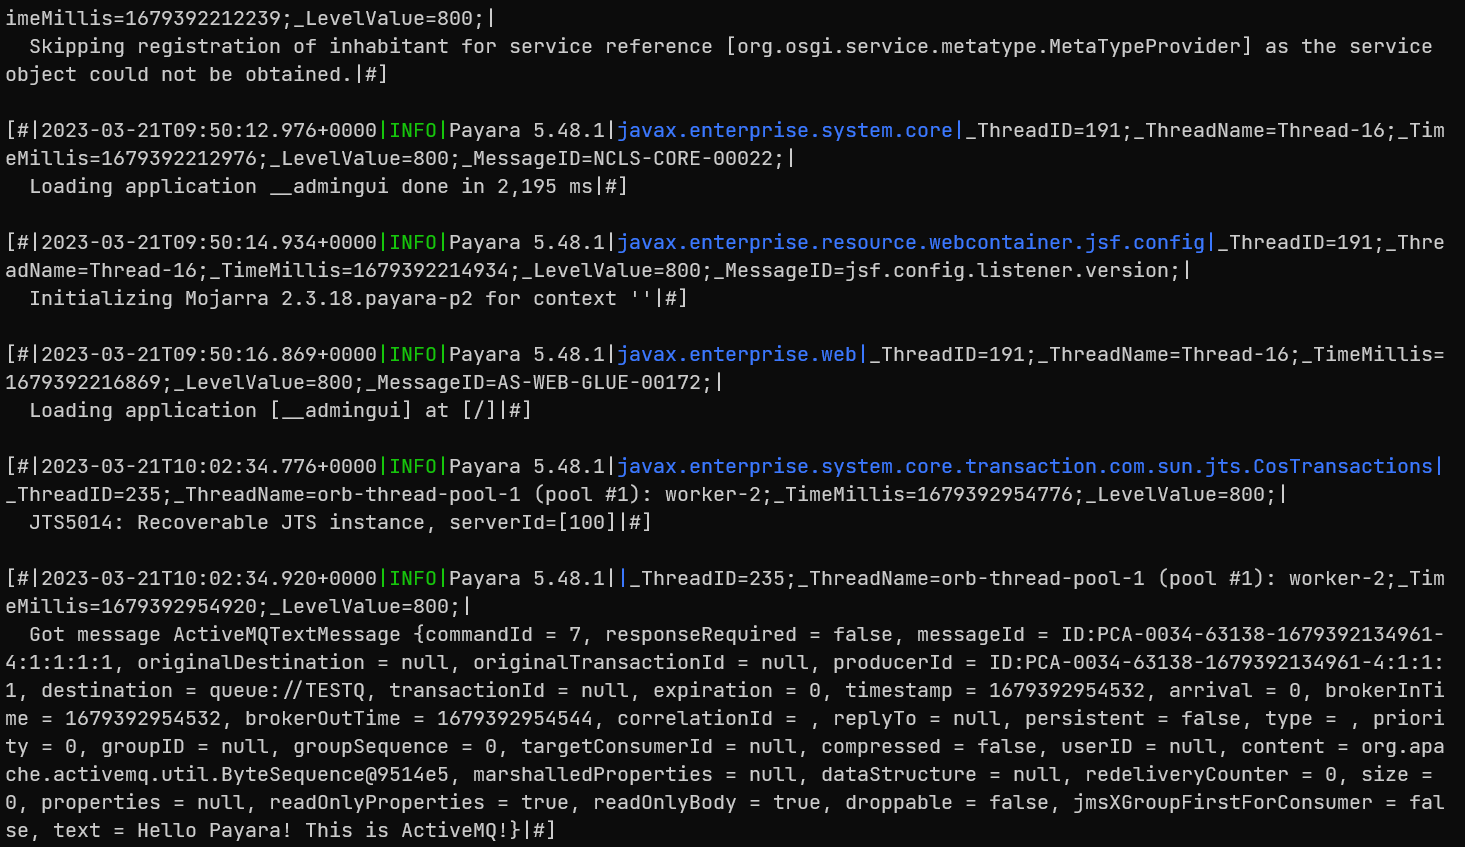
Once you have sent the message we can check the server log, the message will be printed out:
