To enhance security and provide temporary, limited-access credentials for your Jakarta EE application using Payara Cloud Connector for AWS SQS, you can integrate with AWS Security Token Service (STS) through Identity and Access Management (IAM). Follow the steps below to set up STS integration:
Creating IAM Role
To integrate Payara Cloud Connector for AWS SQS with your Jakarta EE application, you need to create an IAM (Identity and Access Management) role in the AWS Management Console. Follow the steps below to create an IAM role, retrieve the roleArn, and set a roleSessionName for use with Payara Cloud Connector AWS SQS.
Steps:
-
Open the IAM Console
-
Navigate to the AWS Management Console and open the IAM console.
-
-
Retrieve User ARN
-
Navigate back to the IAM console.
-
In the left navigation pane, choose "Users."
-
Select the IAM user (e.g., "MY-USER").
-
Copy the User ARN from the user’s summary page (e.g., "arn:aws:iam::xxxxxxxxx:user/MY-USER").
-
-
Set Role Session Name
-
For the
roleSessionName, choose a logical name for your session (e.g., "PayaraSQSSession").
-
-
Create an IAM Role
-
In the left navigation pane, choose "Roles".
-
Choose "Create role".
-
Select "AWS account".
-
Enter the AWS account ID, If you’re working within the same AWS account, you can skip this step.
-
Choose "Next".
-
-
Add permissions
-
Search for AmazonSQSFullAccess policiy and attach it.
-
Choose "Next".
-
-
Role details
-
Give the role a Name (e.g., "PayaraSQSRole").
-
Add a meaningful description.
-
Choose "Create role".
-
-
Retrieve Role ARN
-
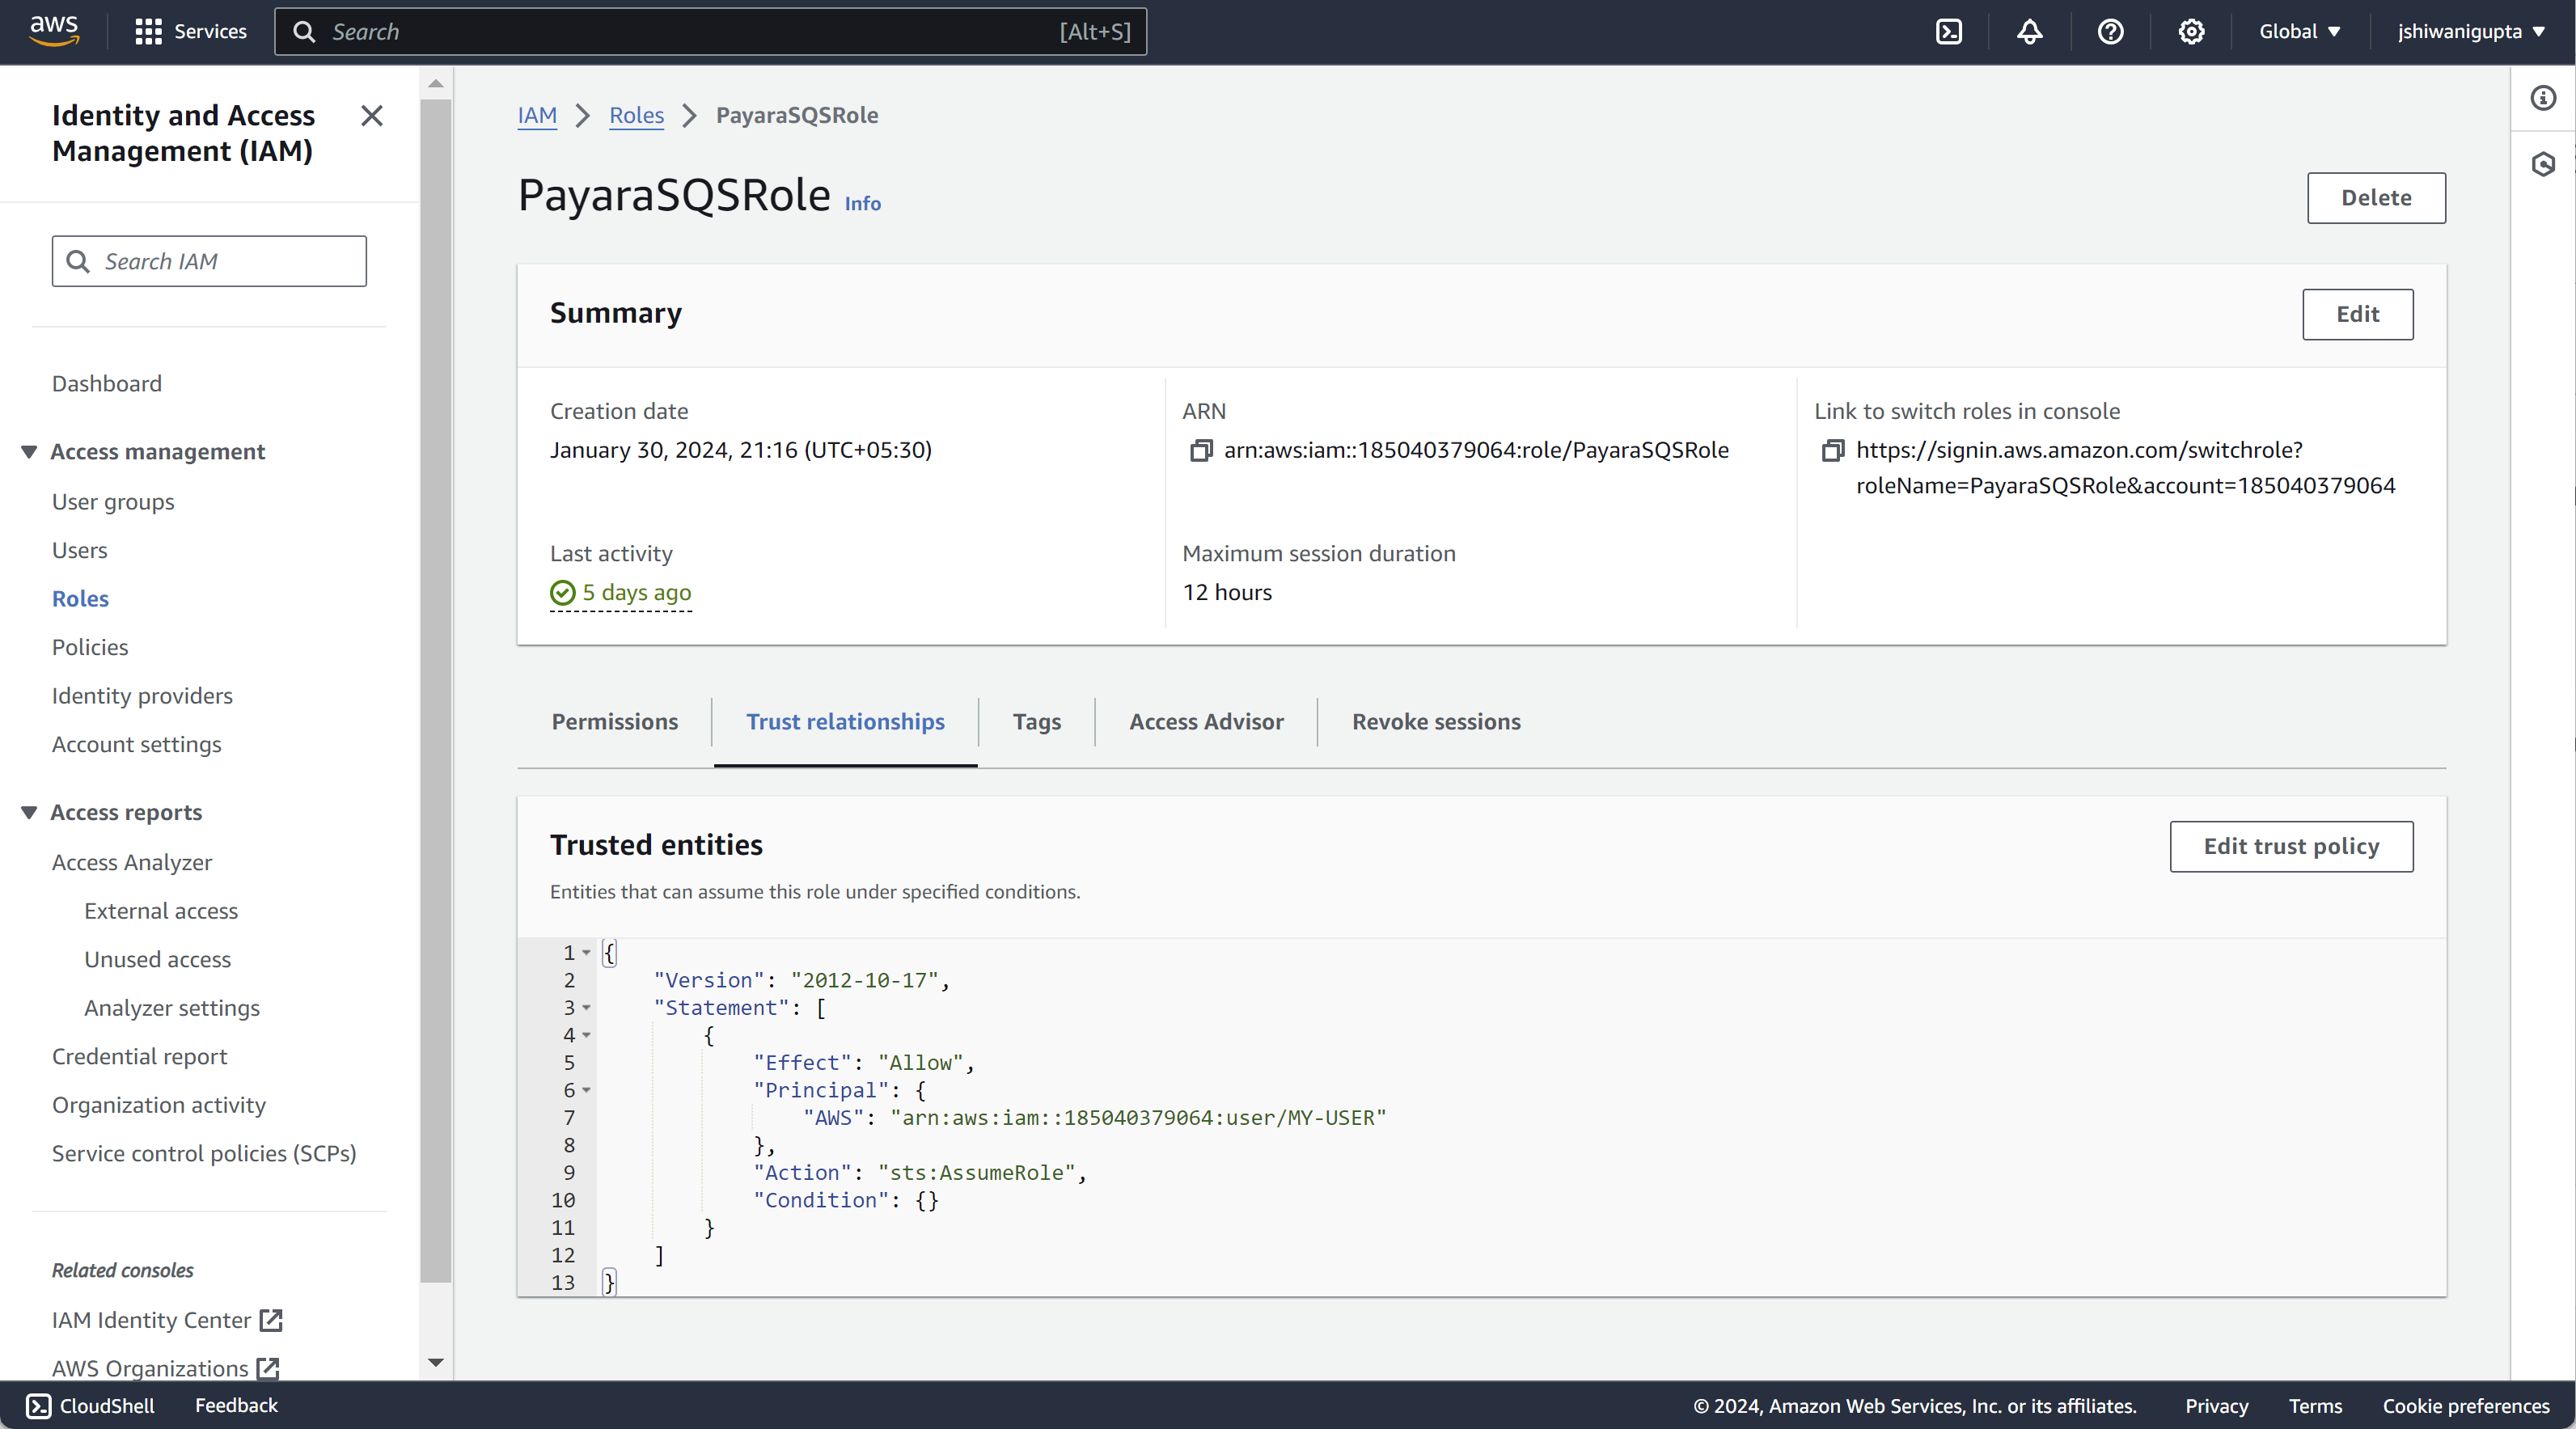
After creating the role, you’ll see a summary page for the role. Copy the Role ARN (e.g., "arn:aws:iam::xxxxxxxxx:role/PayaraSQSRole").
-
-
Update Trust Relationship
To resolve potential authorization issues related to role assumption, ensure that the Trust Relationship in the IAM role is configured correctly. Update the Trust Relationship to explicitly allow the user to assume the role. Below is an example Trust Relationship JSON where root is replace with USER’s ARN:
{
    "Version": "2012-10-17",
    "Statement": [
        {
            "Effect": "Allow",
            "Principal": {
                "AWS": "arn:aws:iam::xxxxxxxxx:user/MY-USER"
            },
            "Action": "sts:AssumeRole",
            "Condition": {}
        }
    ]
}
Make sure to replace the values with your specific IAM user ARN and role ARN.
It’s crucial to establish a link between the IAM user’s ARN and the IAM role’s Trust Relationship by configuring the Trust Relationship with the user’s ARN. This linkage ensures that the IAM user has the necessary permissions to assume the role. Additionally, for seamless integration, configure the roleArn and roleSessionName in the Payara Cloud Connector AWS SQS:
-
roleArn: The ARN of the IAM role you’ve just created. -
roleSessionName: A logical name for your session (e.g., "PayaraSQSSession").
These values play a crucial role in the configuration of Payara Cloud Connector AWS SQS, enabling your Jakarta EE application to establish the necessary connections securely.
Sending messages
Sending messages to Amazon SQS can be done via the JCA and an Amazon specific API. In order to start using this API to send messages, a resource has to be defined via the JCA API; a connection factory.
The connection factory has to be given a name, which can be any name that is valid for JNDI. The java:app namespace is typically recommended to be used. The type of the connection factory to be used for Amazon SQS is fish.payara.cloud.connectors.amazonsqs.api.AmazonSQSConnectionFactory, and we have to specify the resource adapter name which is here amazon-sqs-rar-2.1.0.rar.
Finally, the AWS account details have to be specified in the properties of the corresponding JMS resource definitions, including the roleArn and roleSessionName.
See the following example:
@ConnectionFactoryDefinition (
  name = "java:app/amazonsqs/factory",
  interfaceName = "fish.payara.cloud.connectors.amazonsqs.api.AmazonSQSConnectionFactory",
  resourceAdapter = "amazon-sqs-rar-2.1.0",
  properties = {
        "awsAccessKeyId=<accessKeyID>",
        "awsSecretKey=<secretKey>",
        "roleArn=arn:aws:iam::xxxxxxxxx:role/PayaraSQSRole",
        "roleSessionName=PayaraSQSSession",
        "region=eu-west-2"
    }
)
With the above definition in place the following code shows an example of sending a message:
@Singleton
@Startup
public class SendSQSMessage {

 @Resource(lookup = "java:app/amazonsqs/factory")
 private AmazonSQSConnectionFactory factory;

 @PostConstruct
 public void init() {
    try (AmazonSQSConnection connection = factory.createConnection()) {
        SendMessageRequest sendMsgRequest = SendMessageRequest.builder()
                        .queueUrl("<queueURL>")
                        .messageBody("Hello World")
                        .build();
        connection.sendMessage(sendMsgRequest);
    }
    catch (Exception ex) {
    }
 }
}
Receiving messages
Messages can be received from Amazon SQS by creating a MDB (Message Driven Bean) that implements the fish.payara.cloud.connectors.amazonsqs.api.AmazonSQSListener marker interface and has a single method annotated with @OnSQSMessage and the method signature void method(Message message).
See the following example:
@MessageDriven(activationConfig = {
 @ActivationConfigProperty(propertyName = "awsAccessKeyId", propertyValue = "someKey"),
 @ActivationConfigProperty(propertyName = "awsSecretKey", propertyValue = "someSecretKey"),
 @ActivationConfigProperty(propertyName = "queueURL", propertyValue = "someQueueURL"),
 @ActivationConfigProperty(propertyName = "pollInterval", propertyValue = "1"),
 @ActivationConfigProperty(propertyName = "roleArn", propertyValue = "arn:aws:iam::xxxxxxxxx:role/PayaraSQSRole") ,
 @ActivationConfigProperty(propertyName = "roleSessionName", propertyValue = "PayaraSQSSession") ,
 @ActivationConfigProperty(propertyName = "region", propertyValue = "eu-west-2")
})
public class ReceiveSQSMessage implements AmazonSQSListener {

 @OnSQSMessage
 public void receiveMessage(Message message) {
     // Handle message
 }
}