The Payara API provides a @OpenIdAuthenticationDefinition annotation that creates an authorization mechanism for OpenID Connect support. This works in the same way as other authorization mechanisms in the Java EE Security API.
Usage
The OpenID Connect authentication mechanism is defined through the @OpenIdAuthenticationDefinition annotation. Specifying this in a valid place as defined by the Java EE Security API will create the mechanism.
Example
Here’s an example that configures a OpenID Connect client:
@OpenIdAuthenticationDefinition(
       providerURI = "https://sample-openid-server.com",
       clientId = "87068hgfg5675htfv6mrucov57bknst.apps.sample.com",
       clientSecret = "{my-secret}",
       redirectURI = "${baseURL}/callback",
       extraParameters = {
            "testKey=testValue",
            "testKey2=testValue2"
       }
)
public class SecurityBean {

}
See this sample project for a more detailed example.
When defining a OpenID Connect flow within an application deployed on Payara Server, it is possible to retrieve the access token, identity token, user claims and the other authentication information within any bean in the scope of the callback/redirectURI resource used to configure the authentication:
@WebServlet("/callback")
public class CallbackServlet extends HttpServlet {

    @Inject
    OpenIdContext context;

    @Override
    protected void doGet(HttpServletRequest request, HttpServletResponse response) throws ServletException, IOException {
        PrintWriter out = response.getWriter();
        //Here's the caller name
        out.println(context.getCallerName());
        //Here's the caller groups
        out.println(context.getCallerGroups());
        //Here's the unique subject identifier within the issuer
        out.println(context.getSubject());
        //Here's the access token
        out.println(context.getAccessToken());
        //Here's the identity token
        out.println(context.getIdentityToken());
        //Here's the user claims
        out.println(context.getClaimsJson());
    }
}
The original protected URL called is stored so that a redirect can be issued to this page after the callback from the OpenIdConnect provider is handled.
| Only some basic redirect is supported namely a GET. Only the URL and query parameters are available, not the headers and the request body. |
@WebServlet("/my-servlet")
public class MyServlet extends HttpServlet{

    @Override
    protected void doGet(HttpServletRequest request, HttpServletResponse response) throws ServletException, IOException {
        // handling the OpenIdContext information. See previous example
        // Now return to original requested page
        response.sendRedirect(request.getSession().getAttribute(OpenIdConstant.ORIGINAL_REQUEST).toString());
    }
}
Configuration
OpenID Client can be configured with both @OpenIdAuthenticationDefinition annotation attributes and Microprofile Config properties.
The annotation and MicroProfile properties has several configuration options.
If you are using MicroProfile Config properties and the value contains a placeholder that should not be resolved by MicroProfile Config
itself but by the Server (like payara.security.openid.redirectURI=${baseURL}/Callback) make sure the value is properly escaped. It will otherwise result in NoSuchElementException.Here’s an example how such a value should be escaped: payara.security.openid.redirectURI=\\${baseURL}/Callback
|
The annotation and MicroProfile properties has several configuration options. They are detailed below.
| Option | MP Config Property | Required/Type | Description | Default value | Requirements | ||
|---|---|---|---|---|---|---|---|
|
|
false |
The provider URI to discover the metadata of the OpenID Connect provider. If not specified, metadata are read from |
The endpoint must be HTTPS. |
|||
|
required if |
Alternative way to specify metadata if auto-configuration from |
|
The endpoint must be HTTPS. |
|||
|
|
true |
The client identifier issued when the application was registered. |
N/A. |
|||
|
|
true |
The client secret for the registered application. |
N/A. |
|||
|
|
|
The URL to redirect the user to upon successful authentication. Can include the variable |
|
Must be equal to one set in the OpenID Connect provider. |
||
|
|
false |
The scopes requested from the OpenID Connect provider. |
{"openid", "email", "profile"} |
N/A. |
||
|
|
false |
Response Type value defines the processing flow to be used. |
code |
N/A. |
||
|
|
false |
Informs the Authorization Server of the mechanism to be used for returning parameters from the Authorization Endpoint. |
N/A. |
|||
|
|
false |
The prompt value specifies whether the authorization server prompts the user for re-authentication and consent. |
N/A. |
|||
|
|
false |
The display value specifying how the authorization server displays the authentication and consent user interface pages. |
page |
N/A. |
||
|
|
false |
Enables string value used to mitigate replay attacks. |
|
N/A. |
||
|
|
|
If enabled state & nonce value stored in session otherwise in cookies. |
|
N/A. |
||
|
|
false |
Sets the connect timeout(in milliseconds) for Remote JWKS retrieval. |
|
Value must not be negative and if value is zero then infinite timeout. |
||
|
|
false |
Sets the read timeout(in milliseconds) for Remote JWKS retrieval. |
500 |
Value must not be negative and if value is zero then infinite timeout. |
||
|
|
false |
Enables or disables the automatically performed refresh of Access and Refresh Token. |
false |
N/A. |
||
|
|
|
Sets the minimum validity time(in milliseconds) the Access Token must be valid before it is considered expired. |
10000 |
Value must not be negative. |
||
|
|
|
Defines the name of callerName claim and maps the claim’s value to caller name value in IdentityStore#validate. |
preferred_username |
N/A. |
||
|
|
|
Defines the name of callerGroups claim and maps the claim’s value to caller groups value in IdentityStore#validate. |
groups |
N/A. |
||
|
|
|
Defines the hostname of the proxied server. |
N/A. |
|||
|
|
|
Defines the port of the proxied server. |
N/A. |
|||
|
|
|
An array of extra configuration parameters to be sent to the OpenID Connect provider. |
This is an array of strings in the form The value also supports the use of EL expressions, so it is possible for each string to be defined as
See the section Evaluation of Extra Parameters for more details. |
|||
|
|
Overrides |
Corresponds to an EL expression that can be used to set extra configuration parameters to be sent to the OpenID Connect provider. The expression must evaluate as either:
Example: extraParametersExpression = "#+{securityBean.extraParams+}
See the section Evaluation of Extra Parameters for more details. |
||||
|
|
Defines the functionality that is performed when the user logs out and defines the RP Session Management configuration. |
If both an annotation attribute and a MicroProfile Config property are defined for the same option then the MicroProfile Config property value always takes precedence over the @OpenIdAuthenticationDefinition annotation value.
|
| Option | MP Config property | Description | Default value |
|---|---|---|---|
|
|
OIDC provider’s logout endpoint URL. If set, overrides the URL obtained via the |
|
|
|
This property disables the scope validation for custom scope configurations |
false |
Expression Language Support
The @OpenIdAuthenticationDefinition supports the use of expression language (EL) notation for programmatic configuration scenarios. This means that you can use any CDI bean properties to set the OpenID Connect configuration like this:
@OpenIdAuthenticationDefinition(
    providerURI="#{openidConfigBean.tokenEndpointURL}",
    clientId="#{openidConfigBean.clientId}",
    clientSecret="#{openidConfigBean.clientSecret}",
    redirectURI="#{openidConfigBean.redirectURI}"
)
public class SecurityBean {
}| By default, the EL expressions are evaluated only once after the application is loaded and the evaluated values are then remembered until the application is reloaded, for performance reasons. This means that although the configuration can be evaluated dynamically the first time it’s needed, it’s not possible to change the configuration later on. If you need to dynamically modify the configuration during the lifetime of the application, follow the next section about multi-tenancy support. |
Evaluation of Extra Parameters
There are multiple ways to configure extra parameters set for the OpenID Connect provider using both Expression Language and Microprofile Configuration properties.
Each of the following sources is evaluated in order to determine how extra parameters are set for an active OpenID Connect security context:
1. MP Configuration Property
The annotation supports the payara.security.openid.extraParams.raw MP Config property (see OpenIdAuthenticationDefinition.OPENID_MP_EXTRA_PARAMS_RAW) which accepts a text string in the format of URL-encoded parameters.
| When configured, this property takes precedence over other extra parameter sources. |
Here’s an example on the standard MP Configuration properties file:
payara.security.openid.extraParams.raw=key1=1%2C2&key2=value22. Use of extraParametersExpression attribute
When this attribute is specified in the @OpenIDAuthenticationDefinition annotation, it is evaluated as an EL expression, e.g. it expects a bean returning the configuration.
The parameters are configured depending on the resolved bean value:
-
If the resolved value corresponds to a list of strings, each string corresponds to the
paramName=valueformat. -
If the expression results in a single string, it must be in comma-separated format (
param1=value1,param2=value2"). -
Any other format will result in an error.
| Values can use further expressions to be configurable at runtime. |
Here’s an example of using this attribute in the annotation:
@OpenIdAuthenticationDefinition(
       providerURI = "https://sample-openid-server.com",
       clientId = "87068hgfg5675htfv6mrucov57bknst.apps.sample.com",
       clientSecret = "{my-secret}",
       redirectURI = "${baseURL}/callback",
       extraParametersExpression = "#{securityConfigBean.extraParametersArray}"
)
public class SecurityBean {

}
And here’s the referenced bean used in the expression:
public class SecurityConfigBean {
    public String[] getExtraParametersArray() {
        return new String[]{"key1=value1", "key2=#{value2}"};
    }
}
3. Use of extraParameters attribute
If the previous sources are not configured, then the extraParameters attribute in the @OpenIdAuthenticationDefinition is used.
This attribute corresponds to String array, which each string following the format paramName=value:
@OpenIdAuthenticationDefinition(
       providerURI = "https://sample-openid-server.com",
       clientId = "87068hgfg5675htfv6mrucov57bknst.apps.sample.com",
       clientSecret = "{my-secret}",
       redirectURI = "${baseURL}/callback",
       extraParameters = {"param1=value1", "param2=value2"}
)
public class SecurityBean {

}
Additionally, each value can reference EL expressions:
@OpenIdAuthenticationDefinition(
       providerURI = "https://sample-openid-server.com",
       clientId = "87068hgfg5675htfv6mrucov57bknst.apps.sample.com",
       clientSecret = "{my-secret}",
       redirectURI = "${baseURL}/callback",
       extraParameters = {"param1=#{securityConfigBean.value1}", "param2=#{securityConfigBean.value2}"}
)
public class SecurityBean {
}
Multi-tenancy Support (Session-scoped Configuration)
By default, the same configuration of the OpenID connector is applied for the whole application, for all authentication attempts. This is for performance reasons. The OpenID connector also supports re-evaluating the configuration for each user session, before each authentication attempt. This is useful in a multi-tenant scenario to define a different configuration for each tenant. It’s also useful if the user should be able to select which provider they want to use to authenticate.
To enable re-evaluation of the configuration for each user session, set the MicroProfile Configuration property payara.security.openid.sessionScopedConfiguration to true. To specify it directly in the application, you can place it in the microprofile-config.properties file in the META-INF directory on the classpath (in a WAR application it could be in WEB-INF/classes/META-INF).
With this enabled, it’s possible to use EL expressions to dynamically adjust the configuration before each authentication attempt, e.g. based on any information in the incoming HTTP request. The information about the HTTP request can be retrieved from a HttpServletRequest object injected using @Inject.
| It’s not possible to use a different configuration for just a subset of secured resources. Once a user is authenticated, the authentication information is saved in the HTTP session. All secured resources will be accessed using the same user, having the same roles, until the user logs out. |
Example Multi-tenant Authentication
This example should showcase the following steps:
-
Enable session-scoped OpenID Connect configuration
-
Resolve the tenant name from an HTTP request query parameter
-
Use the tenant name to read the configuration value from the respective MicroProfile Config property
-
Retrieve the value from an EL expression defined in the
@OpenIdAuthenticationDefinitionannotation
The tenant can also be resolved from a cookie, which is set the first time a user loads the application; from the domain name in the URL (if different tenants use a different domain name to access the same application); from a path prefix that follows the context root and prepends all application URLs (e.g. contextroot/tenant1/index.xhtml, contextroot/tenant2/index.xhtml).
|
-
Create a file
microprofile-config.propertiesin your application (for a WAR application it would be in theWEB-INF/classes/META-INFdirectory), with the following contents:microprofile-config.propertiespayara.security.openid.tenant1.providerURI=<TENANT1_OPENID_PROVIDER_URI> payara.security.openid.tenant2.providerURI=<TENANT2_OPENID_PROVIDER_URI> payara.security.openid.sessionScopedConfiguration=trueThis will provide configuration for
tenant1andtenant2tenants. For each additional tenant, add a new line for itsproviderURI. -
Create an
OpenidConfigBeanclass with thetokenEndpointURLmethod. This class will be a CDI bean that injectsHttpServletRequestto get information about which tenant to use. It will also injectConfigto retrieve the configuration about each tenant from themicroprofile-config.propertiesfile:OpenidConfigBeanEL.java@Named public class OpenidConfigBeanEL { @Inject HttpServletRequest request; @Inject Config config; private static final String BASE_OPENID_KEY = "payara.security.openid"; public String getTokenEndpointURL() { String tenant = getTenant(request); // a custom method to decide which tenant to use return config .getOptionalValue(BASE_OPENID_KEY + "." + tenant + ".providerURI", String.class) // e.g. payara.security.openid.tenant1.providerURI for "tenant1" tenant .orElseGet(() -> { // read config for the "tenant1" tenant by default return config.getValue(BASE_OPENID_KEY + ".tenant1.providerURI", String.class); }); } private String getTenant(HttpServletRequest request) { return request.getParameter("tenant"); // resolves the tenant name from a query parameter } } -
Finally, configure the OpenID Connector using the
OpenIdAuthenticationDefinitionannotation that references thegetTokenEndpointURL()in an EL expression:SecurityBean.java@OpenIdAuthenticationDefinition( providerURI = "#{openidConfigBean.tokenEndpointURL}", clientId = CLIENT_ID_VALUE, clientSecret = CLIENT_SECRET_VALUE, redirectURI = "${baseURL}/Callback" ) public class SecurityBean { }
Logout functionality
With the logout parameter of the OpenIdAuthenticationDefinition you can define the behavior when the user logs out of the application and defines how the RP session is managed.
| Option | MP Config property | Required | Description | Default value |
|---|---|---|---|---|
|
|
|
Notify the OIDC provider (OP) that the user has logged out of the application and might want to log out of the OP as well. If |
false |
|
payara.security.openid.logout.redirectURI |
|
The post logout redirect URI to which the RP is requesting that the End-User’s User Agent be redirected after a logout has been performed. If redirect URI is empty then redirect to OpenID connect provider authorization_endpoint for re-authentication. |
|
|
|
|
Whether the application session times out when the Access Token expires. |
|
|
|
|
Whether the application session times out when the Identity Token expires. |
|
A programmatic logout is performed by calling OpenIdContext#logout() which invalidates the RP’s active OpenId Connect session.
If fish.payara.security.annotations.LogoutDefinition#notifyProvider is set to true then it redirects the End-User’s User Agent to the end_session_endpoint to notify the OP that the user has logged out of the RP’s application. It will also ask the user whether they want to log out from the OP as well.
After a successful logout, the End-User’s User Agent redirects back to the RP’s post_redirect_uri configured via the fish.payara.security.annotations.LogoutDefinition#redirectURI property.
Proxy Definition
Using the proxyDefinition parameter of the @OpenIdAuthenticationDefinition annotation, you can specify details regarding proxy mapping within the OpenID Connect client configuration. It contains attributes to specify the hostName and port of the proxied server. This addition facilitates the configuration of proxy mapping for requests traversing through reverse web proxies.
Moreover, the proxy configuration details (hostName and port) can be dynamically utilized to define the redirectURI within the annotation configuration, replacing the baseURL placeholder if present. This allows for a more flexible setup, especially in scenarios involving reverse web proxies.
Scenarios without Proxy
-
Case 1
-
redirectURIemploys the${baseURL}placeholder, which defaults to${baseURL}/CallbackwhenredirectURIis not explicitly defined. -
Proxy definition is also absent.
-
→ Outcome: The generated
redirectURIshould include the request’s host and port.The registered Authorized Redirect URI in Google Cloud must contain a URL with the Payara Server instance’s host and port.
-
-
Case 2
-
redirectURIis explicitly defined with the Payara Instance’s host and port. -
Proxy definition is not present.
-
→ Outcome: The registered Authorized Redirect URI in Google Cloud must contain a URL with the Payara Server instance’s host and port.
-
Scenarios with Proxy
-
Case 3
-
redirectURIemploys the${baseURL}placeholder, defaulting to${baseURL}/CallbackwhenredirectURIis not explicitly defined. -
Proxy definition is included.
-
→ Outcome: The generated
redirectURIshould include the proxy’s host and port. The registered Authorized Redirect URI in Google Cloud must contain a URL with the proxy’s host and port.
-
-
Case 4
-
redirectURIis explicitly defined with the Payara Server instance’s host and port. -
Proxy definition is also present.
-
→ Outcome: The registered Authorized Redirect URI in Google Cloud must contain a URL with the Payara Server instance’s host and port.
-
-
Case 5
-
redirectURIis explicitly defined with the Proxy’s host and port. -
Proxy definition is included.
-
→ Outcome: The registered Authorized Redirect URI in Google Cloud must contain a URL with the proxy’s host and port.
-
Provider Metadata
If the OpenId server doesn’t provide autoconfiguration, or it is necessary to customize it, it is possible to set these values in the providerMetadata attribute of the @OpenIdAuthenticationDefinition annotation.
It’s also possible to specify all values by using MicroProfile Config properties. None of the attributes are required in the annotation, but some options are required and must be specified either in the annotation or a MicroProfile property or must be provided by the OIDC provider.
The order of evaluation is: MicroProfile Config → @OpenIdProviderMetadata → automatic configuration on providerURI address.
|
When these values, which correspond to lists (e.g. scopesSupported, responseTypesSupported), are loaded from MicroProfile Config, they are separated by a comma, following MicroProfile Config Array conventions.
| Option | MP Config property | Required | Description |
|---|---|---|---|
|
|
|
The base address of OpenId Connect Provider (OIDC Provider). |
|
|
|
The URL for the OAuth2 provider to provide authentication. |
|
|
|
The URL for the OAuth2 provider to give the authorization token. |
|
|
|
An OAuth 2.0 Protected Resource that returns Claims about the authenticated End-User. |
|
|
|
OIDC Provider’s endpoint to notify that the End-User has logged out of the site and might want to log out of the OIDC Provider as well. |
|
|
|
An OIDC Provider’s JSON Web Key Set document. |
|
|
recommended |
List of the OAuth 2.0 scope values that this server supports, e.g. |
|
|
|
List of the OAuth 2.0 response_type values that this OIDC Provider supports, e.g. |
|
|
|
List of the Subject Identifier types that this OIDC Provider supports. Valid types include |
|
|
|
List of the JWS signing algorithms (algorithm values) supported by the OIDC Provider for the ID Token to encode the Claims in a JWT, e.g. |
|
|
|
List of the JWE encryption algorithms ( |
|
|
|
List of the JWE encryption algorithms ( |
|
|
recommended |
List of the Claim Names of the Claims that the OIDC Provider MAY be able to supply values for. Note that for privacy or other reasons, this might not be an exhaustive list. |
Client Secret Aliasing
The client secret can be input directly, or for added security it can be aliased using any of the following features:
Fetch Caller Data
As the OpenId Connect Client is built on top of Jakarta EE Security API, therefore javax.security.enterprise.SecurityContext interface can provide caller info which is available as a CDI bean and can be injected into any context-aware instance.
The Payara Platform Public API also provides a fish.payara.security.openid.api.OpenIdContext interface which is also available as a CDI bean and consist of the following methods:
-
The
getCallerName()method - Gets the caller name of the currently authenticated user. -
The
getCallerGroups()method - Gets the groups associated with the caller. -
The
getSubject()method - Subject Identifier. A locally unique and never reassigned identifier within the Issuer for the End-User, which is intended to be consumed by the Client. -
The
getTokenType()method - Gets the token type value. The value MUST beBeareror another token type value that the client has negotiated with the authorization server. -
The
getAccessToken()method - Gets the authorization token that was received from the OpenId Connect provider. -
The
getIdentityToken()method - Gets the identity token that was received from the OpenId Connect provider. -
The
getRefreshToken()method - Returns the refresh token that is used by OIDC client to get a new access token. -
The
getExpiresIn()method - Return the time that the access token is granted for, if it is set to expire. -
The
getClaimsJson()method - Gets the User Claims JSON that was received from theuserinfoendpoint. -
The
getClaims()method - Gets the User Claims that were received from theuserinfoendpoint. -
The
getProviderMetadata()method - The OpenId Connect Provider’s metadata document fetched via provider URI.
User Information from the ID Token
The userClaimsFromIDToken attribute that belongs to the @OpenIdAuthenticationDefinition will instruct the container to retrieve the user information details from the ID Token instead of calling the userinfo endpoint, as defined by the OpenID Connect standard workflow.
As such, this behaviour is non-standard and should be used on special cases.
To properly connect an application with Microsoft ADFS this property is required because by default Microsoft ADFS doesn’t allow calls to the userinfo endpoint.
|
| Option | MP Config Property Name | Required | Description | Default value |
|---|---|---|---|---|
|
|
|
Instructs the container to retrieve user information from the ID Token |
|
Disable Scope Validation
By default, the OpenID Connect connector validates that a scope is reported as a supported scope by the provider. However, some providers support more scopes than they actually report as supported scopes. In order to disable the validation and allow using such scopes, it’s possible to use the disableScopeValidation property of OpenIdProviderMetadata.
See the Configuration section for more details about this option.
Example
@OpenIdAuthenticationDefinition(
       providerURI = "https://sample-openid-server.com",
       clientId = "87068hgfg5675htfv6mrucov57bknst.apps.sample.com",
       clientSecret = "{my-secret}",
       redirectURI = "${baseURL}/callback",
       providerMetadata = @OpenIdProviderMetadata(disableScopeValidation = true))
public class SecurityBean {

}
Bearer Authentication and Authorization
In order to authenticate and authorize calls between services using the OpenID mechanism, it is possible to use authorization compatible with RFC 6750. In this case, the access token presented to the resource service is an JWT token that is used to verify that the caller has access to OAuth2 protected resources.
Obtaining JWT Token
Obtaining the token is specific to the OAuth provider and the application. The usual approach is using Client Credentials Grant, where an application posts its clientId and secret to identity provider and receives access and refresh tokens in return.
Passing Token To The Resource Service
The obtained access token is passed with every request to the resource service by adding it into the Authorization HTTP header:
Authorization: Bearer access__token
Processing Bearer Authorization
When the Bearer authorization header is present in the request, the provided token is verified. It’s validated that it comes from the expected issuer and hasn’t expired.
Compared to the normal browser flow, no groups are automatically assigned to the identity. The reason for this is that machine-to-machine communication tends to be much more fine-grained and services might want to check more claims, such as audience.
|
The resource service is required to map the information in the JWT token to groups utilizing the IdentityStore interface.
The OpenID connector provides the following classes to make this process possible:
AccessTokenCallerPrincipal-
Caller principal subclass that contains access to all claims of passed JWT token
BearerGroupIdentityStore-
A convenience base implementation of the necessary Jakarta EE security identity store.
@ApplicationScoped
@DeclareRoles({"user", "calendar-reader"})
public class Auth0BearerIdentityStore extends BearerGroupsIdentityStore {

    @Override
    protected Set<String> getCallerGroups(AccessTokenCallerPrincipal callerPrincipal) {
        if (callerPrincipal.hasAudience("https://example.org/api/user")) {
            // if the token is for USER api, set this group
            return Set.of("user");
        }
        if (callerPrincipal.hasAudience("https://example.org/api/delegate")
                // delegate API is further constrained by scope
                && callerPrincipal.getAccessToken().getScope().contains("read:calendar")) {
            return Set.of("calendar-reader");
        }
        return Set.of();
    }
}| The Payara Platform also provides similar functionality by way of the MicroProfile JWT Authentication specification, which is limited only to securing JAX-RS resources. On the other hand, the OpenID Connect Bearer Authentication and Authorization feature is better aligned with the OpenID Connect support in Payara Platform and can also be used to secure other web resources like Jakarta Servlets, for example. |
Integration with Specific Providers
Google Integration
The Payara Public API provides built-in support for Google OpenID Provider via the @GoogleAuthenticationDefinition annotation.
Request Refresh Token
To enable the refresh token feature, set the tokenAutoRefresh to true and add the access_type parameter value to offline so that application can refresh access tokens when the user is not present at the browser.
If application requests offline access then the application can receive access and refresh token. Once the application has a refresh token, it can obtain a new access token at any time or as older ones expire. Otherwise, If application requests online access, your application will only receive an access token
@GoogleAuthenticationDefinition(
    providerURI="#{openidConfigBean.tokenEndpointURL}",
    clientId="#{openidConfigBean.clientId}",
    clientSecret="#{openidConfigBean.clientSecret}",
    tokenAutoRefresh = true,
    extraParameters = {"access_type=offline", "approval_prompt=force"}
)
public class SecurityBean {
}
Azure AD Integration
The Payara Public API also provides built-in support for Azure AD OpenID Provider via the @AzureAuthenticationDefinition annotation.
Request Refresh Token
To receive the refresh token, set the tokenAutoRefresh to true and explicitly add the offline_access scope to the definition.
@AzureAuthenticationDefinition(
    providerURI="#{openidConfigBean.tokenEndpointURL}",
    clientId="#{openidConfigBean.clientId}",
    clientSecret="#{openidConfigBean.clientSecret}",
    tokenAutoRefresh = true,
    scope = {OPENID_SCOPE, EMAIL_SCOPE, PROFILE_SCOPE, OFFLINE_ACCESS_SCOPE}
)
public class SecurityBean {
}
Groups Mapping
-
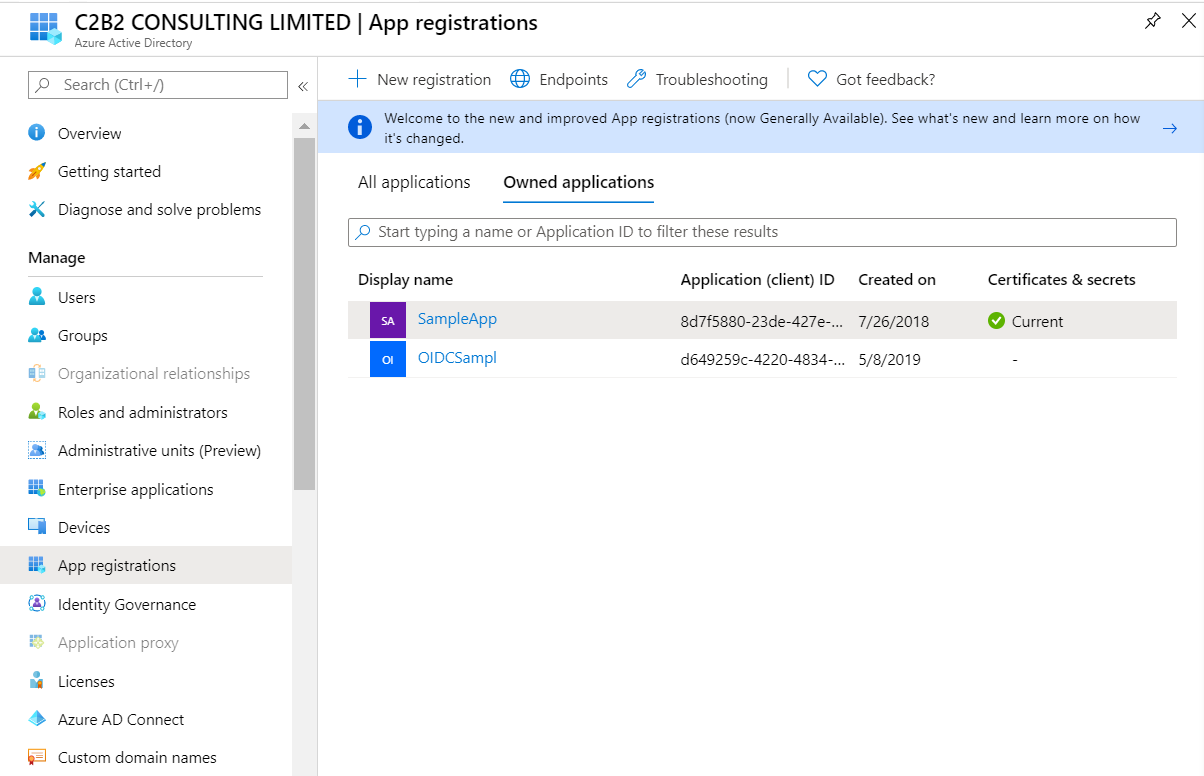
To add the groups to the registered application, Sign in to the Azure portal > Azure Active Directory > Manage > App registrations > select your application:
-
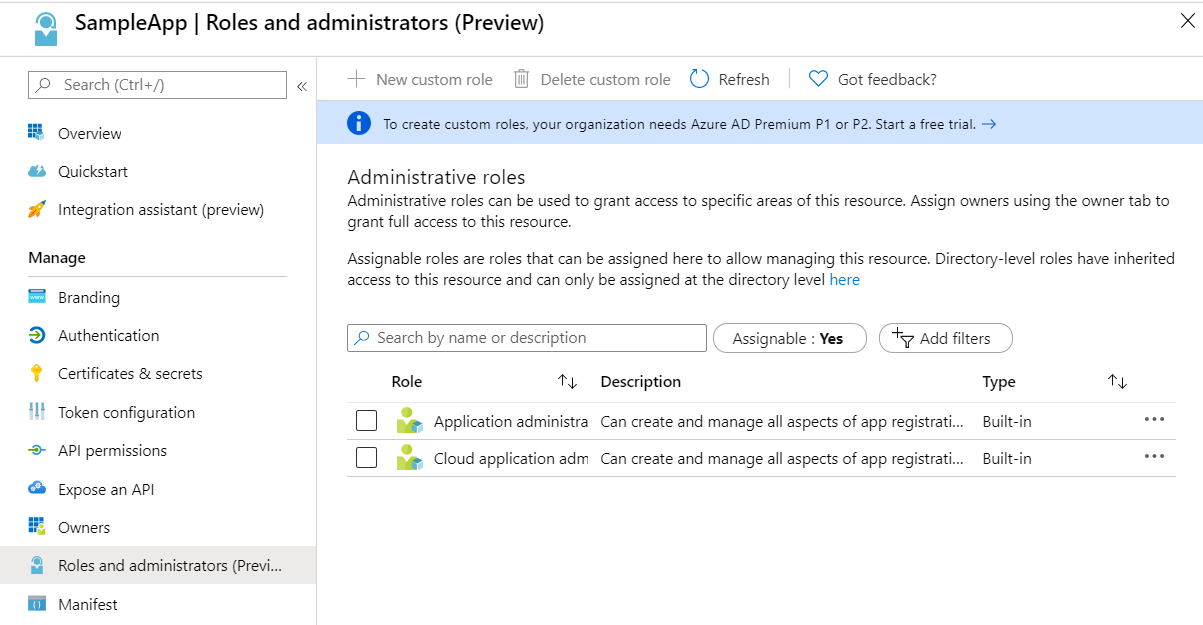
You may also add the custom roles via Roles and administrators under the Manage section:
-
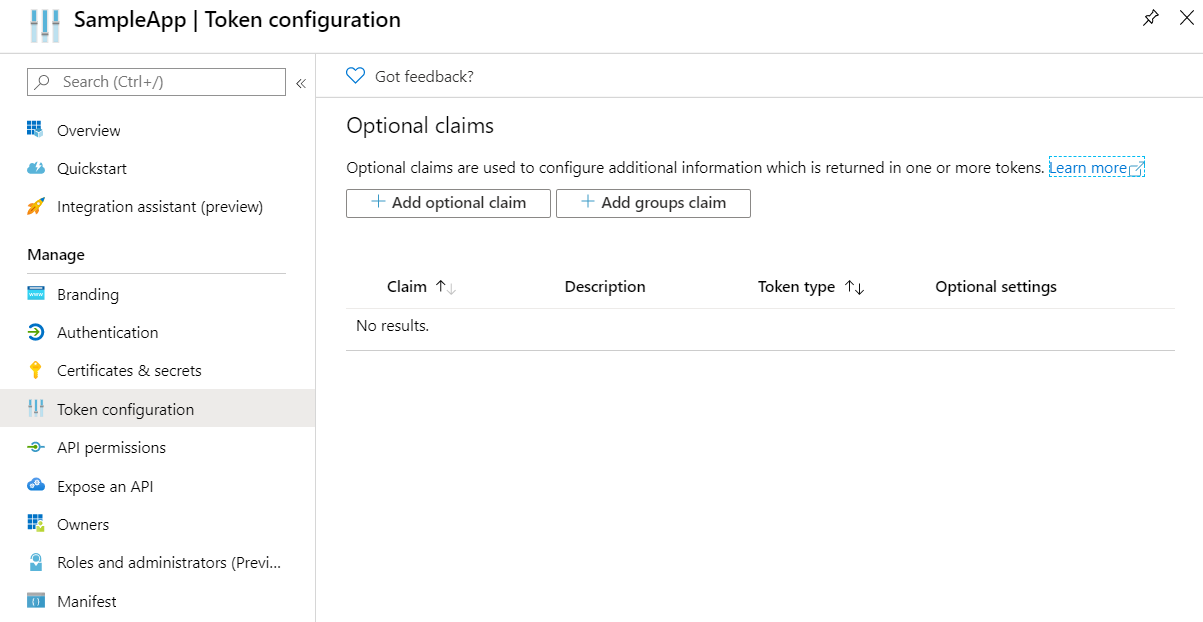
Now to map group claims, select Token configuration under the Manage section:
-
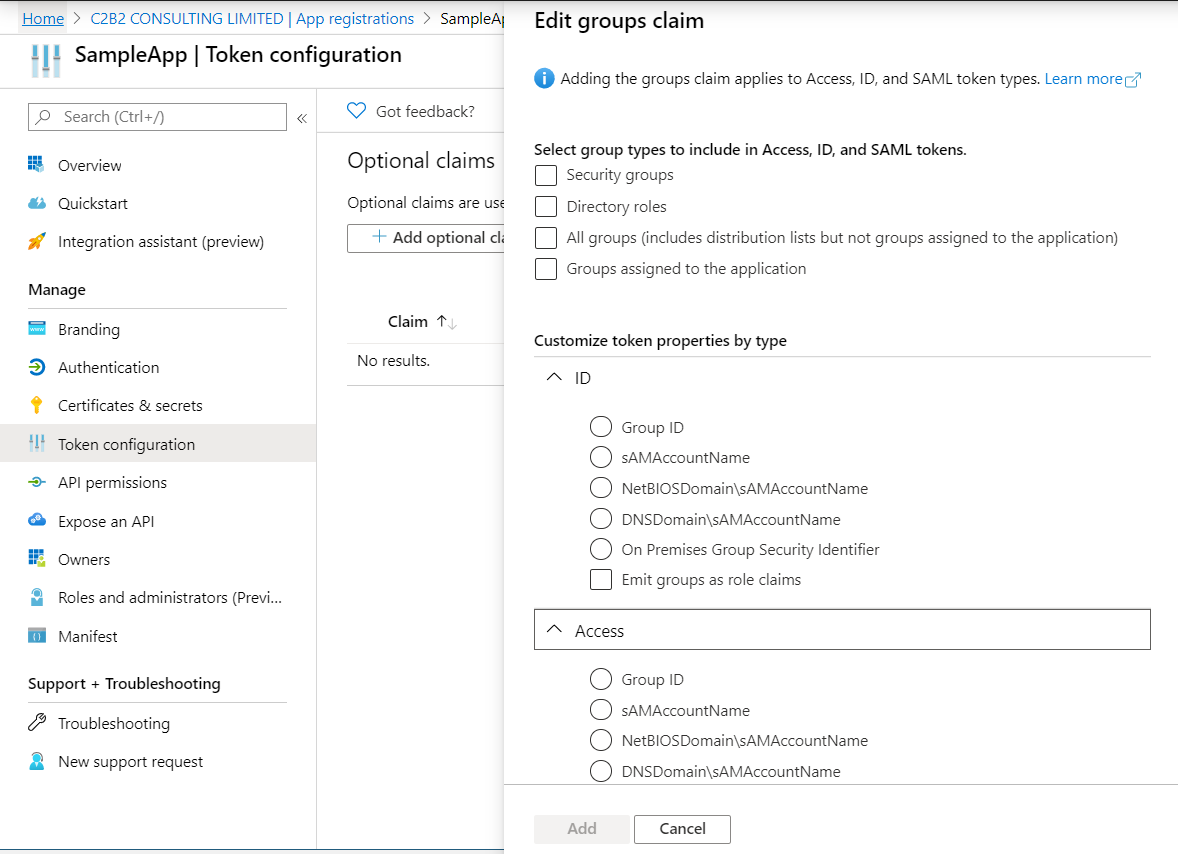
Press Add groups claim button to select group types and customize Id and/or Access token properties:
-
Groups claim can also be defined via Azure Manifest under the Manage section which is a JSON configuration file.
-
To retrieve and map the caller name & groups from token claims, set the caller name & group claim definition to
preferred_username&groups.@AzureAuthenticationDefinition( providerURI="#{openidConfigBean.tokenEndpointURL}", clientId="#{openidConfigBean.clientId}", clientSecret="#{openidConfigBean.clientSecret}", claimsDefinition = @ClaimsDefinition( callerGroupsClaim = "groups", callerNameClaim = "preferred_username" ) ) public class SecurityBean { }
Microsoft ADFS Integration
To enable integration for Microsoft ADFS it is needed to use the userClaimsFromIDToken annotation attribute.
See User Information from the ID Token for more information.
Azure AD Scope Validation
To disable the scope validation for Azure AD integration it is needed to use the disableScopeValidation annotation attribute.
See Disable Scope Validation for more information.
Keycloak Integration
Keycloak is an Open Source Identity and Access Management Server, which is a OAuth2 and OpenID Connect(OIDC) protocol complaint.
In this section,the basic steps are described to set up a Keycloak OpenId provider:
-
Refer to Keycloak getting started documentation to run and setup keycloak.
-
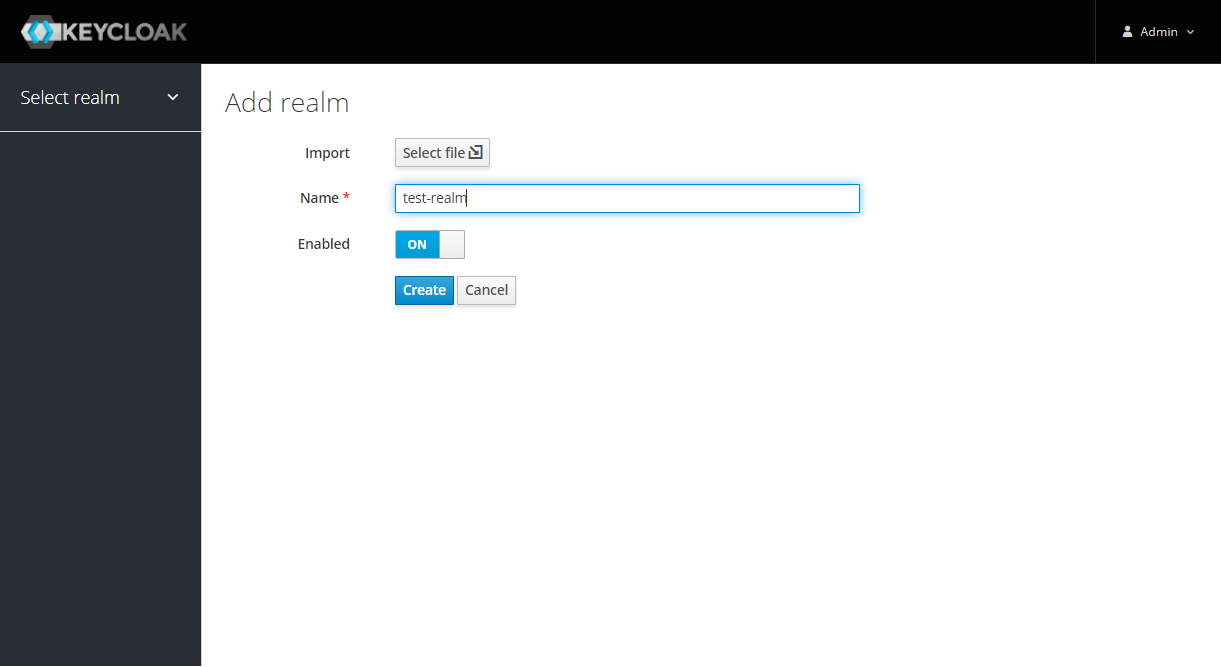
After Keycloak setup done, login to Keycloak admin console and add the new realm by pressing the Add Realm button:
-
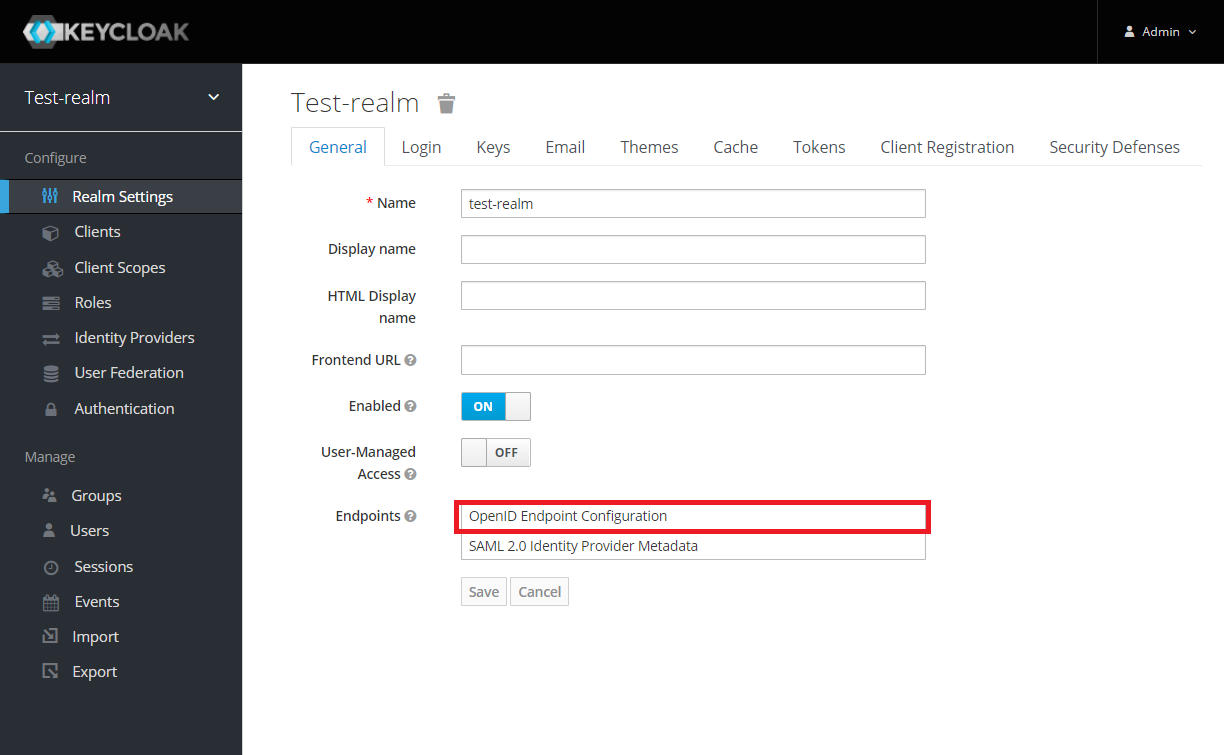
Copy the OpenId endpoint configuration URL from endpoint section:
-
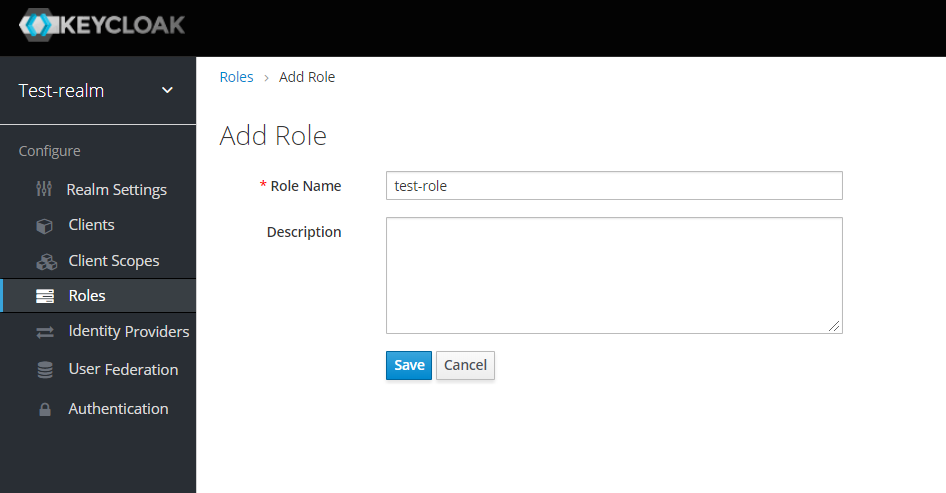
Now add the Role that will be used by the application to define which users will be authorized to access the application.
-
Create the Groups:

-
Add the User:

-
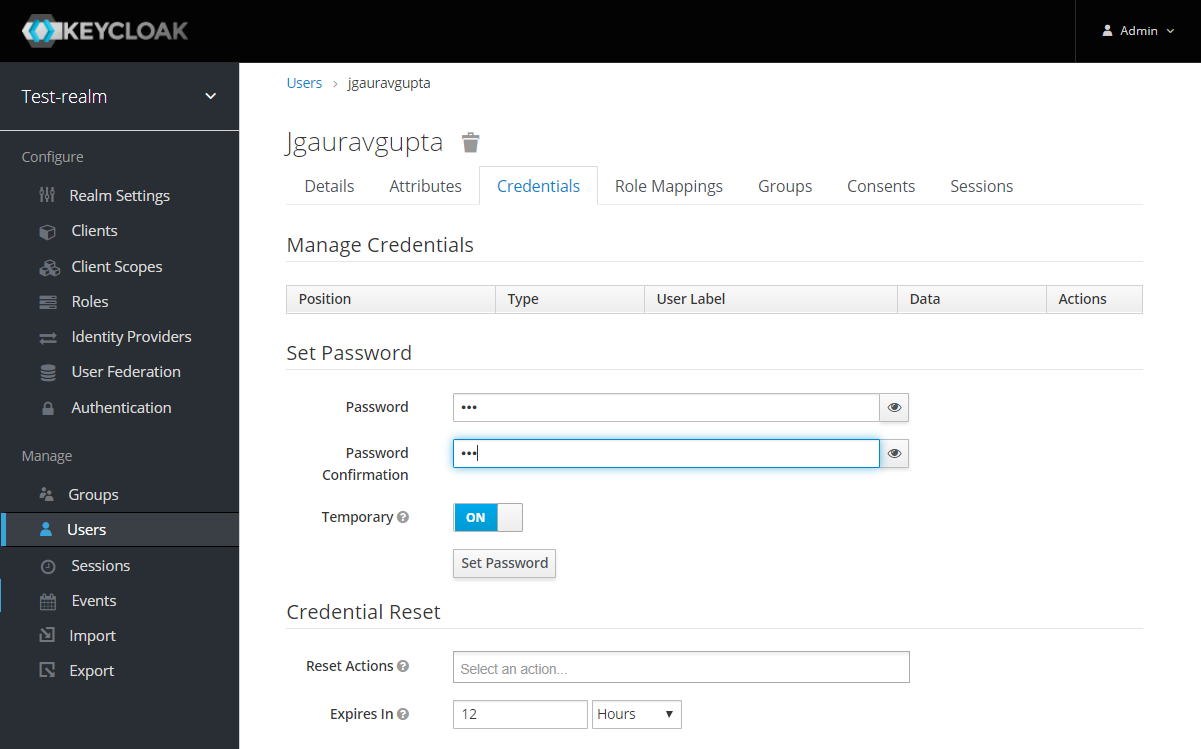
After the user is created, set a new password for the user:
-
Now map the user to roles. Click on Role Mappings tab and assign the roles to the user from the available roles:

-
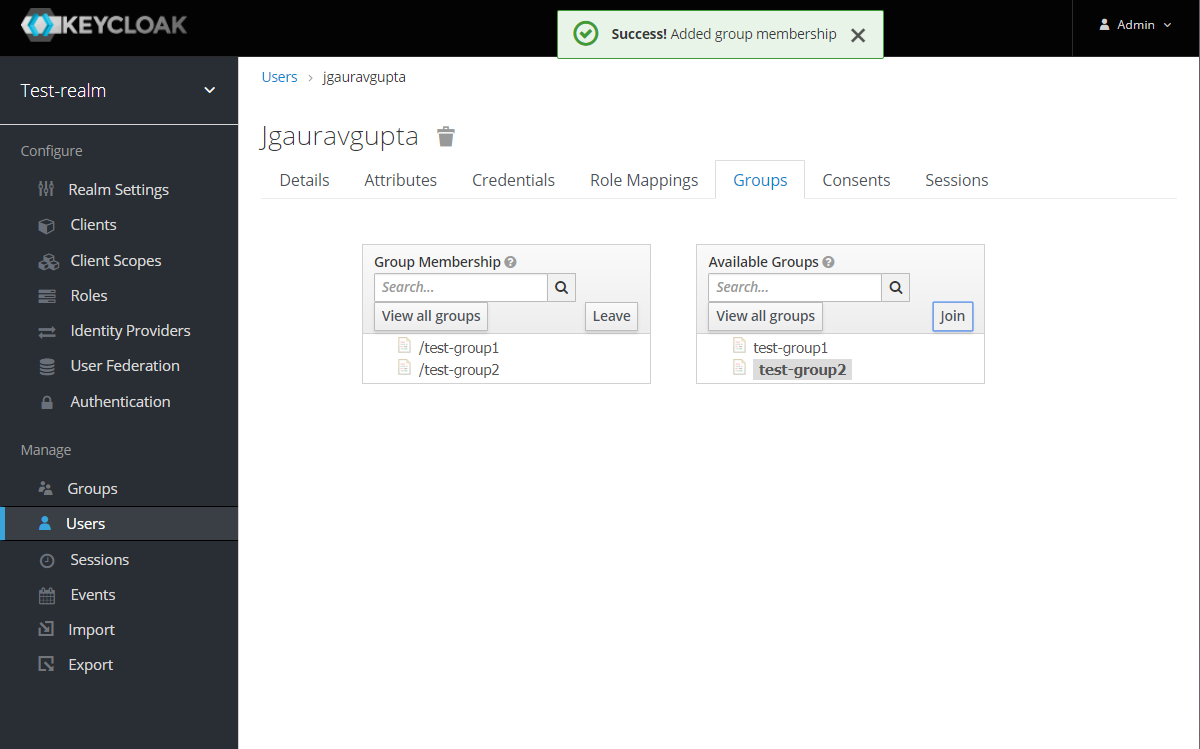
Assign the user to the groups. Click on Groups tab and join the groups from the available groups:
-
Create the OpenId Client by clicking the Client option from sidebar and press the create button:
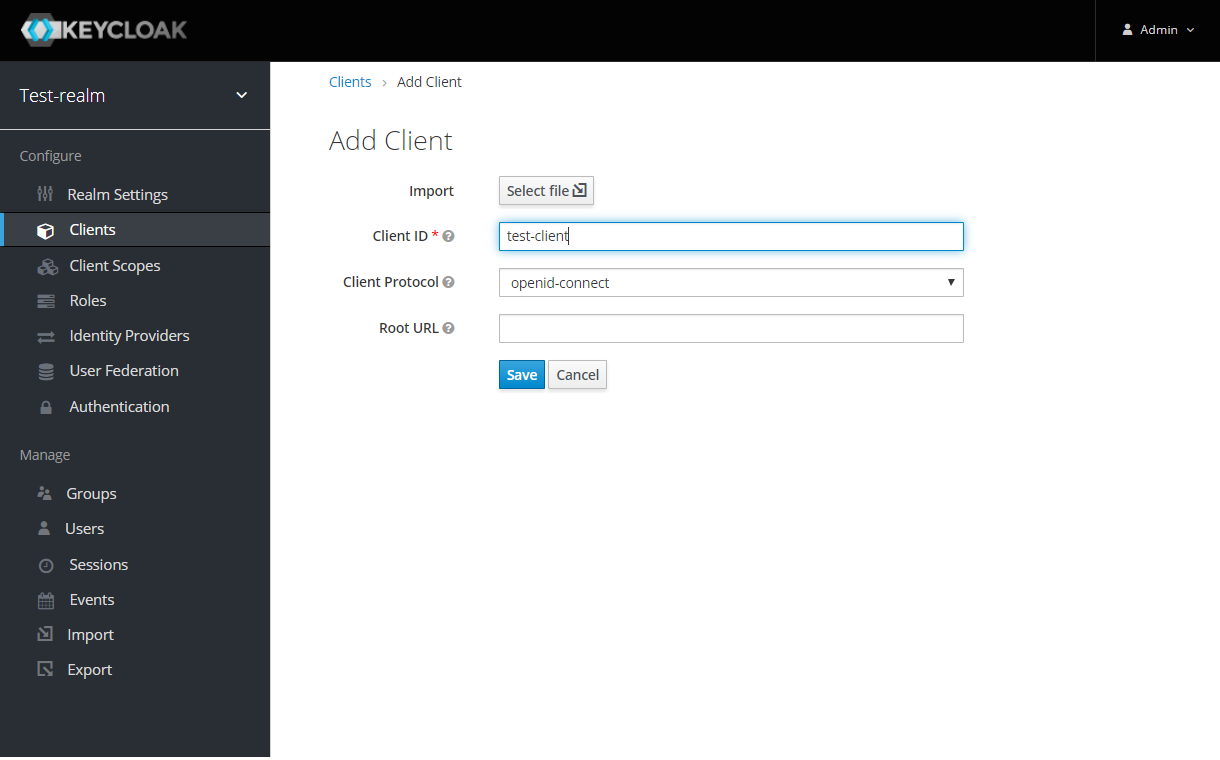
Enter the Client ID and select the Client Protocol openid-connect and press Save.
-
After the OpenId client is created change its Access Type to confidential and enter the valid Redirect URIs:
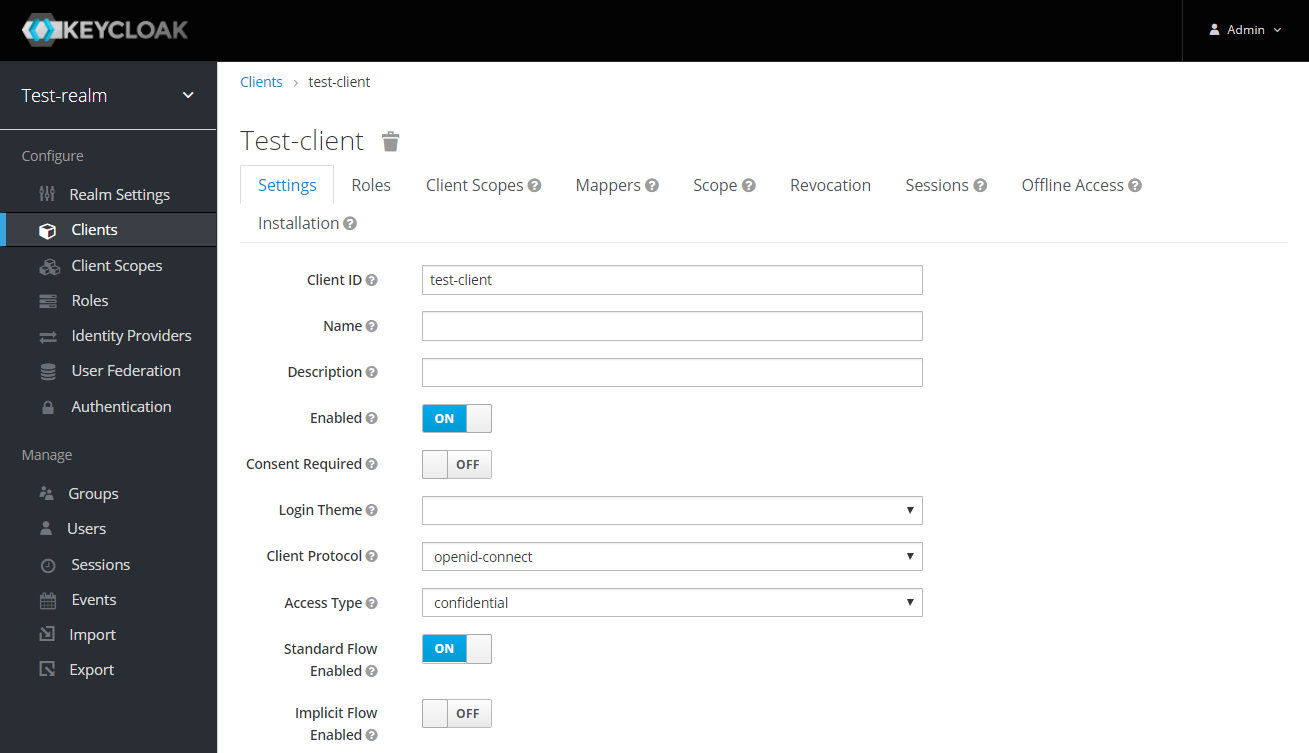
-
Next copy the client secret from Credentials tab.
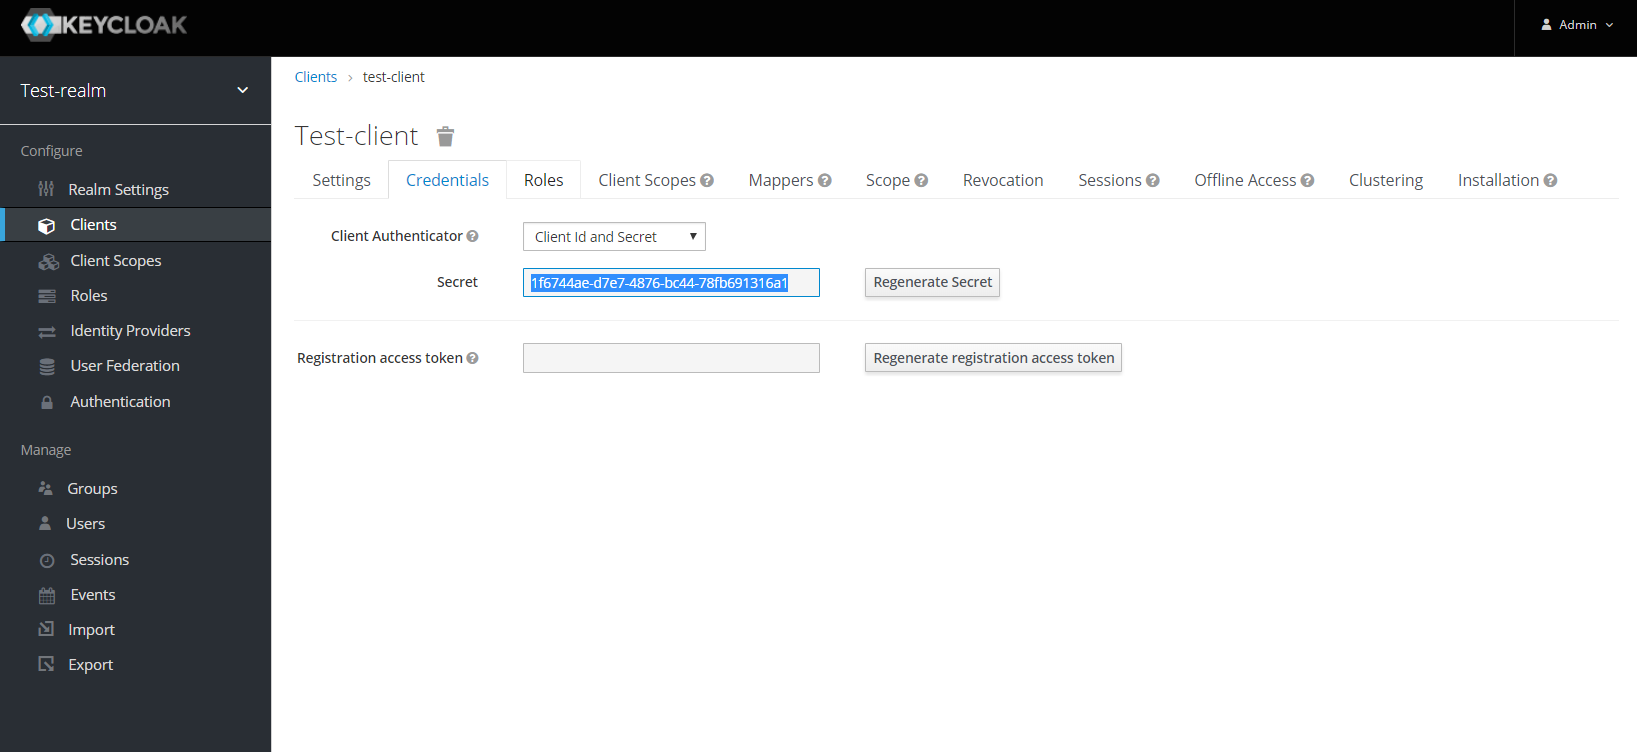
Here’s an example that configures a OpenID Connect client for Keycloak provider. To test the KeyCloak OpenId provider, enter the copied client secret, client ID (client name) and the endpoint configuration URL:
@OpenIdAuthenticationDefinition(
    providerURI = "http://${keycloak-host}:${keycloak-port}/auth/realms/test-realm",
    clientId = "test-client",
    clientSecret = "1f6744ae-d7e7-4876-bc44-78fb691316a1"
)
public class SecurityBean {
}
Groups Mapping
-
To get the groups details in token claims, navigate to KeyCloak admin console → OpenId Client → Mappers tab → press Create button → Select Group Membership mapper type → enter the Name and Token Claim Name → press Save.
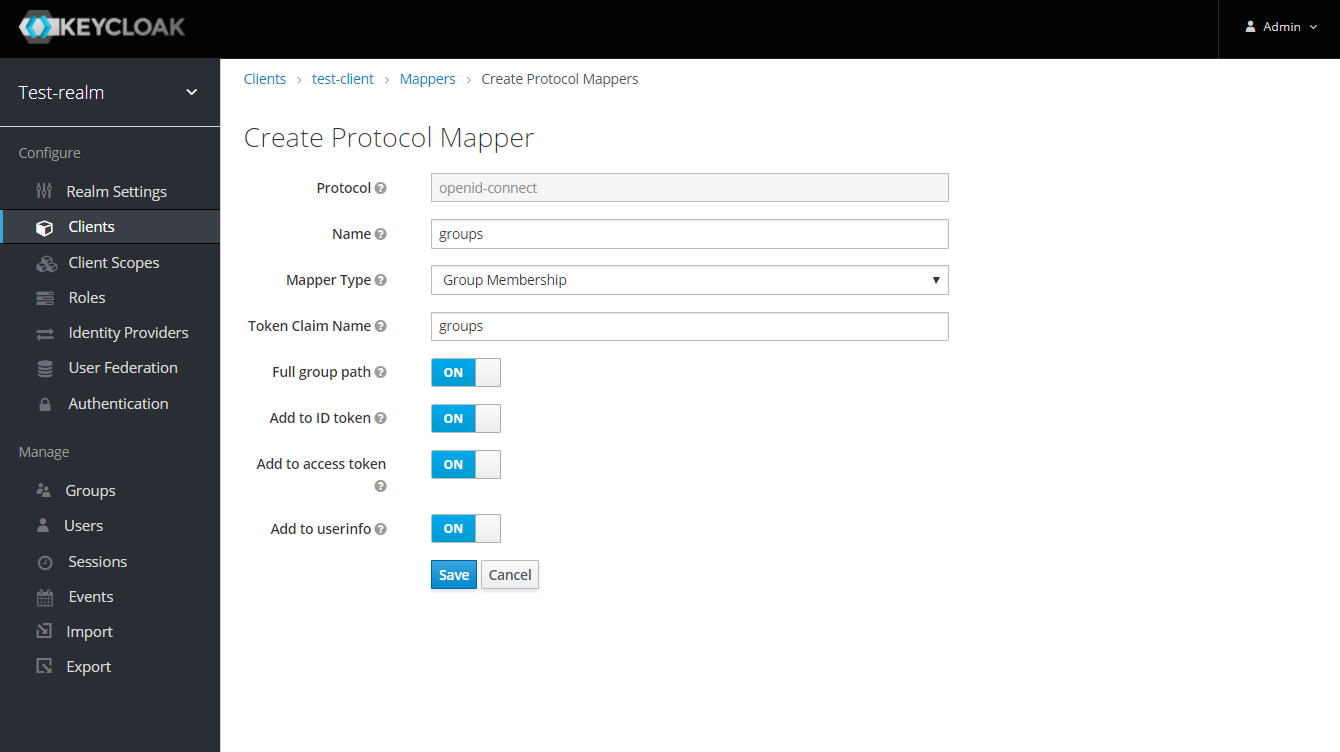
-
To retrieve and map the caller name & groups from token claims, set the caller name & group claim definition to
preferred_username&groups.@OpenIdAuthenticationDefinition( providerURI = "http://${keycloak-host}:${keycloak-port}/auth/realms/test-realm", clientId = "test-client", clientSecret = "1f6744ae-d7e7-4876-bc44-78fb691316a1", claimsDefinition = @ClaimsDefinition( callerGroupsClaim = "groups", callerNameClaim = "preferred_username" ) ) public class SecurityBean { }
-
Standalone OpenID Connect connector
When using this standalone connector, import classes with the fish.payara.security.connectors package instead of the fish.payara.security.
Download the standalone OpenID Connect connector
You can access the latest version in the Payara Platform Artifacts Maven Repository.
You can also add the Payara Artifacts repository into your pom.xml and define the dependency as follows:
<project>
    <repositories>
        <repository>
            <id>payara-nexus-artifacts</id>
            <url>https://nexus.payara.fish/repository/payara-artifacts</url>
            <releases>
                <enabled>true</enabled>
            </releases>
            <snapshots>
                <enabled>false</enabled>
            </snapshots>
        </repository>
    </repositories>
    <dependencies>
        <dependency>
            <groupId>fish.payara.security.connectors</groupId>
            <artifactId>openid-standalone</artifactId>
            <version>VERSION</version>
        </dependency>
    </dependencies>
</project>